 Abstract

The basis of this project is to provide a solution to any resource monitoring applications that involve sharing a limited resource for increased productivity or throughput optimizing. The solution involves use of a single board computer to monitor remote sensor nodes, manage a queue for any assets waiting to use the resource, and notifying the assets. This specific example is monitoring and managing a queue for use of company bathrooms and notifying employees when they become available. Employees can subscribe to the bathroom status using SMS text messaging and become alerted when it’s available and their next in the queue. The code, schematics, and documentation in this practical (and entertaining) example will allow for better time management of resources in a variety of serious applications (human resources, assembly lines, industry, etc.). Home
The Project
Contention can arise in any setting involving multiple people sharing a limited resource. As our company has grown, one resource that has increasingly become congested is the restrooms. With two restrooms for people numbering in the double digits, it was becoming increasingly common to find both facilities occupied. None of the existing options seemed befitting to a high tech company. Camping outside a restroom waiting for it to become available makes sure you get to use it as soon as it is available, but what if you pick the restroom which is going to be in use for the next half an hour while the other restroom was free right after you left? Walking back and forth in a polling fashion eliminates this problem, but may be less comfortable, and now you risk somebody else enter the restroom if it becomes free shortly after you are on your way to the next. In either case, one’s time would be unproductively wasted walking across the building just to discover they had to wait.
This paper documents a high-tech solution to the problem with the use of a Technologic Systems’ TS-7680 and node.js. The solution was created using node.js for fast development time. Users can send e-mails or SMS messages to the server to check the restroom state, request a reservation to use the facilities, or cancel a reservation. The server will send replies back in the same medium as the request came in, notifying the user of the current state and when their reservation is ready. Each restroom has a TS-7680 connected to the LAN via WiFi which the server polls to determine its state.
The server has four main tasks it must perform: maintain and log the restroom states, respond to commands, maintain the queue, and send notifications.
State
Maintaining the restroom states is done via two simple, inexpensive sensors. A magnetic sensor is attached to the door of the restroom and detects whether the door is open or shut. A photoresistor is used to detect whether or not the light is on. Of note, the restrooms in this model are of the single-user locking variety. For multi-user restrooms the solution presented herein would not work, and would be less likely to be needed in the first place. Not to worry! You can adapt the solution to any resource in your office which has contention and could benefit from a notification and reservation system!
We start with the simplistic model that restroom is considered occupied if door is shut and light is on. By DeMorgan’s theorem, another way to state this is that restroom is considered not occupied if door is open or light is off.
| Door | light | State | Reasoning |
| Closed | Off | Unoccupied | Some people like to close the door when they are done. |
| Closed | On | Occupied | This is normally how the restroom is used. |
| Open | Off | Unoccupied | This is normally how the restroom should be when not in use. |
| Open | On | Unoccupied | If the vent fan and light are on the same switch, leaving the fan running requires leaving the light on. |
However, there is a potential issue with this model. Sometimes when somebody leaves the restroom, they may leave the light on and shut the door! This makes it difficult to non-invasively determine if the restroom is in use. In our office, there is insufficient contrast between the light being on and off to easily tell by looking at the small gap below the door, and bending over to look can be awkward. Some people are shy about trying the handle because occasionally the person in the restroom will forget to lock the door. Others are shy or oblivious and don’t respond to calls or knocks from outside, perhaps mistaking them from normal hall noise not directed at them. Home
We don’t want to have to resort to more complicated sensors, so we are going to come up with some additional logic to try to detect this condition. The basic idea is that when someone leaves the restroom and closes the door leaving the light on, there is a short window during which the door is open and the light is on. So we will look for a transition from closed/on to open/on and back to closed/on within a limited amount of time. We can’t distinguish this case from the case where somebody opens the door, walks out, and somebody else immediately walks in, so we will call this state “unknown”. With the implementation of a reservation system we hope to cut down on the need to linger near the door waiting to pounce the moment somebody walks out, so a restroom in the “unknown” state can be flagged as such so that somebody such as the next person in line can go find out whether or not the restroom is really available. This model will also reduce the discomfort some may experience at having to try the door or call out loud asking if it is in use by laying out a clear signaling system in which this is acceptable due to the likelihood that the facility is empty being high.
In addition, we will add a state called “exiting”. This state will be entered as soon as the door opens but the light is still on. This will allow for the possibility of sending a notification that the restroom may be available shortly to give the person waiting a better chance against somebody outside the system who just happens by at nearly the right time.
Finally, we will add a state called “reserved”. We will enter this state when the restroom is unoccupied, but the scheduling system has notified a waiting user that they can now go.
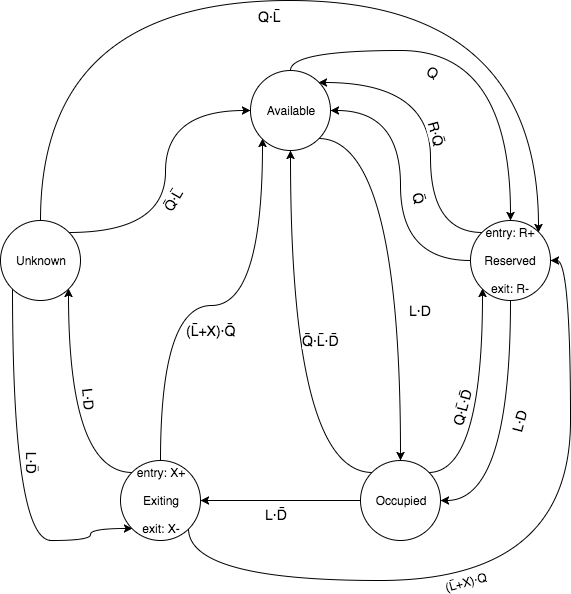
Given this, a high-level over of our state machine looks like this:
At power-up, the state machine is initialized per the above table based on the current door and light inputs.
In the available state, we wait for somebody to either request the restroom, in which case we enter the reserved state, or for somebody to occupy the restroom, in which case we enter the occupied state.
Whenever we enter the reserved state we send a notification to the person at the head of the queue that the facility is now reserved for their use. We also send this notification if we remain in the reserved state and the head of the queue has changed, to the new person at the head of the queue.
When we enter the reserved state we set a timer to prevent anybody from tying up resources by requesting use of the restroom and then never using it. If that timer expires before the restroom is occupied, then we cancel their reservation and give it to the next person in the queue, or if the queue is empty, we go back to the available state. The user can also cancel their request with the same effect. But when we detect that the restroom has become occupied we then enter the occupied state and cancel the reservation timer.
Once in the occupied state, there are three things that can happen to cause the state to change. If we detect the door has opened and the light is off, then we go to the reserved state, unless the queue is empty in which case we go to the available state. However, if the door opens but the light goes on, then we start the exit timer and go to the exit state.
Once in the exiting state we wait for the light to go off or the exit timer to expire. If either of these happen then we transition to the reserved state unless the queue is empty, in which case we go to the available state. However, if instead the door closes and the light is still on, we enter the Unknown state, because we don’t know for sure if the leaving user shut the door or if another person walked in. Home
In the unknown state, we can either transition back to the exiting state (starting the timer again) if the door opens with the light on, or if the light goes off we go either to the reserved state (if anybody is waiting) or the available state (if nobody is waiting).
For determining the optimal timeouts for the reservation and exit timers, the server can log all state changes with a timestamp for manual examination.
A graphical representation of the state machine is shown below. In this diagram:
Q is true if the queue is non-empty, i.e. somebody is waiting for this restroom
L is true if the light is on
D is true if the door is closed
R is momentarily high when the reservation timer expires (R+ arms, R- cancels)
X is momentarily high when the exit timer expires (X+ arms, X- cancels)
Architecture
The server is designed to separate the concerns of getting inputs, maintaining room state, and responding to commands.
Room
This object encapsulates the state of the room. It has a control loop that polls the inputs for the room (door state, light state, and reservation queue empty state), updates the state according to the state machine as documented below, and notifies all state listeners of state changes. There are also exit and reservation timers which are started leaving the Occupied and Reserved states, respectively, which can affect state if they expired under certain conditions.
The control loop pseudo-code looks like this:
Record current time as t0
Samples all inputs
Update state machine
If state changed, notify all listeners of change
Record current time as t1
Sleep for a bit, using t1-t0 to determine how long
Our room object is instantiated with two parameters: the name of the room, and a function that is called to get the inputs for that room:
var room = new Room("engr",get_engr_inputs)
After instantiation, default timing parameters can be modified if necessary:
room.poll_delay_ms = 1000 // default
room.exit_timeout = 15000 // default
room.reservation_timeout = 180000 // default
The poll_delay_ms variable holds how often (in milliseconds) the room object should call the function to get the inputs for the room. If this value is too high then it is more likely to miss input changes and fail to transition between states properly. If it is too low then there may be excessive resource usage.
The exit_timeout variable holds the number of milliseconds to wait after the door is opened and the lights remain on before assuming nobody is in the room. A good value to use can be determined empirically by observation. If this value is too low it increases the chance of mistakenly thinking the room is in use if the door subsequently shut by the person exiting. If it is too high, it decreases the responsiveness of notifications and increases the likelihood of somebody else entering the room and causing the unknown state to be entered.
The reservation_timeout variable holds the number of milliseconds to wait for a user to claim their reservation before cancelling it and giving the next person in line a chance. If we set this too low, users are going to have to rush or may not be able to make it to the room in time. If we set it too high, other users will be forced to wait longer if the current user does not respond promptly to their notification Home
Listeners can be added to the room by adding a function to process change notifications. This function takes three parameters: the name of the room, the new state, and the old state. The Room.State object can be used to convert the state into a readable string as shown in the following example. This adds a listener which will print state changes to the console:
function listener1(name,new_state,old_state) {
      console.log(new Date()+name
                  +":STATE CHANGE:"
                  +Room.State[old_state]
                  +"->"
                  +Room.State[new_state])
}
room.listeners.push(listener1)
Once the room is configured, call the start function to begin running the control loop:
room.start()
Input7680
The Room object requires an input function to get the current state of all the inputs in order to run the control loop. This function must take a callback function which must return the input values in an object containing the following keys:
- door: current state of the door, either “OPEN” or “CLOSED”
- light: current state of the light, either “ON” or “OFF”
This Input interface encapsulates the door and light state inputs for a room. It provides a function to get the current state of these inputs and notifies all state listeners when any input(s) change.
The Input7680 object implements the Input function above using HTTP requests to the ADC API of the ts7680-demo-server app. It also allows the input to be configured according to the lightning conditions in the room. It is instantiated by passing the name of the input, the hostname of the TS-7680 running the ts7680-demo-server, and a light threshold. In our installation we have two restrooms, “engineering” and “production”, and the instantiations for these look like this:
var engr_input = new Input7680("engr","engr.local.net",25000)
var prod_input = new Input7680("prod","prod.ts-local.net",4000)
The light threshold can be determined empirically by running the web interface on the server and monitoring the value of the ADC input for the photo-diode. While it is running, adjust the light conditions between light off and door open, light off and door closed, and light on from various locations in the room. With our circuit design, a more light equates to a high ADC value, so choose a threshold value that has all light-off conditions less than the threshold value, and all light-on conditions above it. If necessary, adjust the position of the photo-diode. Light from outside the room should not be sufficient to trigger a false “light on” condition when the light is off.
In the above example, the engineering restroom has a higher threshold value. This is due to the fact that the only suitable location for the photo-diode is prone to shadowing due to the position of the lighting and pattern of human movement in the room.
InputTest
For testing purposes, or trying out the code without having to set the hardware up, the InputTest adheres to the Input interface. However, instead of interacting with the real world, it provides functions that can be called to simulate input changes:
ob = new InputTest("room1")
ob.enter() // this sets the room in use, so another user can't enter
ob.exit() // this marks the room as not in use, so another user can enter
ob.open_door() // this marks the door as open. It will fail if the room is in use, and returns a boolean indicating whether or not it succeeded
ob.close_door() // this marks the door as closed
ob.turn_on_light() // this marks the light as on
ob.turn_off_light() // this marks the light as off. It will fail if the room is in use, and returns a boolean indicating whether or not it succeeded
Room State Machine
The state machine was developed by examining all combinations of input changes for each state as shown below:
States and Transitions:
The states in the state machine are shown below. The first three states are straightforward to derive the logic for, but the final two states are more complex. The waveforms below show the possible transitions and how they are handled. The character representing the state is shown at the top, the inputs are shown at the left side, and “ET” stands for “exit timer expires”.
Available (A)
Reserved (R)
Occupied (O)
Exiting (E)
Door opens, then closes before exit timer expires
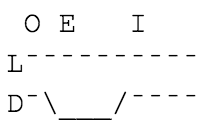
Door opens, then light goes off before exit timer expires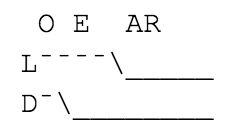
Door opens, and timer expires without further change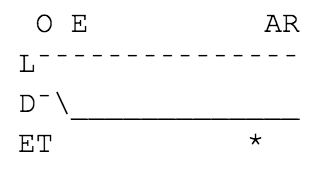
Door opens, then lights is off at the same time door is closed
Unknown (I)
Light goes off. This could be because someone is in the room to turn off the light, the lights failed, or the light sensor failed.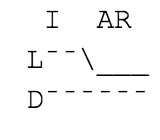
Door opens. Someone could be entering or leaving. If they are entering, the door will likely close again very soon while the lights stay on. If they are leaving, the same could happen, but it is less likely.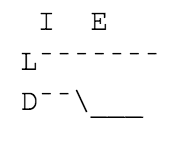
Door opens and lights go off at once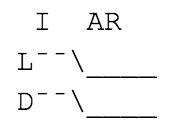
Nothing changes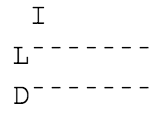
Responding to Queries
The server will accept emails or SMS text messages containing commands.
SMS messages are sent and received using the SMS to e-mail gateway offered by most cell phone providers. The user will send an SMS to the e-mail address the server uses. (We created a GMail account for our installation). The server then waits for e-mail messages, processes them, and then sends replies back to the originating address. This ensures that text messages will be forwarded back across the e-mail to SMS gateway of the corresponding carrier and finally to the user’s phone as a text message. Home
By providing SMS capability, we offer a more rapid method for sending and receiving responses. Once an entry is created for the server’s address it is only necessary to select that user and enter the message, rather than composing an entire e-mail. However, by also providing support for requests by e-mail, those users who do not have SMS capabilities can still take part in the system. However e-mail only access may have some inconveniences; for instance, if a user only has e-mail on their desktop computer, they won’t see any notifications received while they are away from the keyboard.
To make it simple, we use short commands that the user is likely to remember:
- “go” – This simple request indicates that the user would like to go to the restroom, and wants to know if one is available for them. If a restroom is available, it is immediately reserved for them and a reply is sent informing them that they can immediately proceed to the specified restroom. If a restroom is not available, the server adds the to user to the queue and replies with their position in line. As soon as they reach the head of the line and a restroom becomes available, they are notified.
- “cancel” – This request indicates that the user no longer needs to go. This command removes the user from the queue and notifies them of the result.
- “q” – This request is a command to query the current state of the queue and each restroom (occupied or not).
- “help” – In case the user forgets what they can do, any command containing the text “help” will result in a reply containing the valid commands and a short description of each.
The logic for each command is fairly simple. When we get the “go” request, we first check if the user is already in the queue, and if not add them to the end. This is done by aggregating an individual queue for each room. If the user is in any room queue they are in queue for use of a restroom. When users are added to the queue they are added to the queue for each room. The user’s position in the overall queue is the based on which queue they are closest to the front of. We notify the user of their position once they are added to the queue.
When we get the “cancel” request we remove the user from every queue that they are in.
When a restroom becomes occupied the user presumed to be using it is removed from the queue. A future enhancement could provide a mechanism to address the situation where the head of the queue is not occupying a restroom.
Another enhancement could be to allow users to set a restroom they prefer to use. We would need to store each user’s preference and use this info to select which restroom to assign them when more than one is available at once.
Sending notifications
The queue consists of a separate queue for each room. This is because the room will leave the reserved state as soon as the queue is empty. When we add a user to “the queue” we will actually add them to the individual queues of each room.
We listen for notifications from each room to determine what to do. We maintain a reservation object that maps users to the room that has been reserved for them. When the room state transitions to the reserved state, we check if the user at the head of the line for that room already has a reservation for a different room, and if so they are removed from the queue. Otherwise, we add them to the reservation list and notify them that their reservation is ready. When we receive a notification that a room has left the reservation state, we remove the user at the head of the line and cancel their reservation.
When suitable state transitions occur such that a request in the queue can be satisfied, the restroom is marked as reserved, and a notification is sent.
Notifications are sent back to the same message source that sent the original request for service. Home
The Command Module
The functionality of responding to queries and sending notifications is performed in the command module contained in command.js. The file has the following functions, grouped by purpose:
Queue Management
Each Room object maintains its own queue of users waiting for that room as a javascript array, where element 0 is the head of the line. The functions below all aggregate the individual queues for each room in a single virtual queue.
QueuePosition returns the position of the user in line (0 = first in line) by finding the individual queue that the user is closest to the front in.
QueuePush adds the user to the end of the queue for each room.
QueueRemove removes the user from the queue of every room they are a part of.
QueueRemoveOther is like QueueRemove, except it provides the ability to keep the user in the specified room queue.
QueueLength returns the total number of unique users waiting across all queues.
Notification
state_changed is a function that listens to all changes for the Room objects. It uses this to manage reservations. When the room state becomes Reserved, or is already Reserved but the head of the queue has changed, it sends a notification to the new reservee that the room is ready for them. When it exits the Reserved state, it cancels the reservation for that room.
mail_reply_ob is an object which defines a send function which takes the reply object generated by the command processor as described below turning it into a string suitable for sending as an SMS or text message.
Command and Control
process_command is the function which interprets command requests. It takes three arguments: a string containing the command, a string containing who sent the request, and a reply object. The reply object must define a function send which takes the string identifying who to send the reply to and an object defining the reply. The format of this object consists of a pair of keys each of which identify a type of reply that can be sent and the value of that reply. Not every key is present in each reply. These keys and their possible values are listed below:
position: An integer representing the user’s current position in the queue, zero indexed, or -1 if the user is not in the queue.
change: A boolean which is true if the value of the position field has changed as a result of the command being replied to.
qlen: An integer indicating how many people are currently waiting in the queue.
ready: A string containing the name of the restroom that is now reserved for the user.
timeout: How long the reservation is good for, in milliseconds.
The purpose of sending the reply as an object instead of text is to separate the concern of formatting the reply to the user from the actual reply. This is used in the simulated user code to allow the reply to be processed by javascript code rather than needing to parse text. It could also be used for localization or customization of the reply message, or other automated processing.
start is the function that is called to begin listening to and processing commands. It takes three parameters. The first is a listen function which is called to wait for messages to be processed and which takes a callback which is called every time a message arrives. The second is a “get info” function which is used to translate the received message into separate “from” and “command” fields. Finally there is a reply object, which is passed to the command object to send replies. This function is very simple, calling the listen function to begin listening, and in the callback passing the information received to the “get info” function. The sender’s name or address is associated with the interface to allow multiple message sources to be replied to without knowing ahead of time who will be communication on which source. It then calls the process_command function to process the request and send the reply.
init is a general initialization function which must be called before anything else is done. It takes an array of rooms and a logger function, sets up some variables, and registers the state_changed function as a listener to all rooms. The logger function is used by the Log and LogQ functions which log state and queue changes for debugging, testing, and informational purposes.
Emails
The mail.js module is a wrapper around the e-mail sub-system which allows for commands and replies to be received and sent over both e-mail and SMS via the carrier’s SMS gateway. It uses two node modules found in the standard npm repository: mail-notifier, which listeners for new messages, and nodemailer, which allows us to send e-mail. The mail.js module looks for a simple config file in the user’s home directory (~/.ts-server-mail) for both the username and password of the e-mail account for the server to use. The format of this file must be a JSON encoded object with information about the account Further details on the nature of this object documented in mail.js.
Testing and Debugging
For testing the state machine quickly without needing to manually open and close doors and turn lights on and off there is the SimUser.js module. It defines the SimUser object, which is initialized with a test name, an Input object, and a logger function. This object has several configurable switches which are named in a self-explanatory manner in the constructor function (SimUser). These do things such a defining the minimum and maximum amount of times the simulated user will take to move between its states, as well as attributes such as “doesn’t turn off the light when done”. Home
The simulated user moves through the following states to exercise the Room logic:
- wait a random amount of time
- send a request to use a room
- wait for a message to be received that the room is available
- delay a certain amount of time to “walk” to the simulated room.
- try to open the door, returning to step 2 if it fails
- set the presence flag in the room so another simulated user cannot enter
- wait a random amount of time
- turn on the light
- wait a short amount of time
- close the door
- wait a bit to simulate using the room
- open the door
- clear the presence flag so another user can enter
- if the user is configured to turn off the light when done, the light is turned off after another short delay.
- if the user is configured to close the door when done, shut the door after another delay.
- Go to step 1
The state machine can be tested by instantiating several user profiles with differing configurations. This can help reveal any situations where the state machine does not function properly; for example, if there are users waiting but no notifications being sent. The logger function StateChange in StateLogger.js stores state and queue changes. This module also sets up a signal handler when it is loaded. When CTRL+C is pressed all of the queue changes are dumped to a CSV file which can then be loaded into a spreadsheet for further examination.
Initialization
The main.js file contains startup code which initializes the program state and starts the command loop running. It has a debugging flag to indicate whether or not we are in debug mode or normal mode. Debug mode is entered by passing the string “test” as an argument on the command line. Running node main.js test will start in debug mode, while node main.js will start in normal mode. In debug mode, simulated inputs are started for each simulated room by instantiating InputTest for each room. While in normal mode Input7680 is instantiated for each real restroom, passing the name of the room, the hostname, and the light threshold. Whether in debug or normal mode, we instantiate a Room for each restroom, passing the inputs instantiated above. We also create and register listener functions. These functions listen for changes to the inputs and the room states in order to log them. We then initialize the command module. If we are in debug mode, we instantiate simulated users and start a command processor attached to each. Normal mode will start the command processor, attaching it to the mail listener. Finally, we then call the start function of each room to begin the monitoring process.
Software Installation
First, make sure that nodejs and npm are installed. Then run the following commands to install the TS-7680 demo server and set it up to be run automatically. We will use the pm2 utility, which is a program monitor which will automatically restart our server if it stops for any reason, and will start it automatically whenever the machine boots.
cd node
npm install ts7680-demo-server
pm2 start node_modules/ts7680-demo-server/server.js
pm2 startup
pm2 save
The server can be run on any machine on the same network which is running node version 6 or greater. The server can be installed using:
npm install ts-room-server
pm2 start node_modules/ts-room-server
pm2 startup
pm2 save
Once you have installed the ts-room-server module, you will need to create a .ts-room-server-config file in $HOME to define your mail services. This file is expected to define the transport service, IMAP parameters, and room definition. It must be in JSON format as an object containing three keys: “transport”, “imap”, and “rooms”, respectively.
For using a GMail account you can use the following template below. Note that GMail requires that you “Let less secure apps use your account” before you run ts-room-server for the first time. For other e-mail services please consult the documentation on nodemailer (for sending) and mail-notifier (for receiving mail). The “transport” value is passed directly to the nodemailer.createTransport() function while the “imap” value is passed directly to notifier. Home
template ~/.ts-room-server-config:
{
    "transport": {
        "service": "Gmail",
        "auth": {
            "user":"<your email address excluding @gmail.com>",
            "pass":"<your password>"
        }
    },
    "imap": {
        "user": "<your email address excluding @gmail.com>",
        "password": "<your password>",
        "host": "imap.gmail.com",
        "port": 993,
        "tls": true,
        "tlsOptions": { "rejectUnauthorized": false }
    },
    "rooms": [
        {
           "name":"<your device nick name users will see>",
           "Host":"<your host name>",
           "threshold":16000
        }, {
           "name":"<your device nick name users will see>",
           "Host":"<your host name>",
           "threshold":16000
        }
    ]
}
The above template assumes two restrooms, you may add or remove as necessary. When using this template, be sure to tweak the light threshold values for your environment.
Hardware Installation
We installed a TS-7680 in each of the two restrooms in the Technologic Systems’ office. These rooms are named “engr” (engineering) and “prod” (production).
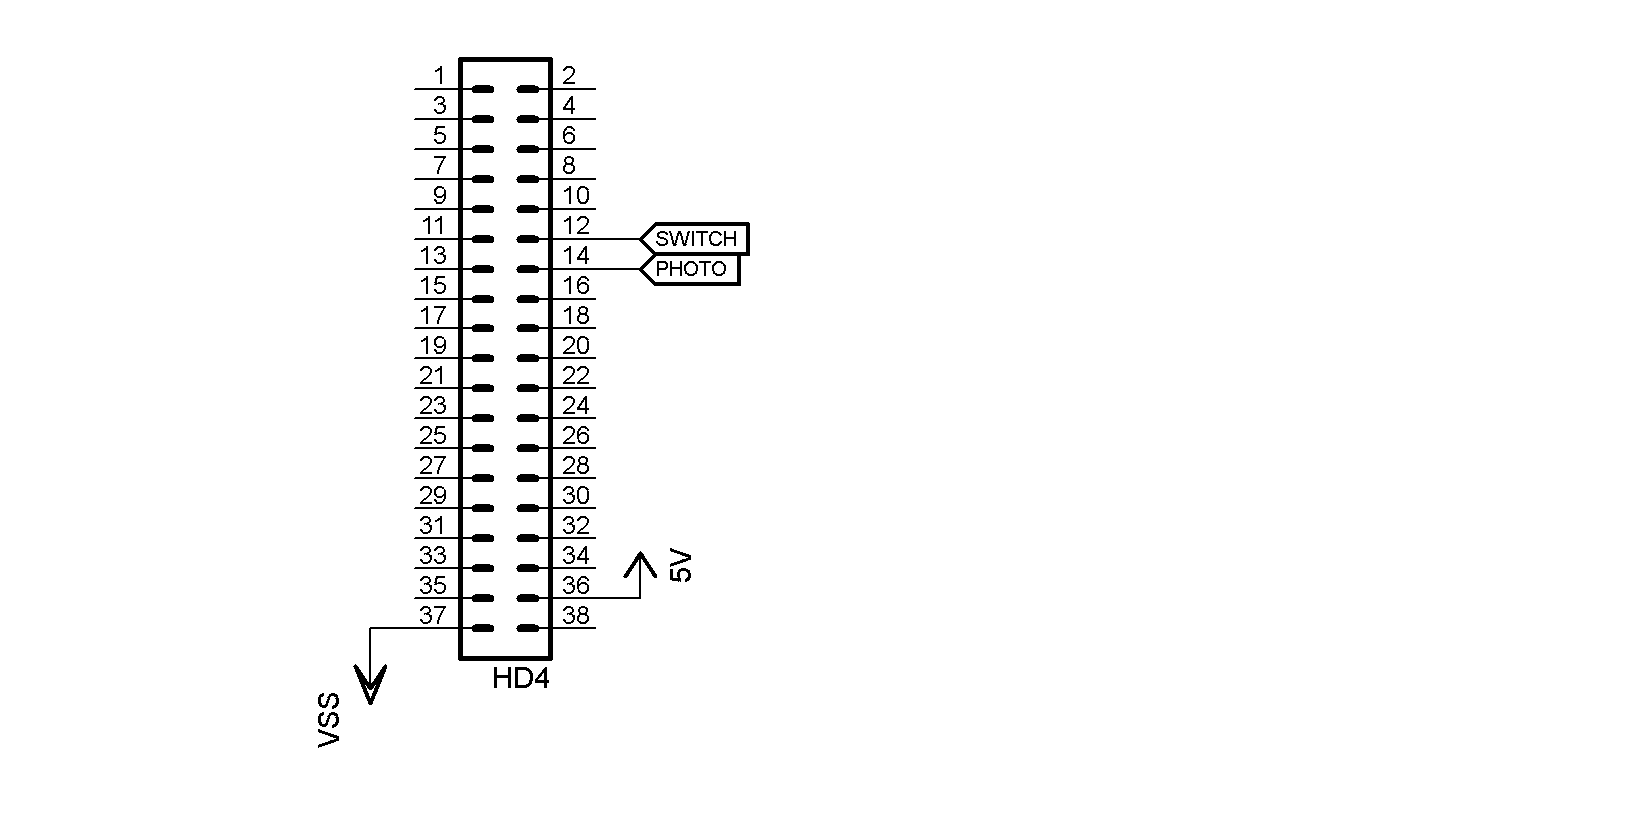
We built up a small perforated PC board to connect the switch and light sensor to the J1 header (on the PC board itself) and HD4 header (on the TS-7680), per the schematic below:
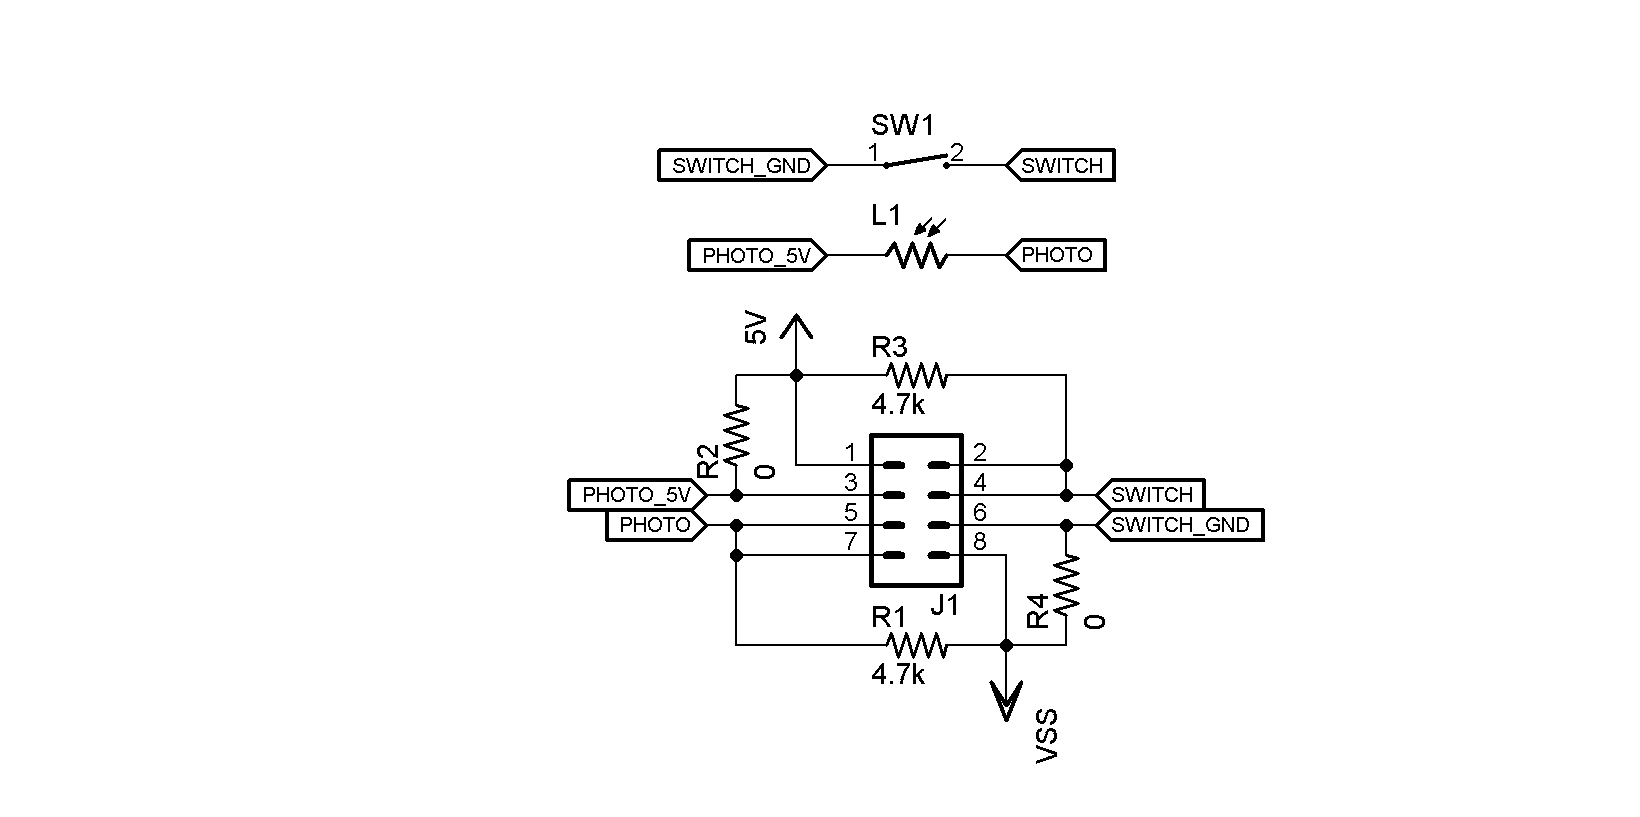
The PC board mounts to the HD4 header and connects to it electrically via the SWITCH and PHOTO signals. Note the 0 ohm resistors, these are provided in case the electrical characteristics of the door sensor or photoresistor require a different bias.
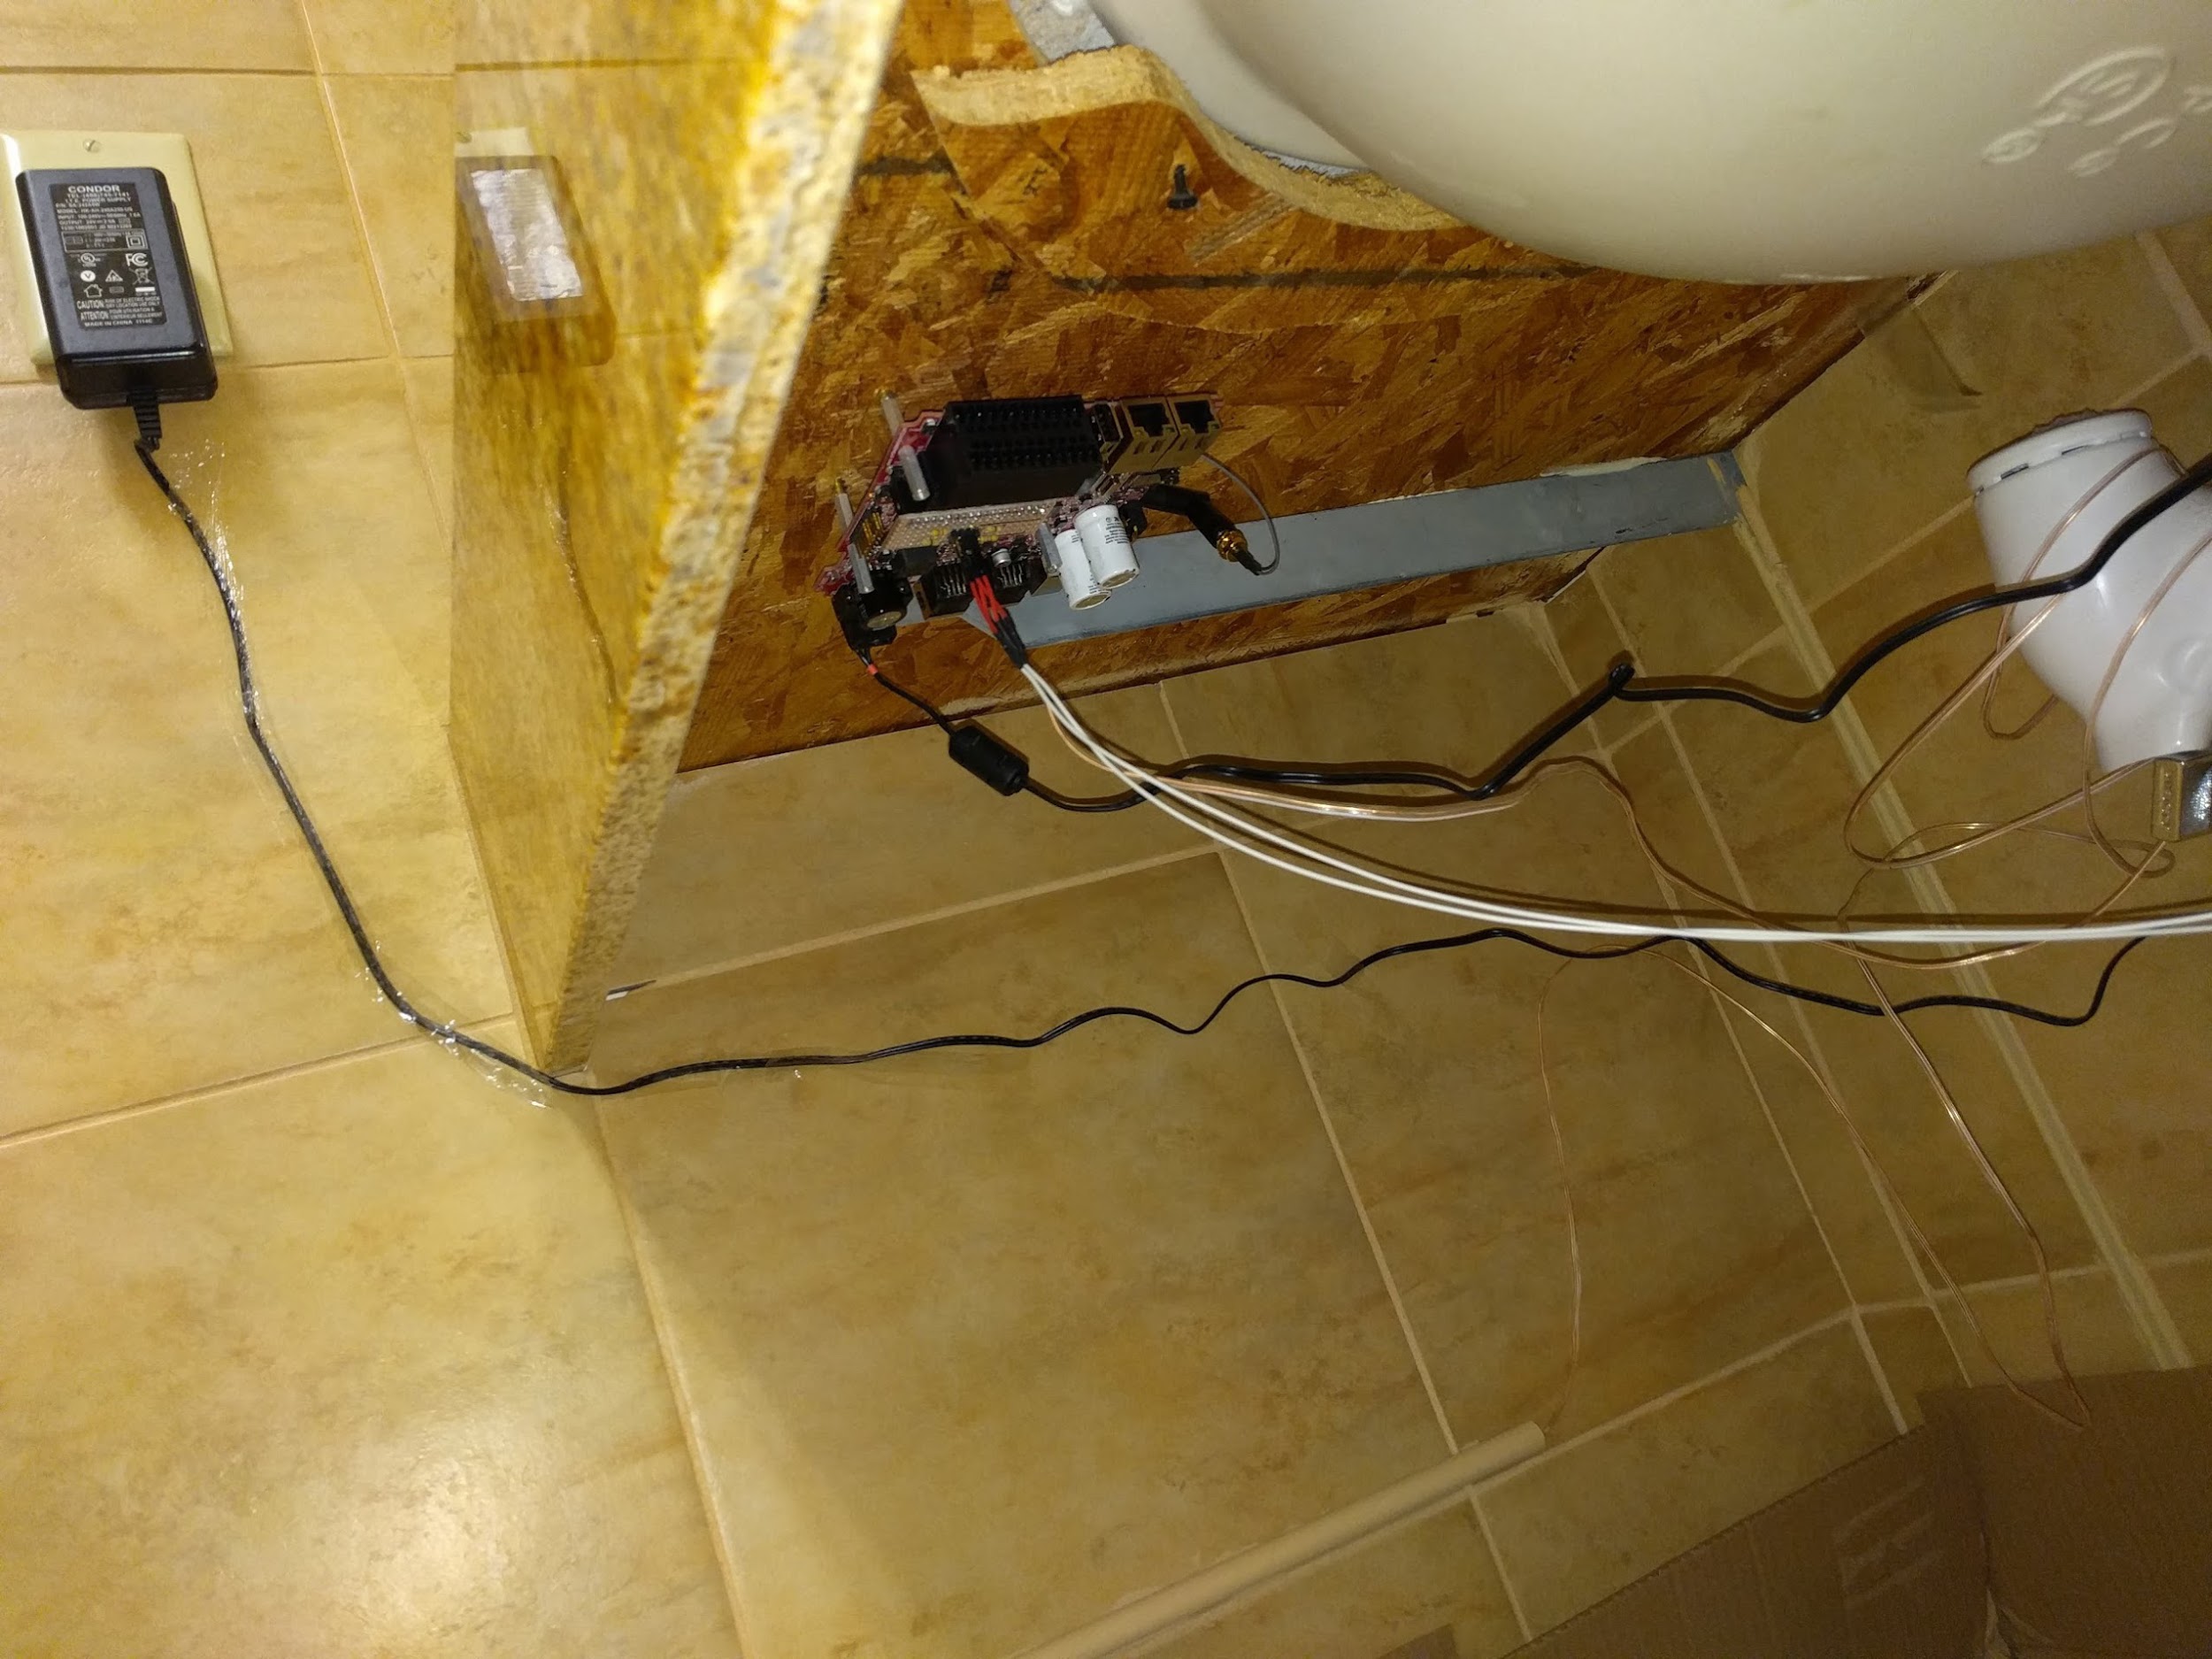
Each TS-7680 was installed under the sink in each restroom. The picture below shows the finished installed product including the custom PC board:

The wires to the magnetic door sensor and photoresistor are tucked out of the way under the sink. Power is provided by a nearby outlet:
The door sensor and conduit was painted to blend in with the surroundings:

The wiring for the light sensor runs across the back wall:

The position of this sensor was chosen to maximize the amount of light that falls on the sensor in all conditions. This means placing it where it can see the light source and is unlikely to fall into a shadow based on traffic patterns in the room. For instance, we would not want to place it at the front of the sink as anybody standing in front of the sink would greatly reduce the amount of light hitting the photoresistor. We also want to place it in the shadow of any light coming from outside the room. In the picture above, the restroom door is behind and to the left, preventing the sensor from being able to see any direct light from the room. This allows us to set a threshold that detects room light but rejects light coming from outside the room.
As can be seen in the image below, the light sensor sticks out just far enough to see the light source, in this case the fluorescent lights in the center of the ceiling above: Home

See it in Action
[gfycat data_id="PeacefulMediocreCrocodile"]Conclusion
If your office has a constrained resource, such as restrooms, which are frequently occupied you can benefit straight-away from this project. If you come up with a particularly clever idea or want to implement additional functionality you are invited to submit a pull request or fork your own project from the code. Some further enhancements could be to allow users to specify their preferred restroom, add support for additional sensors, or create more complex logic to more accurately detect the restroom states.
We have covered the application of handling contention for a limited shared resource such as a restroom. You can also adapt this demonstration to practically any situation in which it would be useful to be able to control or manage your embedded devices via e-mail or SMS. A device in the field, such as an oil rig or a weather station, could be instructed to send an SMS when any number of things occur. This might include errors or dangerous conditions detected, maintenance or servicing needed, or simply responding to queries asking about current conditions. Using node.js you will be able to develop your solutions on our product quickly and easily. The limit is really only your imagination. Oh, and those pesky laws of physics. Home