Introduction
The goal of this practical guide is to get you through the basic steps of getting your TS-TPC-7990 up and running so you can begin development. It’s mostly an extrapolation of the official TS-TPC-7900 Manual, but provides a more practical and casual approach in setting up connection, networking, and general development environment. Home
Here are some suggested supplies:
- TS-TPC-7990
- Any product configuration will do, but this guide will be using the top-of-the-line TS-TPC-7990-QMW3E, with Quad Core CPU, WiFi, Bluetooth, and accelerometer.
- Bootable microSD card with USB reader (PN: MSD-8GB-CLASS10-USB-4900)
- Media to boot from during development. Onboard flash is preloaded, so technically you could get away without one, but it’s very easy to modify contents of an microSD card via card reader should something go wrong.
- Note: Part number to change soon!
- Optional: WiFi antenna (PN: CB-ANT-TIWI)
- Only necessary if you plan on connecting via WiFi adapter.
- Note: Part number to change soon!
- Development stand (PN: LCD7-STAND2)
- This stand helps your TPC sit upright for easy viewing and development.
- Power supply (PN: PS-12VDC-REG-2_5AMP-3PB)
- You could also use a bench power supply to provide 5 VDC or 8 – 28 VDC. This wall wart style power cable makes it easy.
- Micro USB Cable (Type A-Male to Type Micro-B Male)
- The same type of cable used for charging your phone with.
Assembling the LCD7-STAND2
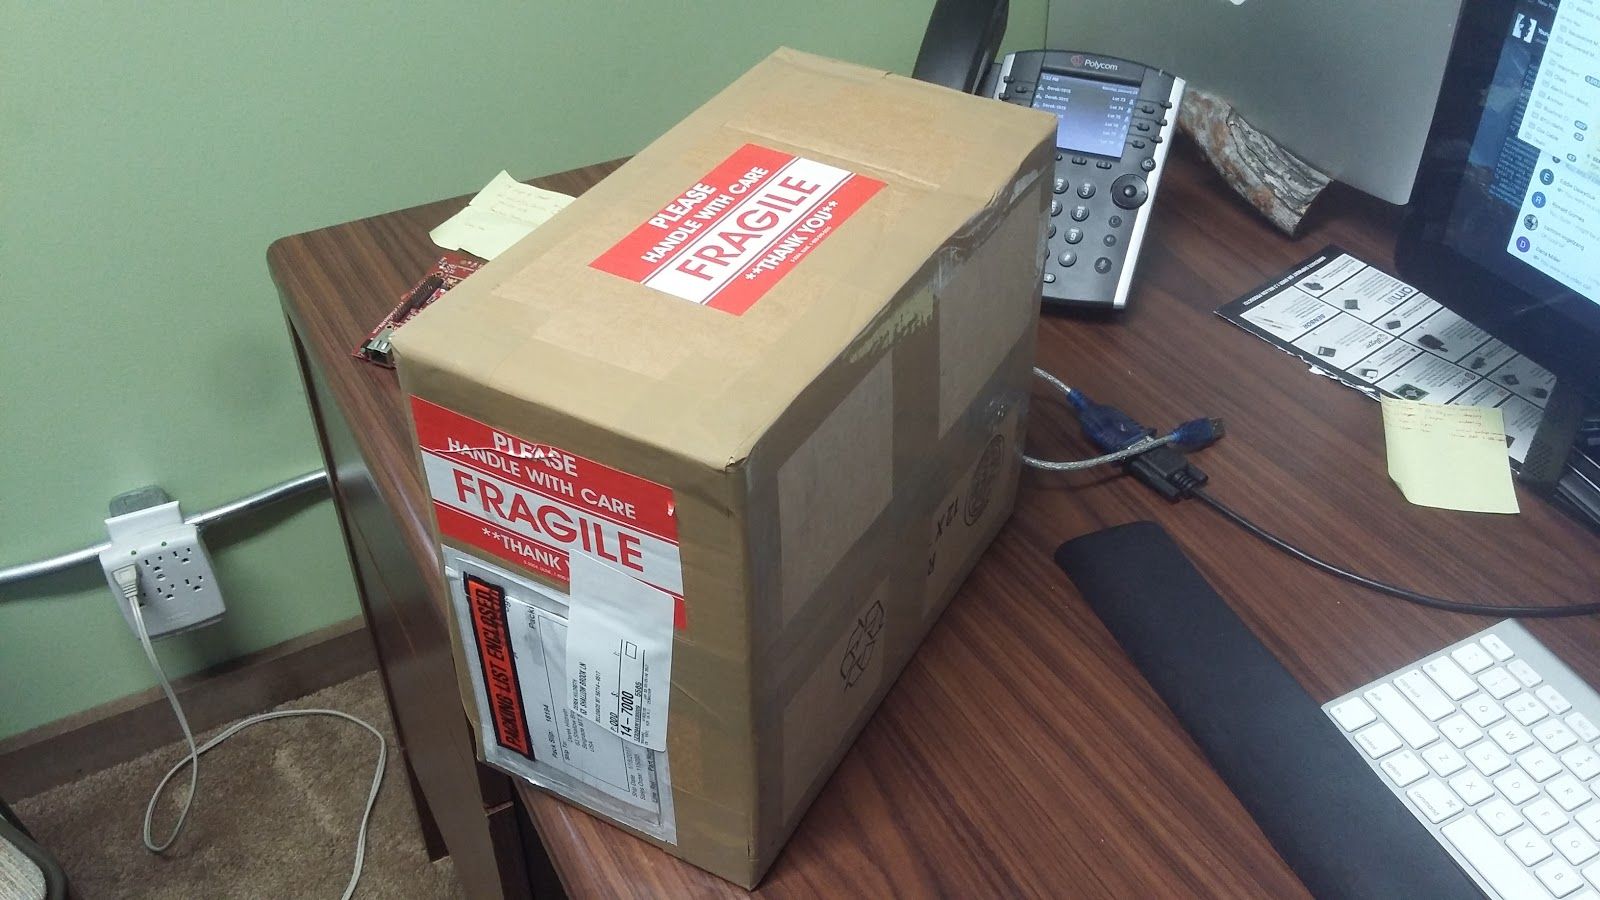
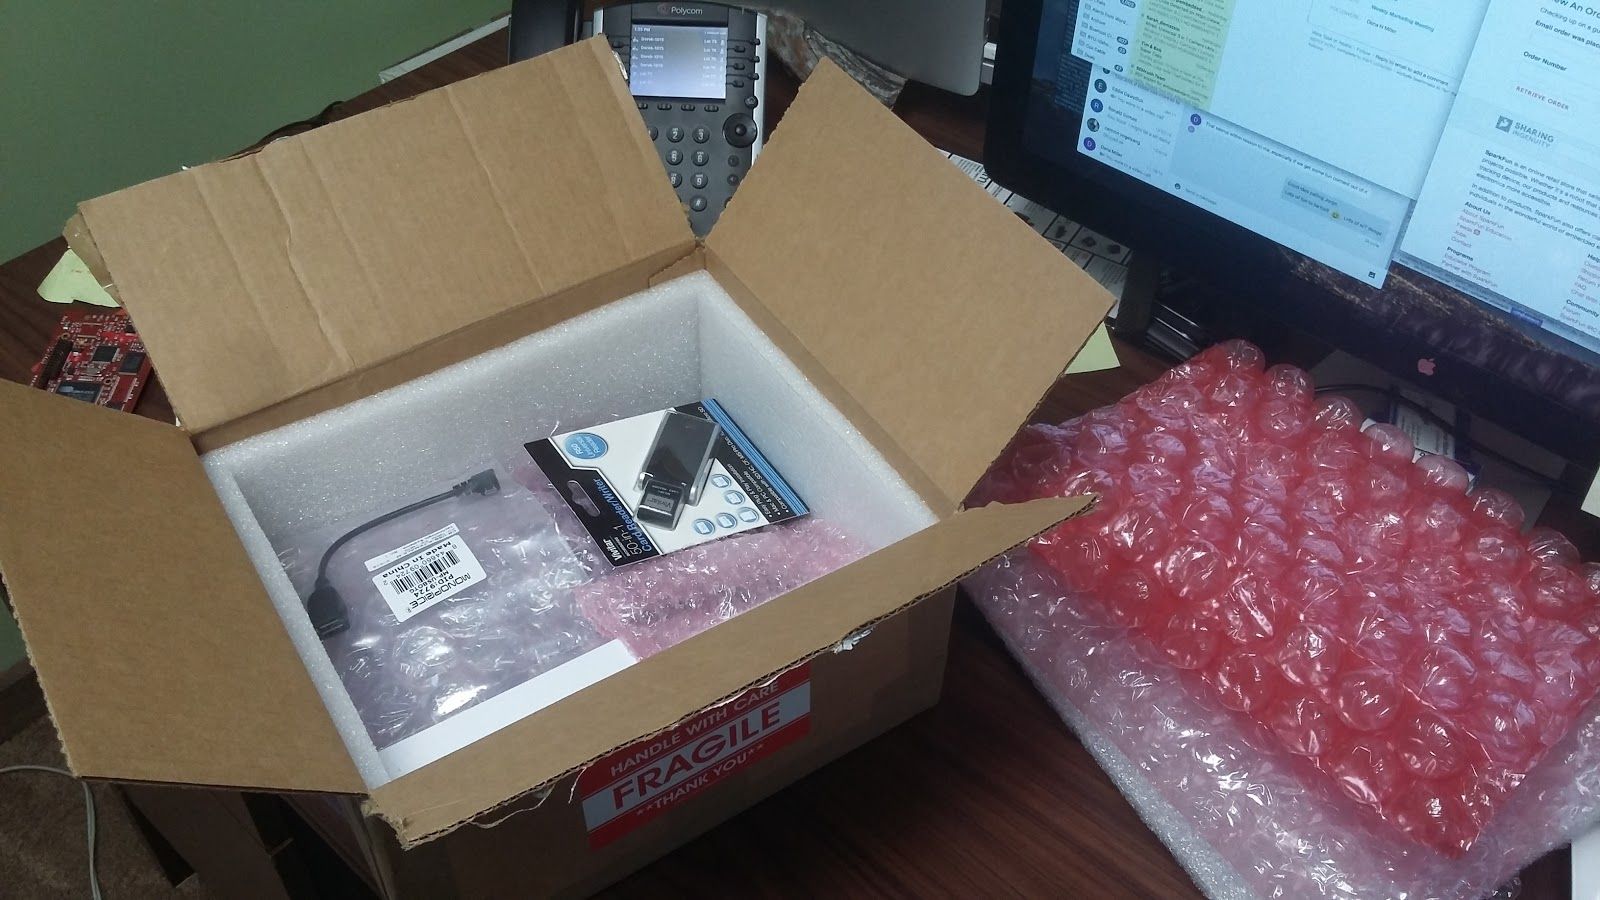
Once you’ve broken through the formidable packaging (compliments of our excellent shipping department) and unboxed everything, you’ll be ready to assemble the TS-TPC-7990 with LCD7-STAND2. If you didn’t order a LCD7-STAND2, you can skip this step, but know that it’s an incredibly handy piece of hardware to have when developing.
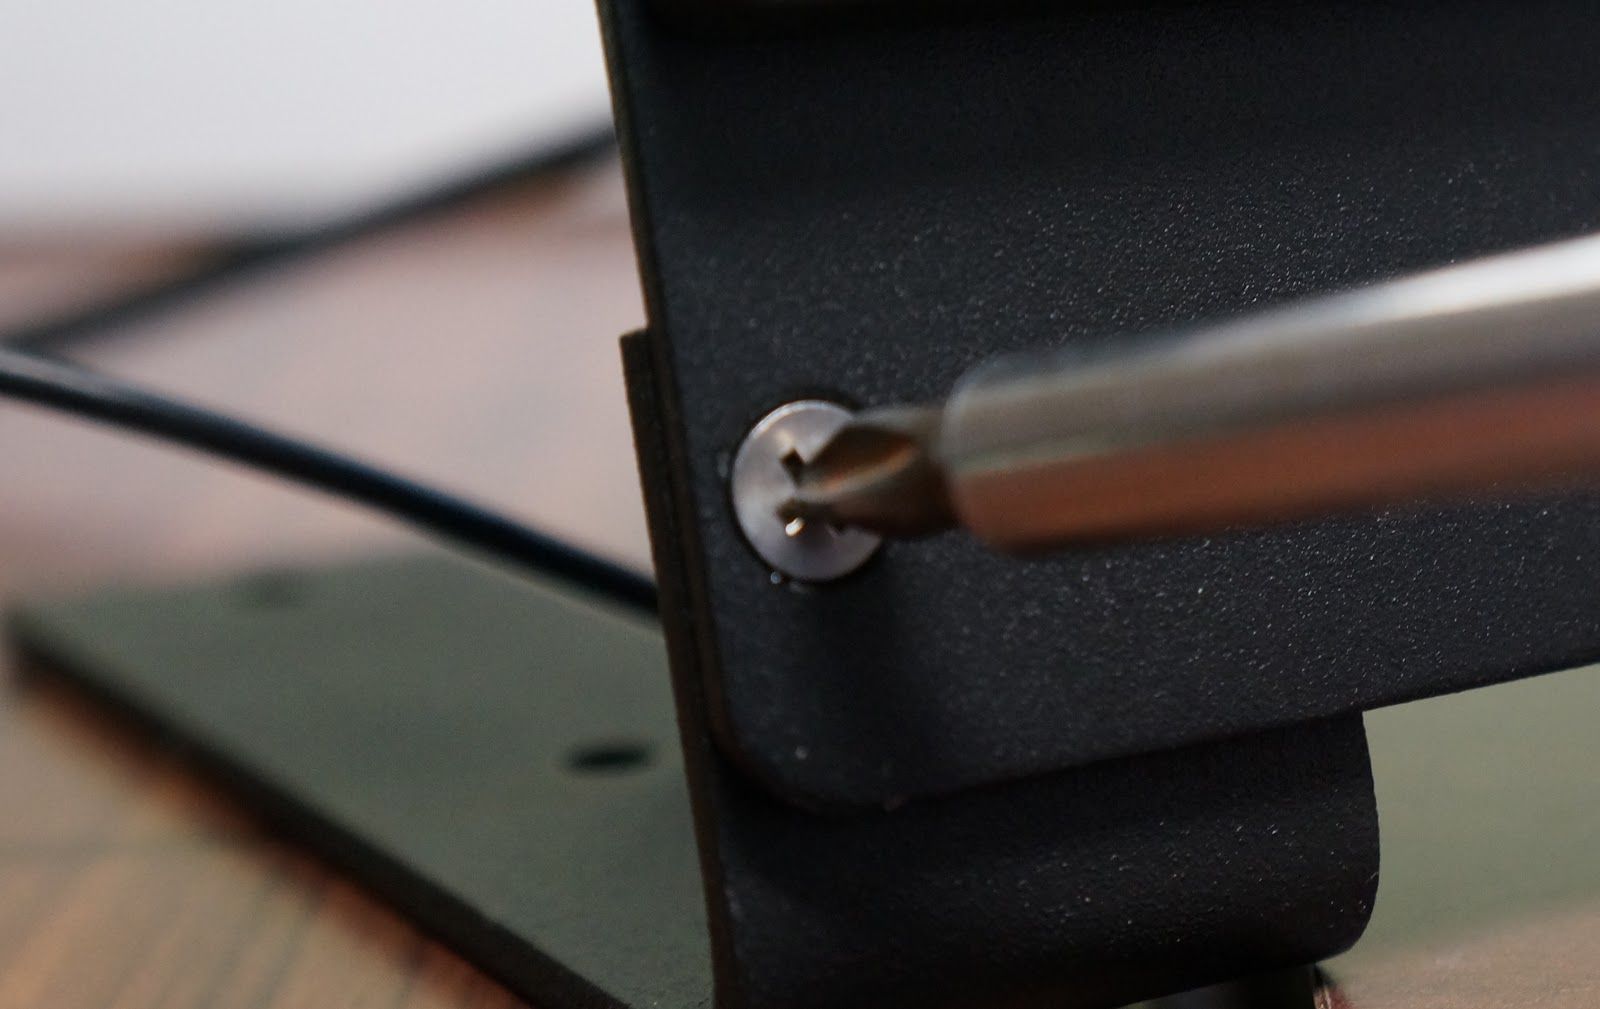
The LCD7-STAND2 is a very simple piece of hardware. There are only three pieces: one mounting frame and two legs. The legs are attached to the mounting frame by four screws total (two for each leg). I like to start by screwing these legs on first.
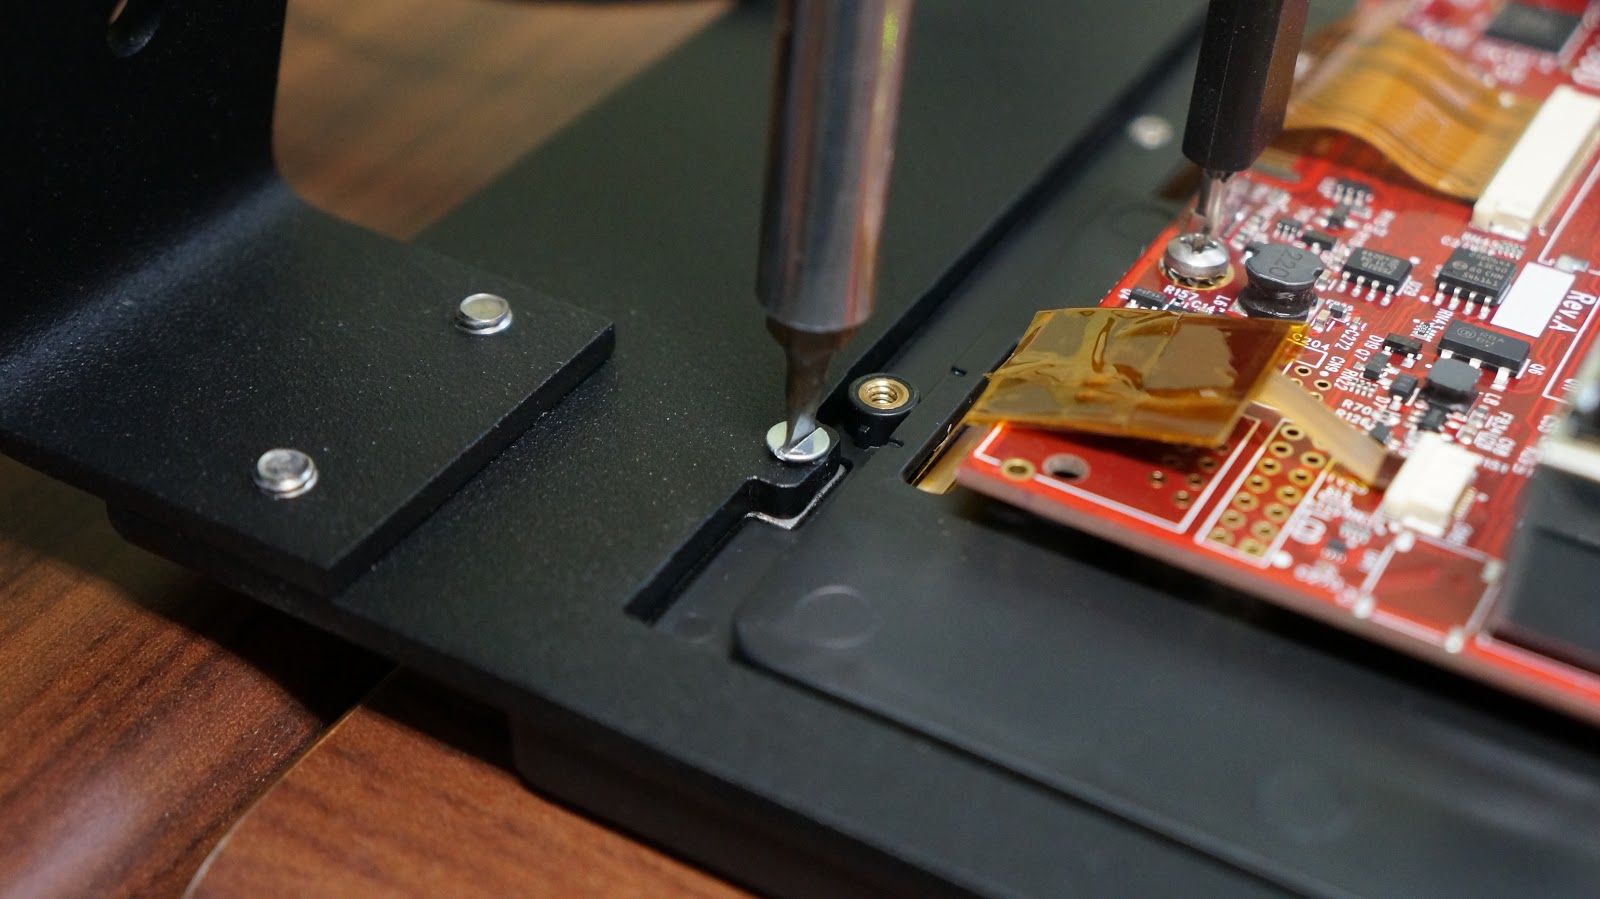
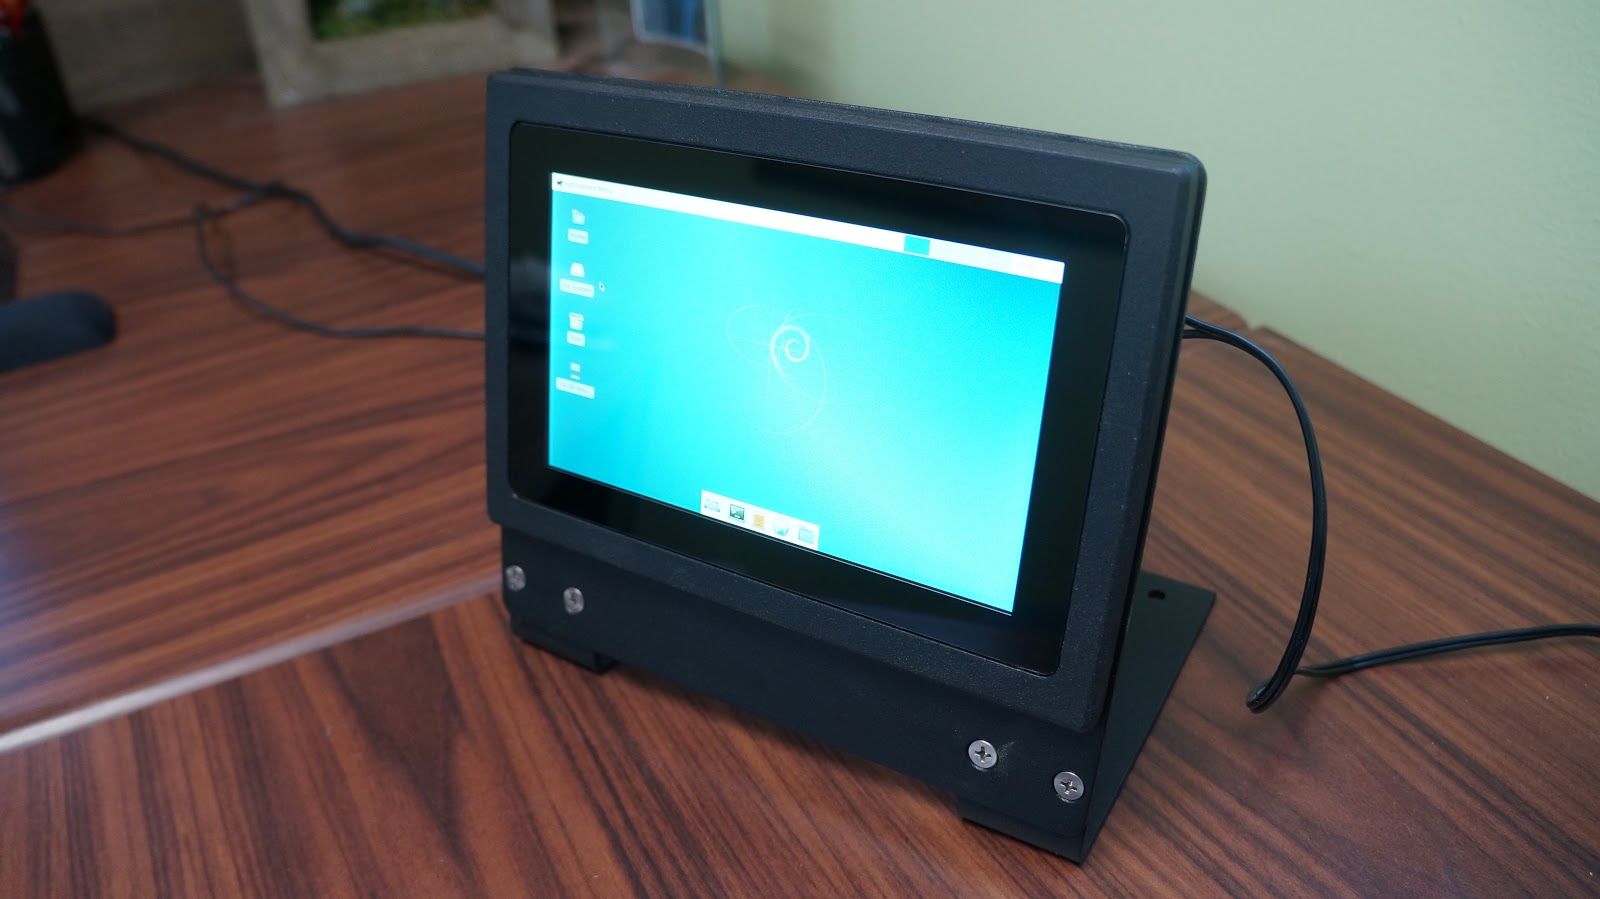
Once the legs have been attached, you’ll then attach the TS-TPC-7990 to the LCD7-STAND2 using four screws, one on each corner of the mounting frame as shown in the image above. Make sure the TS-TPC-7990 is oriented correctly by referring to the image below. After this, you’re finished! Set the whole thing up on the supportive legs and we can start making connections.
Connections
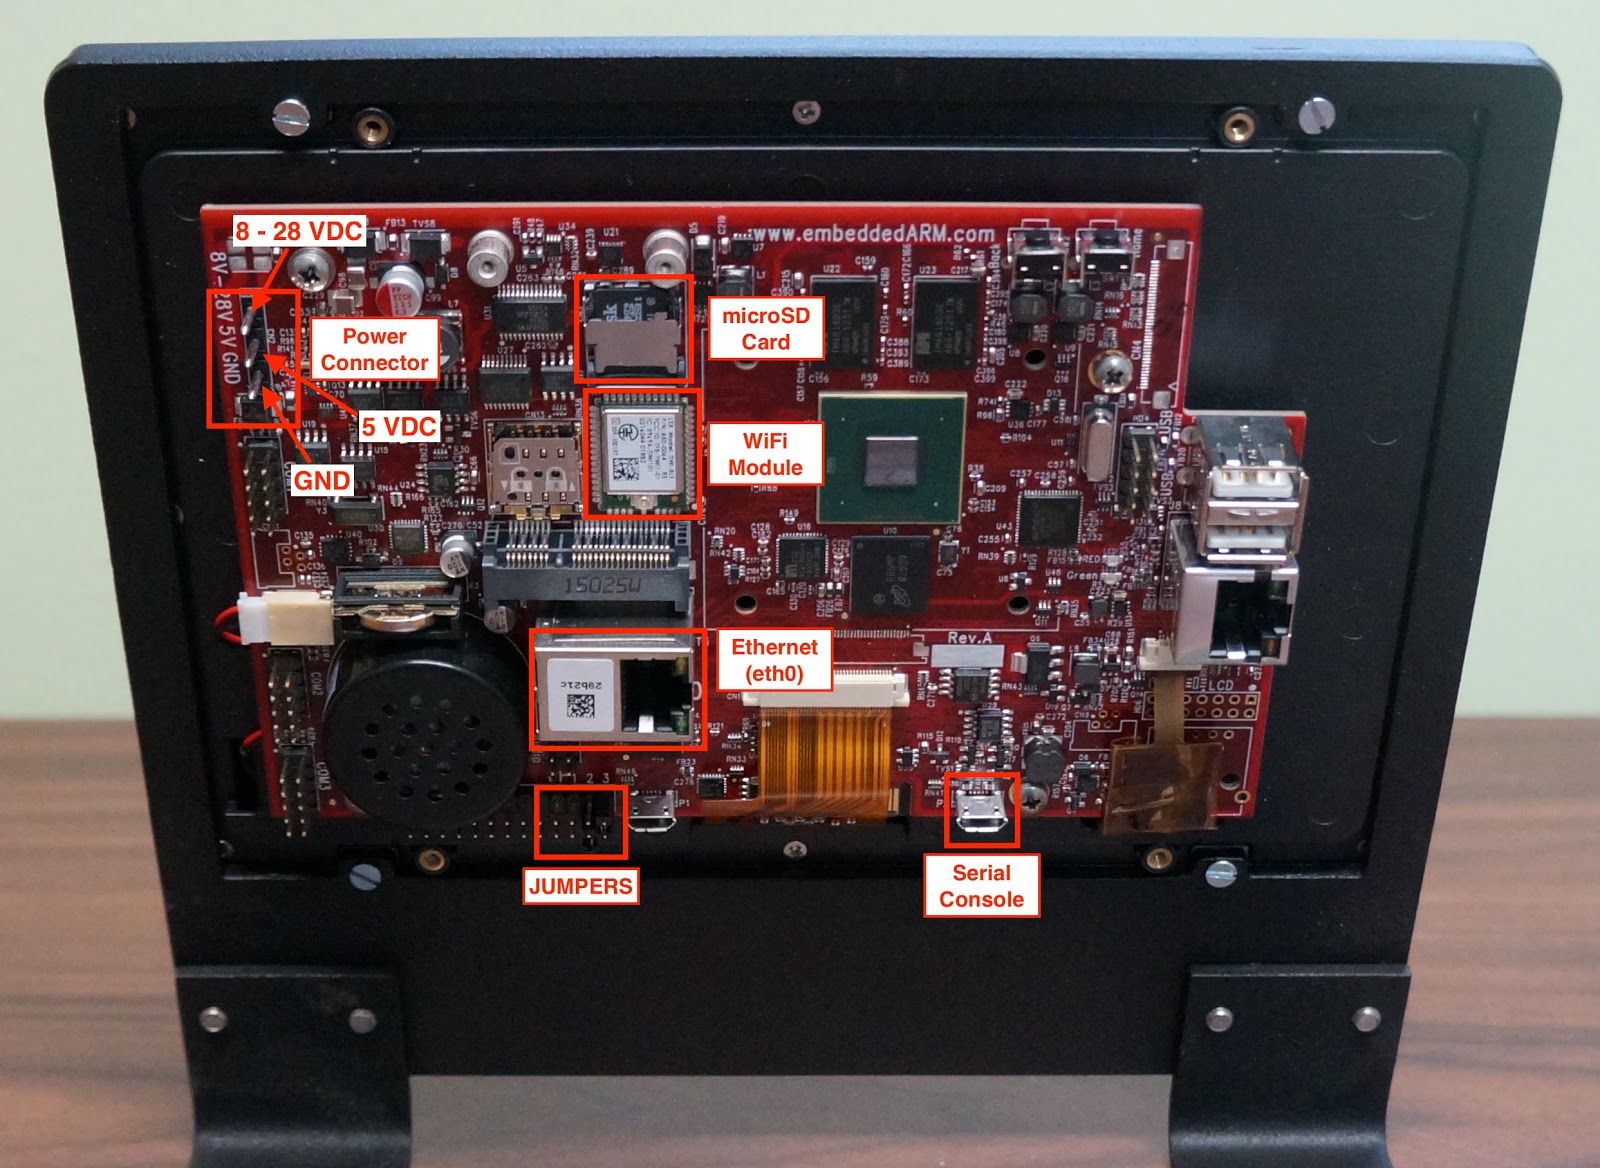
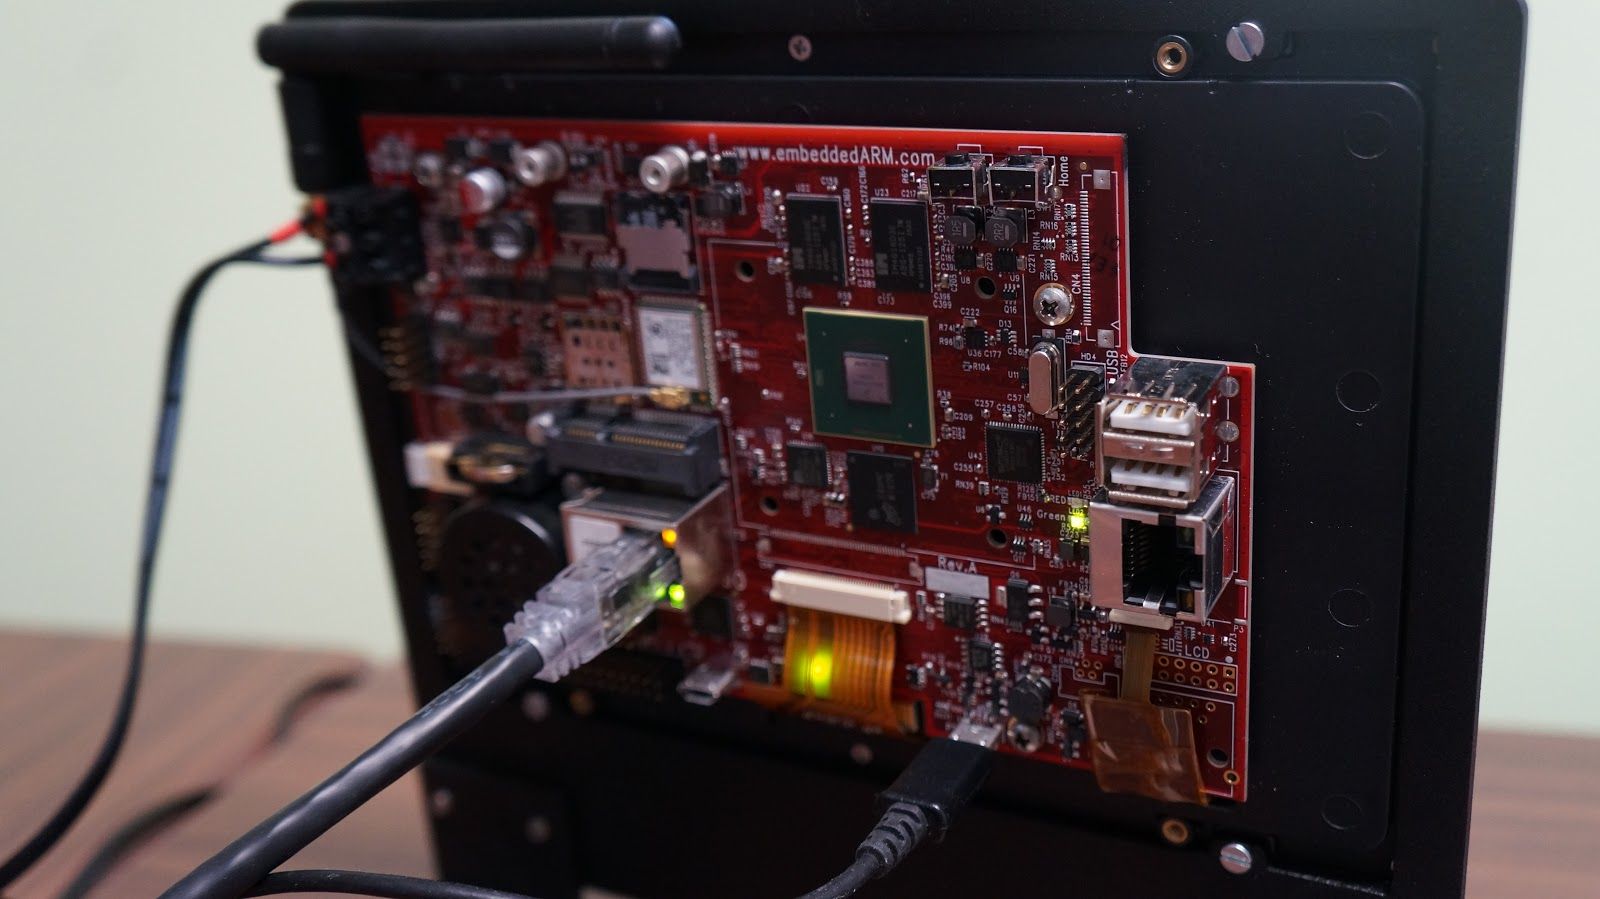
Let’s get our TS-TPC-7990 hooked up! This includes the basic connections we’ll need for most any development or project: power, serial console, Ethernet, and WiFi. The image above shows the locations of the various components we’ll be talking about. Home
Jumpers
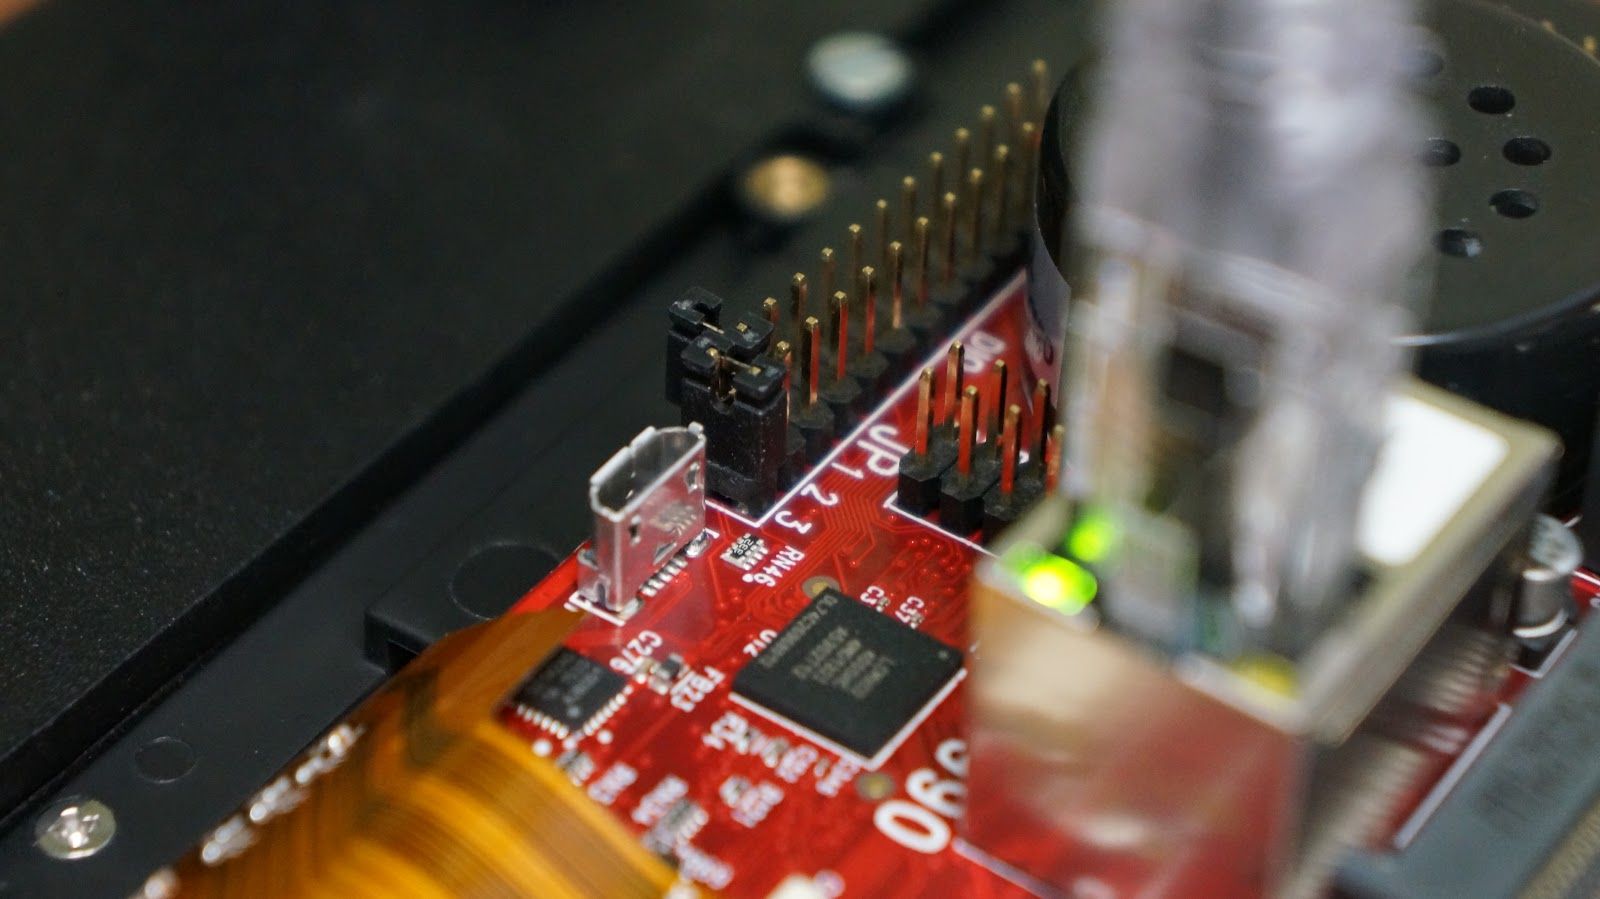
Note: Jumpers on Rev. B and above are labelled CAN, U Boot, and SD Boot.
The TS-TPC-7990 has three jumpers in total, but we’re only concerned with JP3, which tells the board whether to boot from the microSD card or onboard eMMC flash. By default, JP3 should be populated so that the board boots to the microSD card. If we were further in our development, and ready for production deployment, we might think about loading our application to the eMMC flash and boot from it instead. For now, we’ll boot from the microSD card.
For the sake of being complete in explaining each of the jumpers, JP1 is unassigned at this time and JP2, unpopulated by default, will check for USB updates and then stop at the U-Boot console. For now, leave the jumpers as is. We won’t concern ourselves with these in our basic getting started guide.
Serial Console
Nothing beats a good ‘ol serial console for direct access to an embedded system. Where others like telnet and SSH might fail due to bad startup scripts or network snafus, a direct serial console connection will always be there to bail you out. For this, you’ll simply need a type A-male to type micro-B male USB cable, the same type of cable used for charging your phone and other gadgets. No need to deal with NULL modem cables or USB to serial adapters in this case. Just a clean, single cable solution. Plug the USB cable into the micro USB connector on the bottom of the board between the ribbon cable and mounting screw. Home
It’s recommended that you work from a Linux development machine. Not only are the serial port drivers already installed, but you’ll also need it if you plan on using our cross compile toolchains for a larger project later on. For now, if you’re on a Windows or Mac OSX machine, you can obtain the serial port driver from the Silabs USB-to-UART drivers page (be sure to restart once you’ve installed the driver). Your mileage may vary though, as some reported Windows 10 “just worked”.
Next step is to connect the USB cable to your computer and follow the instructions given in the “Get a Console” section of the TS-TPC-7990 manual. This author’s preference is minicom, a no-frills, cross-platform serial communications program. Basically, we’re setting the baud rate to be 115200 with 8N1 parity, no hardware or software flow control. Typically, your serial device name may be:
- Linux, /dev/ttyUSB0
- Mac OSX, /dev/tty.SLAB_USBtoUART
- Windows, Check Device Manager for its dynamic allocation
If you’re following along with minicom, you’ll run the command minicom -s in order to modify the serial port settings. Home
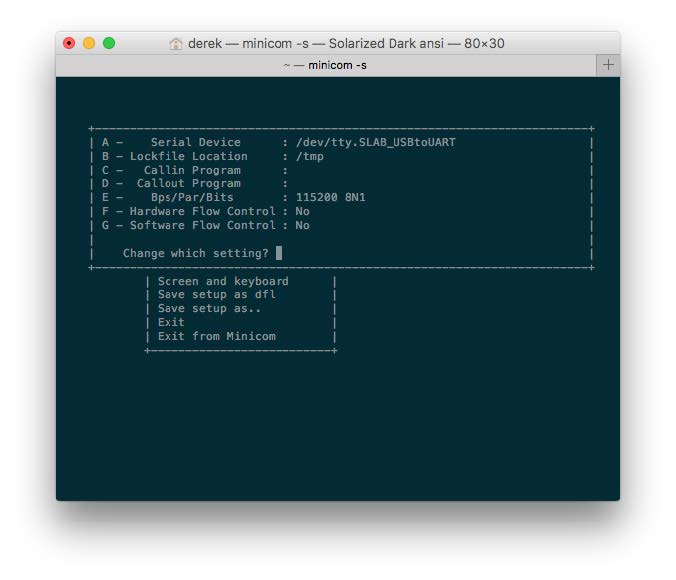
Pro-tip: Running minicom alone will constrain the terminal row and column count to something pretty small that will never take up the whole terminal window. To take advantage of all the real estate your terminal window has to offer, run TERM=linux minicom instead. Remember to setup an alias as a shortcut for yourself! Also, once you have a console loaded, you can issue the command resize, which uses some clever escape codes to talk to your actual terminal emulator and size the serial console appropriately.
After modifying your serial port settings according to the manual and settings mentioned above, you should be ready to move onto the next section with applying power below.
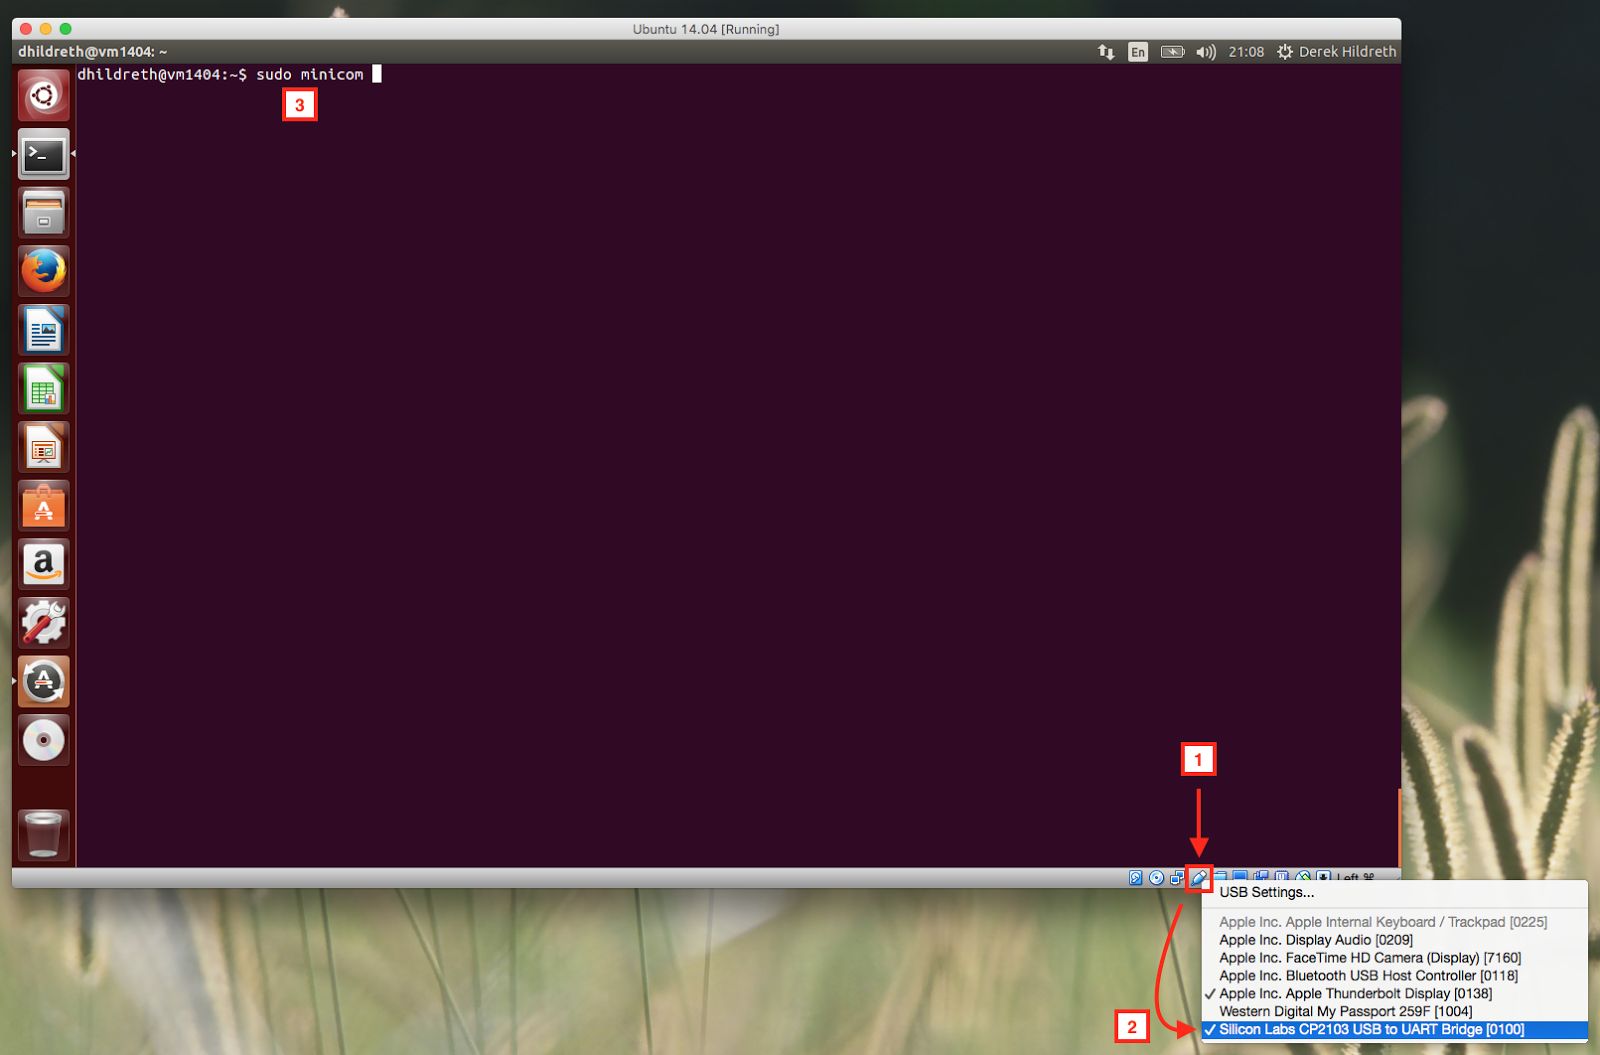
Console in a Linux Virtual Machine (VirtualBox)
As a quick aside, you can also use a virtual Linux development machine using VMWare or VirtualBox. This author’s choice is VirtualBox for its simplicity and ‘just works’ feel. To get serial console working, refer to the image below: you’ll need to boot your VM, 1.) click on the USB icon, 2.) select the Silicon Labs connection from the list, and then 3.) start minicom (after pointing it to /dev/ttyUSB0). Home
Network Connections
Ethernet
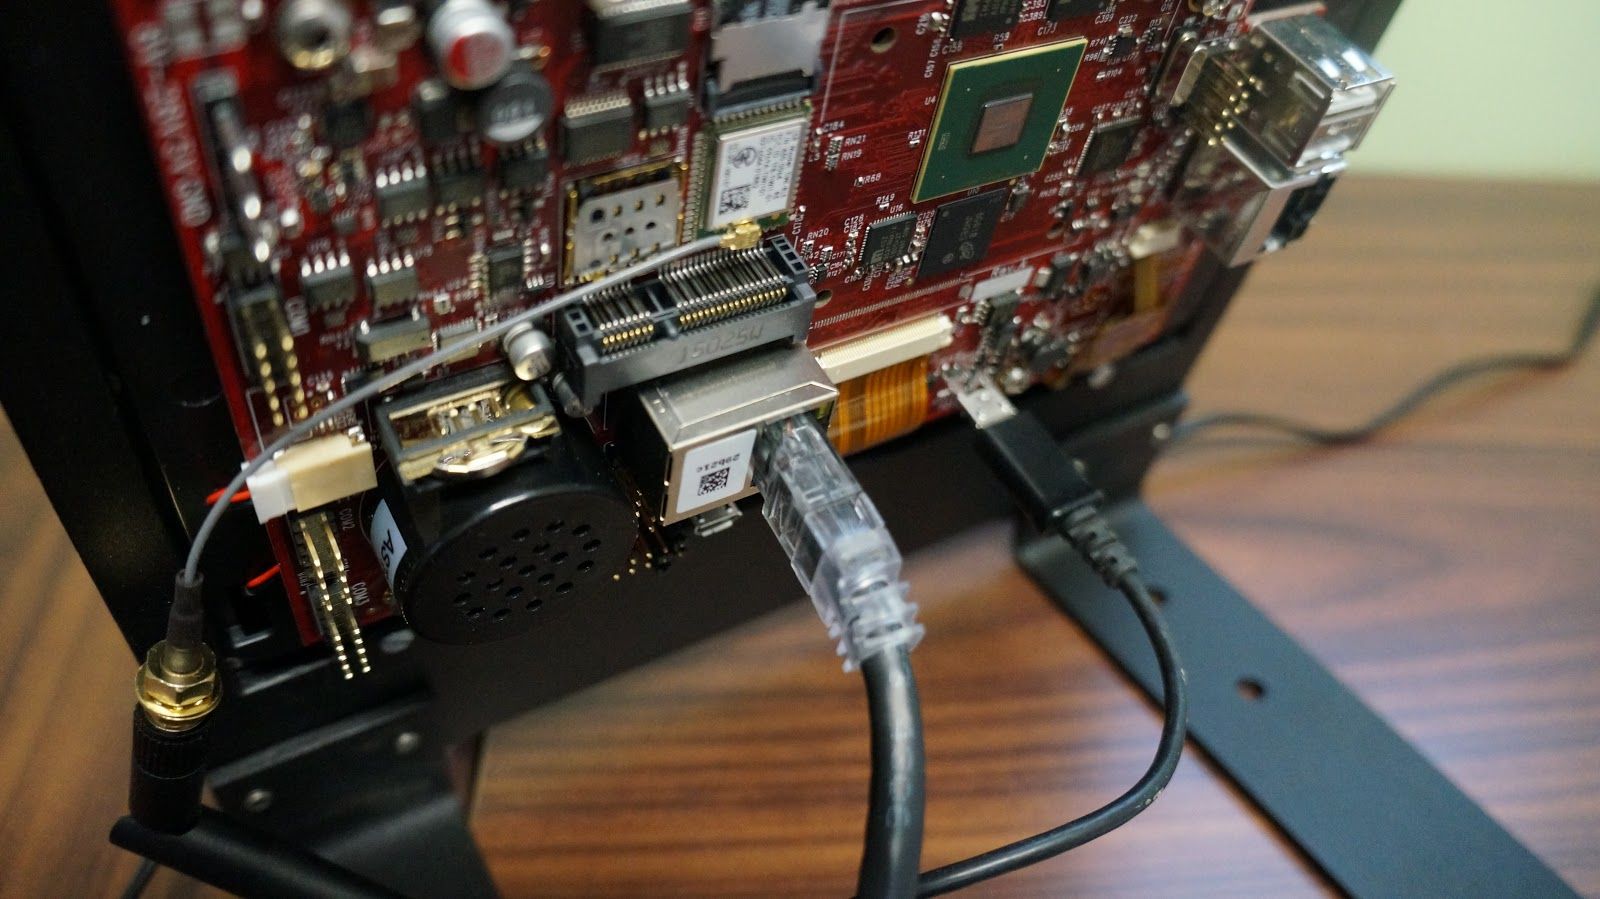
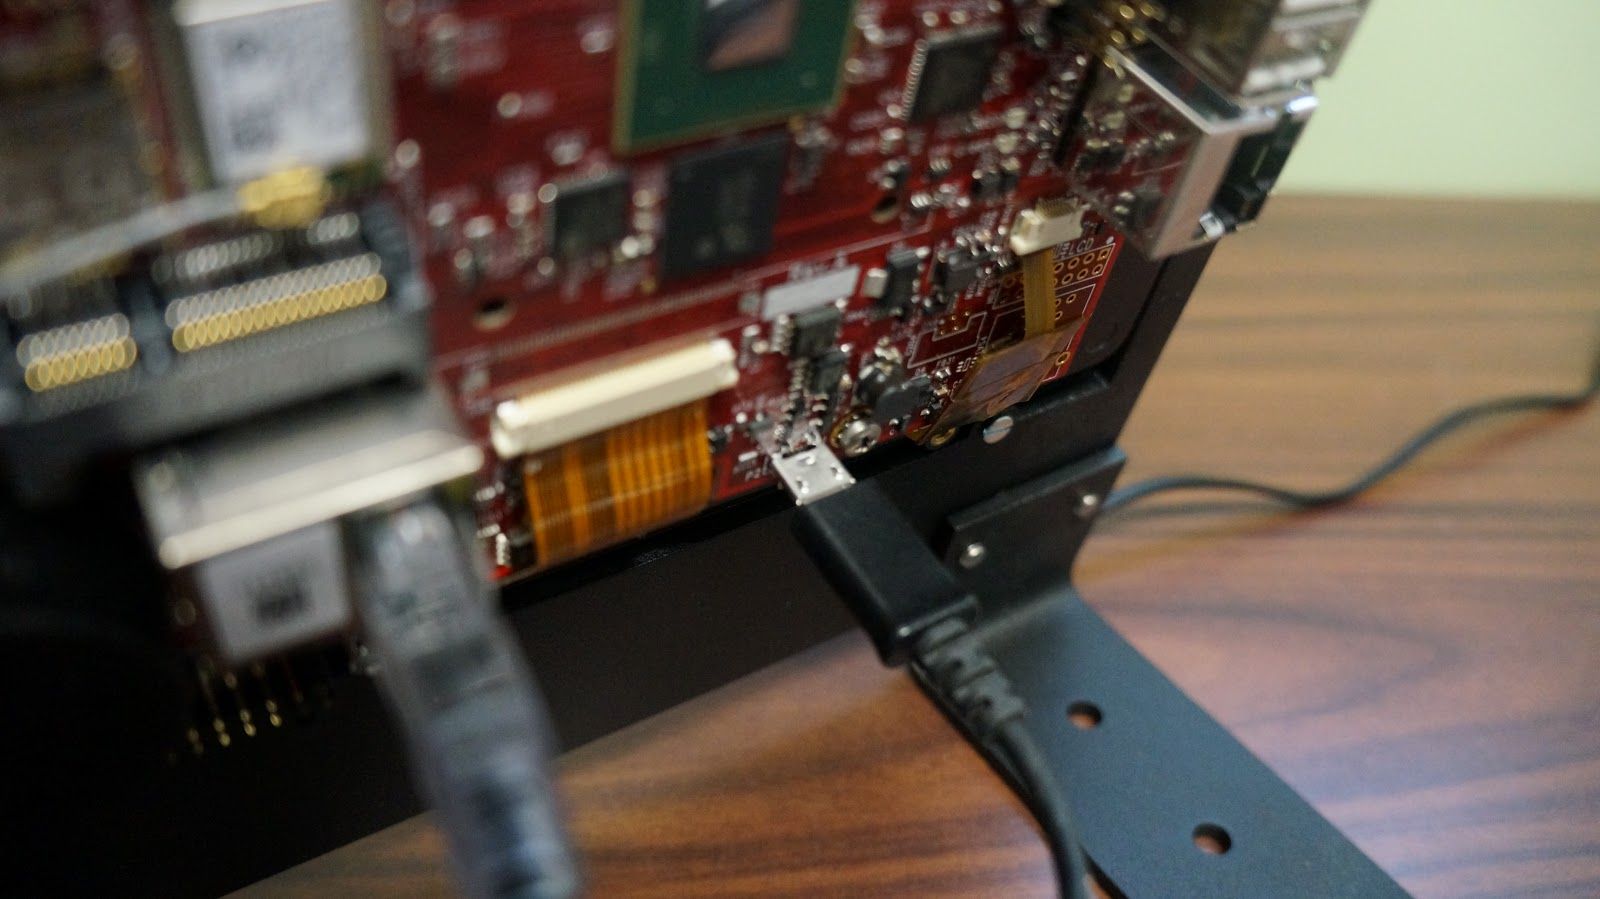
Naturally, we’ll want to be able to connect this to the network so we can get it to talk with the local network or Internet, or even accessing the board via SSH or booting to an NFS filesystem. The TS-TPC-7990 comes with two Ethernet ports, one Gigabit and one 10/100. The primary, designated as eth0, is located next to the speaker. The secondary, designated as eth1, is located next to the USB connectors . Plug in a standard Ethernet cable which is also connected to your router or switch, and we’ll get to the network interface configuration in the networking section below. Of course, you could go wireless as well, but for development, a good ‘ol solid Ethernet connection eliminates a lot of guesswork and headache.
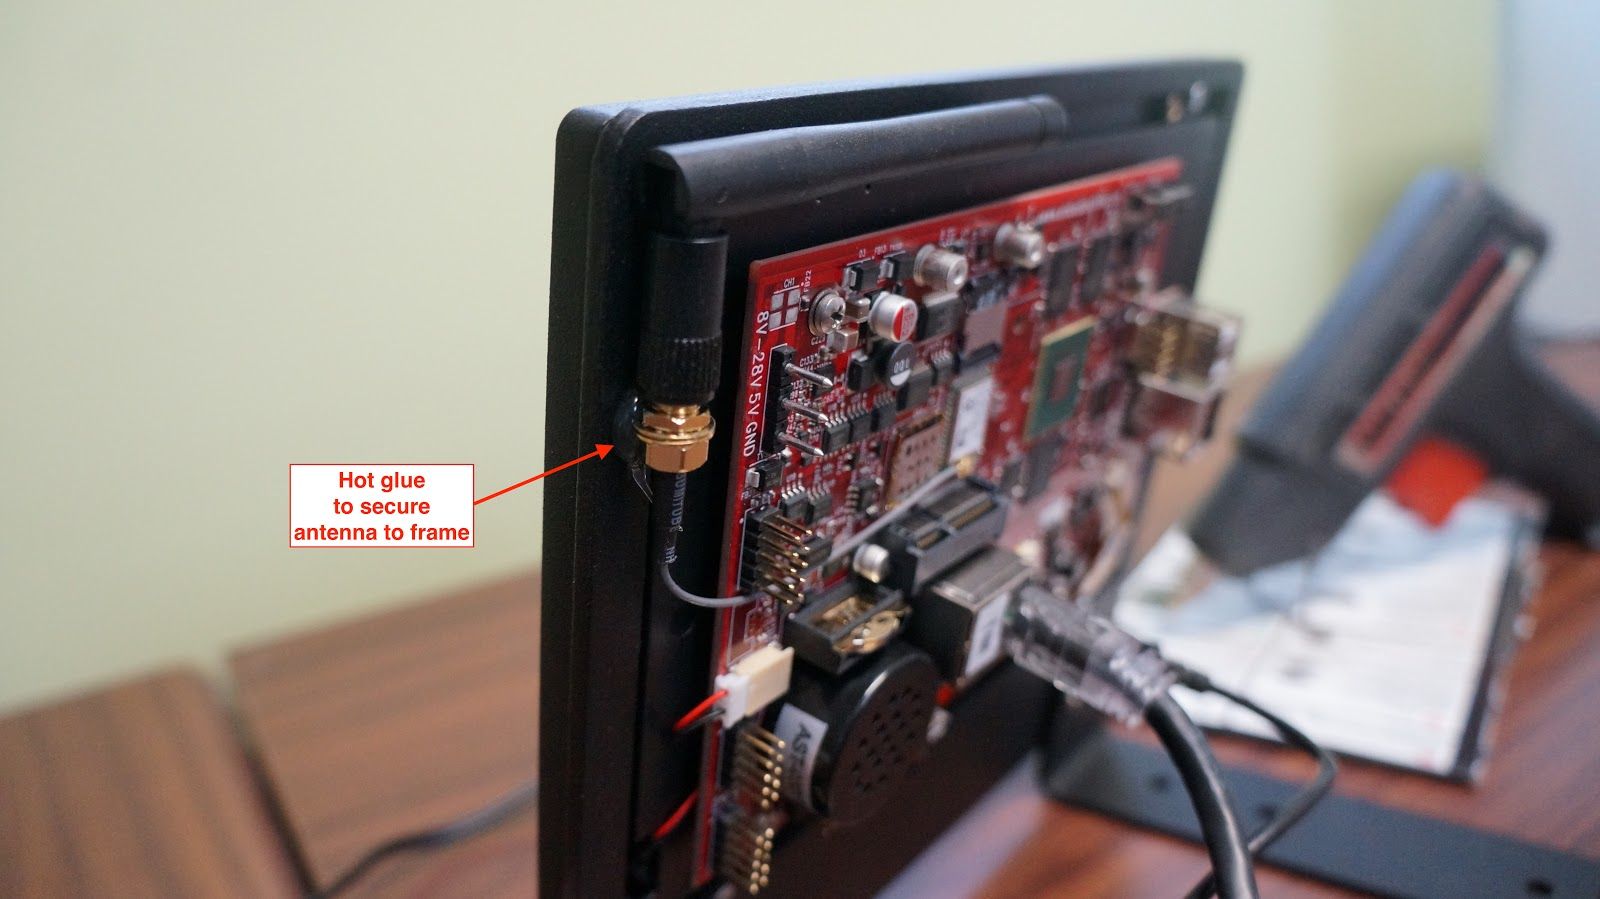
Wireless Module Antenna
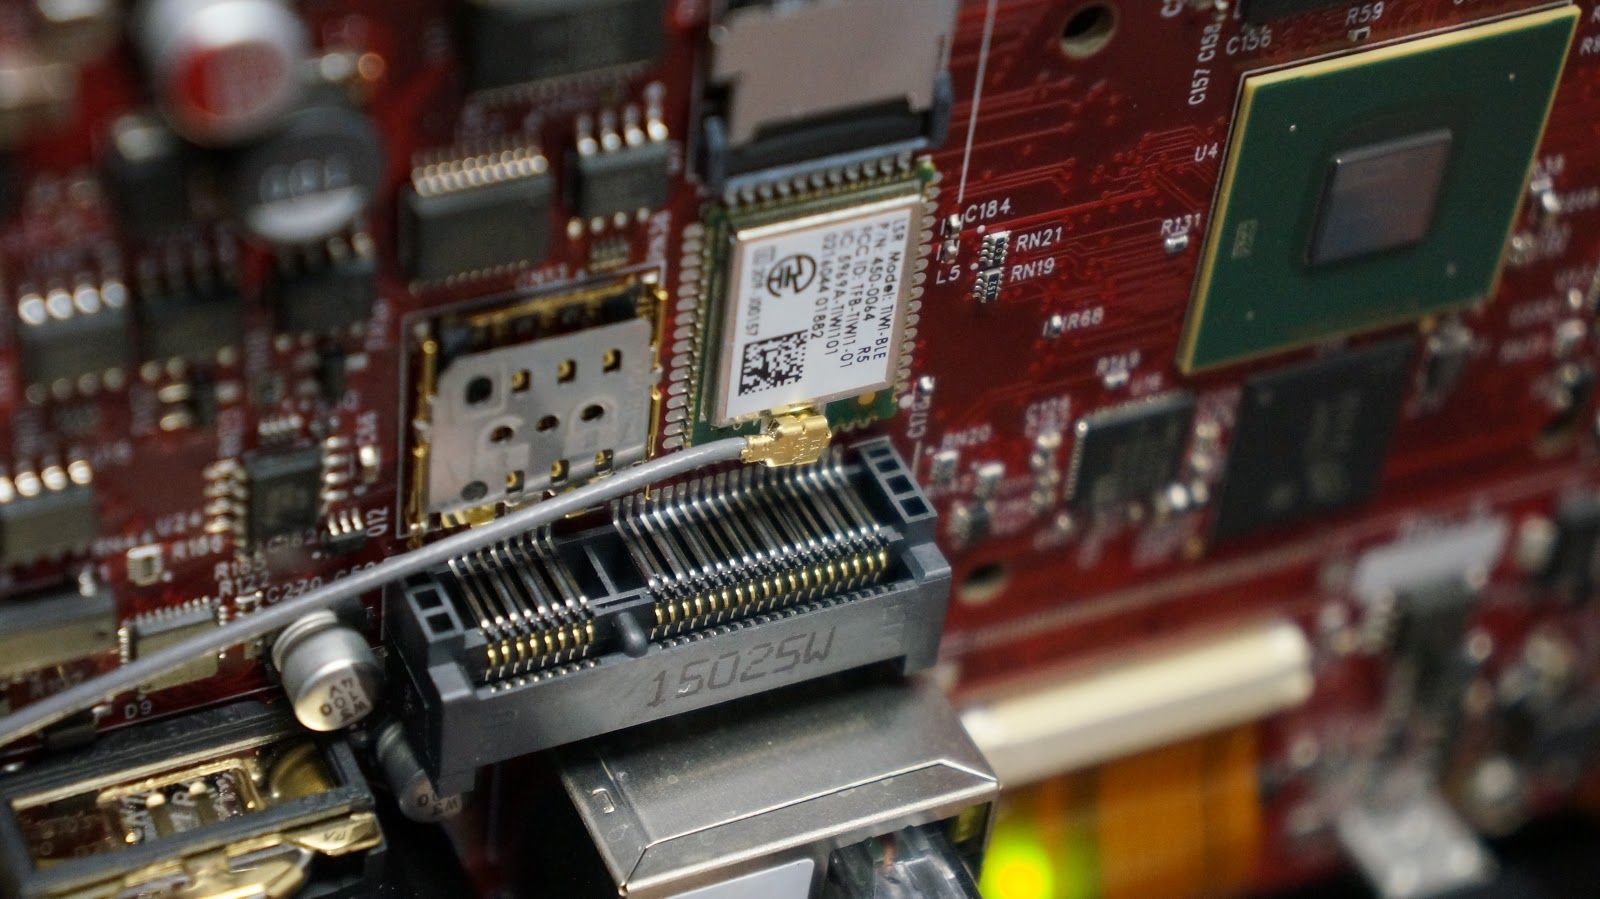
In order for the wireless feature to work, you’ll need to attach the CB-ANT-TIWI antenna. This is easy as there’s only one obvious spot to plug it into, but it’s a little tight and hard to press on when you do it the first time. If you need to, grab a pair of tweezers to help get it in place.
With the antenna connected to the WiFi module, you could move on, leaving it dangling on your workspace. Here’s a nice tip for those of you out there who prefer not leaving things dangling around during development: use some hot glue to attach the antenna to the frame, as shown below. Please note, however, that the combination of a horizontal antenna position and aluminum frame and bezel may have a small impact on range, which in a noisy environment, may cause performance issues. For most folks, it should be perfectly acceptable during development. Home
USB Keyboard and Mouse
There are two standard USB ports on the TS-TPC-7990. As you’d suspect, you can plugin a keyboard and mouse if you’d like. Just plug and play!
Power

The moment has arrived! Let’s work on applying power. You’ll notice there’s an extra connector already attached to the power terminals, simply remove this by pulling up and then slide the PS-12VDC-REG-2_5AMP-3PB power supply in its place. If you’re curious about using your own power supply, take a look at the “Power Specifications” section of the TS-TPC-7990 manual for the nitty gritty details.
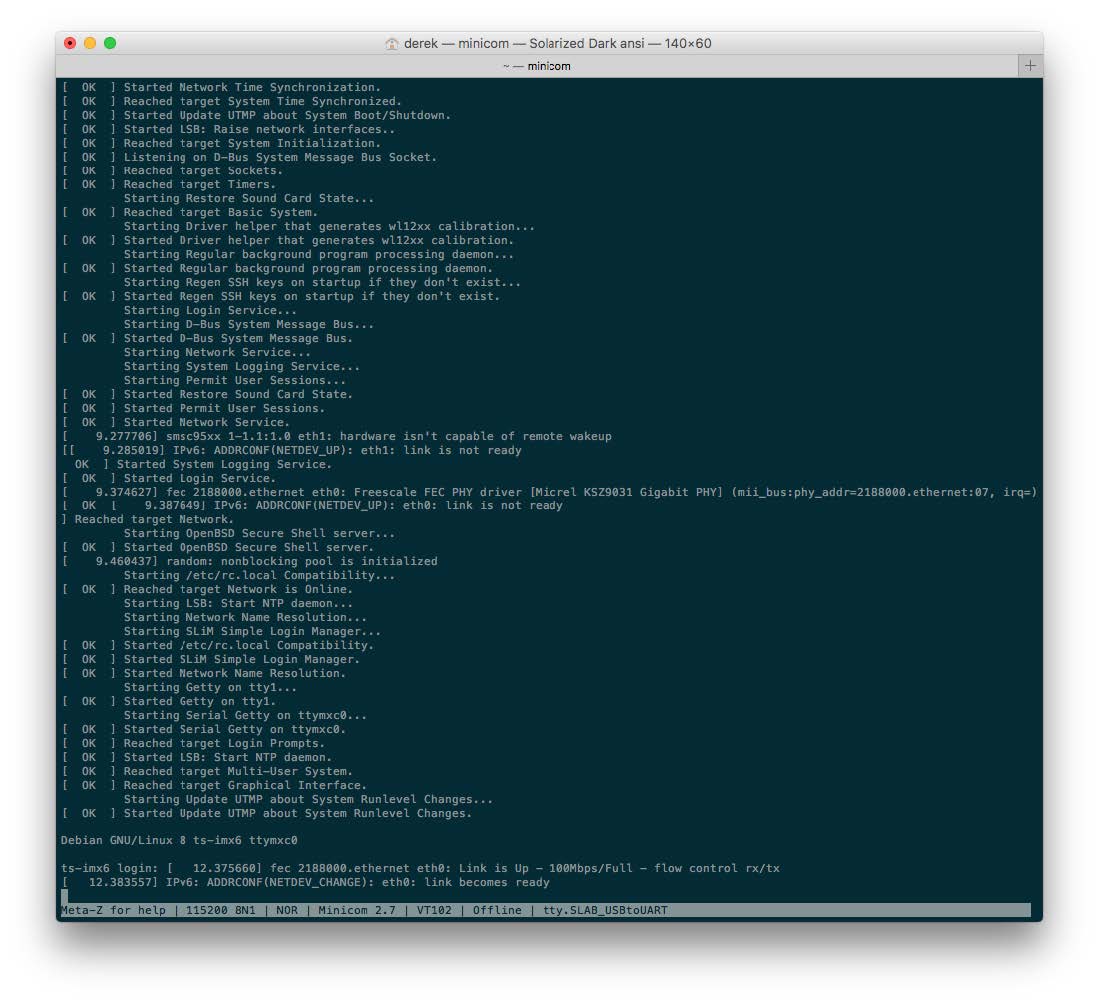
Once power is applied, you’ll see a Technologic Systems’ logo splash on the screen and, if your serial console is setup properly, output similar to the screenshot below (Mac OSX Terminal running minicom):
Once the TS-TPC-7990 has fully booted (~13 seconds), you’ll see a login prompt. Bypass this incredibly secure system by using username ‘root’ without any password. Now, use your hacker powers for good, not evil. Seriously though, it’s not setup out of the box with security in mind, that’s for you to setup as you’re ready to move into production. If you’re really paranoid and would like to get a password setup right away, you can use the command passwd to set one.
About the Embedded Linux Environment
The TS-TPC-7990 has the ability to boot to several different OSs and environments via U-Boot, a general purpose bootloader sitting on the small, 8 MB SPI flash chip onboard. These OS images, as we call them, include Linux camp members Yocto, Debian, Ubuntu, and Slack as well as Android, Windows Embedded Compact, and even a custom OS. Unless you specified otherwise, you’ll be getting the Debian Linux environment preloaded onto both the onboard eMMC flash and microSD (sold separate).
Pro Tip: For development, best practice is to boot to microSD card for ease of recovery should something go wrong. Just plug the microSD card into a development machine using a USB card reader and modify files directly.
The onboard eMMC flash can be configured in two ways: 4 GB MLC for maximum capacity, and 2 GB pSLC (pseudo-SLC) for maximum data reliability. The images all weigh in at about 1.2 GB, so while you could use either option, you may be uncomfortable with space restrictions with 2 GB (1.8 GB usable) pSLC. Home
Pro Tip: We’ve taken a hint from the eMMC flash manufacturer and called it pseudo SLC, or pSLC because it ships as MLC and SLC-like operation can be performed by running a command, which blows a fuse on the chip, making it behave like SLC flash.
Otherwise, the flash and microSD card contain a single partition, where the filesystem and kernel are located. U-Boot understands how to load the kernel, device tree, and boot arguments and run the OS. More information about U-Boot startup sequence can be found in the “U-Boot” section of the TS-TPC-7990 manual.
Pro Tip: If you’ve used any of our products in the past, you probably remember having four different partitions for the kernel, initrd, file system, and spare storage as well as a busybox fast boot environment separate from the full Debian distribution environment. The TS-TPC-7990 has a much simpler setup with a single partition and boot environment. A busybox-like fast boot environment can be booted to, but you’ll want to contact support for instructions on how to do that.
Setup Networking
Let’s take a look at getting connected to the network and Internet through wired and wireless connections. Home
Wired
If you recall, we’re going to be setting up our eth0 network interface. For this, we’re going to follow the “Debian Networking” section of the TS-TPC-7990 manual. First, we’ll enable the network interface, and then we’ll go about obtaining an IP address. The easiest way to get an IP address is dynamically using DHCP. For some applications, like a web server, a static IP address is better to use. We’ll take a look at both.
Dynamic IP
First, we need to enable the eth0 network interface by issuing the following command:
root@ts-imx6:~# ifconfig eth0 up
root@ts-imx6:~#
Then, in order to get an IP address, we issue the command:
root@ts-imx6:~# dhclient eth0
root@ts-imx6:~#
Issuing the ifconfig command should show us our connection information, which in this case the board was assigned the IP address of 192.168.1.138:
root@ts-imx6:~# ifconfig
eth0      Link encap:Ethernet  HWaddr 00:d0:69:4d:10:d6
          inet addr:192.168.1.138  Bcast:192.168.1.255  Mask:255.255.255.0
          inet6 addr: fe80::2d0:69ff:fe4d:10d6/64 Scope:Link
          UP BROADCAST RUNNING MULTICAST  MTU:1500  Metric:1
          RX packets:1260 errors:0 dropped:0 overruns:0 frame:0
          TX packets:1337 errors:0 dropped:0 overruns:0 carrier:0
          collisions:0 txqueuelen:1000
          RX bytes:252886 (246.9 KiB)  TX bytes:114666 (111.9 KiB)

eth1      Link encap:Ethernet  HWaddr 00:d0:69:4d:10:d7
          UP BROADCAST MULTICAST  MTU:1500  Metric:1
          RX packets:0 errors:0 dropped:0 overruns:0 frame:0
          TX packets:0 errors:0 dropped:0 overruns:0 carrier:0
          collisions:0 txqueuelen:1000
          RX bytes:0 (0.0 B)  TX bytes:0 (0.0 B)

lo        Link encap:Local Loopback
          inet addr:127.0.0.1  Mask:255.0.0.0
          inet6 addr: ::1/128 Scope:Host
          UP LOOPBACK RUNNING  MTU:65536  Metric:1
          RX packets:12 errors:0 dropped:0 overruns:0 frame:0
          TX packets:12 errors:0 dropped:0 overruns:0 carrier:0
          collisions:0 txqueuelen:0
          RX bytes:1344 (1.3 KiB)  TX bytes:1344 (1.3 KiB)

root@ts-imx6:~#
Pro Tip: If you’d like to see all of the network interfaces, simply execute the command ifconfig -a to see all available interfaces, and ifconfig to see all enabled interfaces.
Nothing to it! You should now be able to ping an external URL to test your connection:
root@ts-imx6:~# ping debian.org
PING debian.org (130.89.148.14) 56(84) bytes of data.
64 bytes from klecker4.snt.utwente.nl (130.89.148.14): icmp_seq=1 ttl=49 time=134 ms
64 bytes from klecker4.snt.utwente.nl (130.89.148.14): icmp_seq=2 ttl=49 time=133 ms
64 bytes from klecker4.snt.utwente.nl (130.89.148.14): icmp_seq=3 ttl=49 time=132 ms
64 bytes from klecker4.snt.utwente.nl (130.89.148.14): icmp_seq=4 ttl=49 time=133 ms
^C
--- debian.org ping statistics ---
4 packets transmitted, 4 received, 0% packet loss, time 3001ms
rtt min/avg/max/mdev = 132.603/133.510/134.616/0.745 ms
root@ts-imx6:~#
Static IP
For this, we’ll edit the /etc/network/interfaces file to read like the following. The highlighted section is what we’re adding. Make sure to modify the highlighted sections below to fit your specific network settings.
# Used by ifup(8) and ifdown(8). See the interfaces(5) manpage or
# /usr/share/doc/ifupdown/examples for more information.

# We always want the loopback interface.
#
auto lo
iface lo inet loopback

auto eth0
iface eth0 inet static
  address 192.168.1.120
  netmask 255.255.255.0
  gateway 192.168.1.1
The next thing we need is to tell our network interface which DNS nameservers to use, so that we can ping by domain name, like debian.com. For this, we’ll edit /etc/resolv.conf and use the same gateway IP from above as the nameserver. You file should look like something like this:
root@ts-imx6:/var/www# cat /etc/resolv.conf
nameserver 192.168.1.1
After saving your changes, we simply need to enable the interface and then reload the service responsible for the network interfaces. To do this, we run the commands:
root@ts-imx6:~# ifconfig eth0 up
root@ts-imx6:~# service networking stop
root@ts-imx6:~# service networking start
Then, you should be able to run ifconfig eth0 and see the settings applied.
root@ts-imx6:~# ifconfig eth0
eth0      Link encap:Ethernet  HWaddr 00:d0:69:4d:10:d6
          inet addr:192.168.1.120  Bcast:192.168.1.255  Mask:255.255.255.0
          inet6 addr: fe80::2d0:69ff:fe4d:10d6/64 Scope:Link
          UP BROADCAST RUNNING MULTICAST  MTU:1500  Metric:1
          RX packets:1324 errors:0 dropped:0 overruns:0 frame:0
          TX packets:1364 errors:0 dropped:0 overruns:0 carrier:0
          collisions:0 txqueuelen:1000
          RX bytes:263623 (257.4 KiB)  TX bytes:117128 (114.3 KiB)

root@ts-imx6:~#
You may want to test your connection at this point. Try pinging your gateway, aka router. You’ll know it’s successfully up and running when you see 0% packet loss in the report.
root@ts-imx6:~# ping 192.168.1.1
PING 192.168.1.1 (192.168.1.1) 56(84) bytes of data.
64 bytes from 192.168.1.1: icmp_req=1 ttl=64 time=2.74 ms
64 bytes from 192.168.1.1: icmp_req=2 ttl=64 time=2.94 ms
64 bytes from 192.168.1.1: icmp_req=3 ttl=64 time=3.58 ms
64 bytes from 192.168.1.1: icmp_req=4 ttl=64 time=3.95 ms
^C
--- 192.168.1.1 ping statistics ---
4 packets transmitted, 4 received, 0% packet loss, time 3002ms
rtt min/avg/max/mdev = 2.740/3.304/3.951/0.490 ms
root@ts-imx6:~#
Wireless
Note: Rev. B and above are using Atmel ATWILC3000.
The wireless module included on the TS-TPC-7990 is the LSR TiWi-BLE transceiver module. If you’re curious about the nitty gritty, download the datasheet. We’ll concentrate on connecting to an access point in this guide.
Since we’ve already completed the step of creating the interface configuration file in the wired section before this, we’ll just jump right into enabling the interface, scanning for an access point, and then associating with it.
Enabling the wireless interface is a simple command:
ifconfig wlan0 up
Then, we’ll want to scan for access points using iwlist like so:
iwlist wlan0 scan
The output can be overwhelming, so you may want to filter out just the essid names using the command:
iwlist wlan0 scan | grep ESSID | cut -d':' -f2
Okay, so once you’ve identified an access point you want to connect to, you’ll need to associate with it. Now, there are open access points that don’t require any credentials to associate and there are protected ones using WEP or WPA security types. Home
Open Access Point
This is the easiest. You’ll be able to simply issue the following command to associate:
iwconfig wlan0 essid "default"
Now, make sure you’ve associated with the access point:
root@ts-imx6:~# iwconfig wlan0
wlan0     IEEE 802.11bgn  ESSID:"default"
          Mode:Managed  Frequency:2.417 GHz  Access Point: c0:ff:ee:c0:ff:ee
          Bit Rate=1 Mb/s   Tx-Power=20 dBm
          Retry  long limit:7   RTS thr:off   Fragment thr:off
          Encryption key:off
          Power Management:off
          Link Quality=70/70  Signal level=-34 dBm
          Rx invalid nwid:0  Rx invalid crypt:0  Rx invalid frag:0
          Tx excessive retries:0  Invalid misc:0   Missed beacon:0
Finally, run udhcpc -i eth0 to get an IP address.
WEP Protected Access Point
Very similar to ‘Open Access Point’ section above except you’ll need to specify a password: Home
iwconfig wlan0 essid "default" key "yourpassword"
Same as above, follow up with iwconfig wlan0 and udhcpc -i wlan0 .
WPA Protected Access Point
For this, we’re going to use the wpa_passphrase and wpa_supplicant utilities which make life easier. First, create the /etc/wpa_supplicant/ directory and generate a passphrase configuration file. Replace ‘the_essid’ and ‘the_password’ with the essid and password to connect to the access point.
mkdir /etc/wpa_supplicant/
wpa_passphrase the_essid the_password >> /etc/wpa_supplicant/wpa_supplicant-wlan0.conf
You can take a look at this file, but essentially it contains information and a hashed password for the association. Next step is to start the wpa_supplicant daemon which will run in the background.
wpa_supplicant -iwlan0 -c/etc/wpa_supplicant/wpa_supplicant-wlan0.conf -B
You should see output similar to this:
root@ts-imx6:~# wpa_supplicant -iwlan0 -c/etc/wpa_supplicant.conf -B
 Successfully initialized wpa_supplicant
 root@ts-imx6:~# [  306.924691] wlan0: authenticate with 28:cf:da:b0:f5:bb
 [  306.959415] wlan0: send auth to 28:cf:da:b0:f5:bb (try 1/3)
 [  306.968137] wlan0: authenticated
 [  306.978477] wlan0: associate with 28:cf:da:b0:f5:bb (try 1/3)
 [  306.988577] wlan0: RX AssocResp from 28:cf:da:b0:f5:bb (capab=0x1431 status=0 aid=9)
 [  307.009751] wlan0: associated
 [  307.012768] IPv6: ADDRCONF(NETDEV_CHANGE): wlan0: link becomes ready
 [  307.047989] wlcore: Association completed.
Then, same as the other sections above, follow up with iwconfig wlan0 and udhcpc -i wlan0 .
Finally, if you want your connection to be there when you reboot, you’ll need to configure systemctl to automatically set everything for you.
systemctl enable wpa_supplicant@wlan0
systemctl start wpa_supplicant@wlan0
As always, feel free to review the “WIFI Client” section of the TS-TPC-7990 manual for more information.
Setup Bluetooth
For this, you’ll be using Bluez, the official Linux bluetooth protocol stack. There’s not much you need to do for setup, but there are some commands you’ll want to become familiar with such as hcitool and hciconfig . There is plenty of documentation and guides available online for this, so we won’t go into any detail on it here. We also have a small “Bluetooth” section of the TS-TPC-7990 manual you can refer to in order to get a taste of how it works.
Kiosk Demo
The TS-TPC-7990 can be easily configured to run in a kiosk mode which disables and hides any window borders and desktop navigation for use in a public area. By default, XFCE is loaded. The startup script that handles this is /usr/bin/x-session-manager. A closer inspection, and you’ll find this is actually just a symlink to /etc/alternatives/x-session-manager, which is a symlink to /usr/bin/startxfce4. So, really, we’re just updating the symlink on /etc/alternatives/x-session-manager to point to our own script that we’ll name /usr/bin/mini-x-session.
Start off by creating the file /usr/bin/mini-x-session and copy/paste this script (or, with the program of your choosing, like a Qt app):
#!/bin/bash
chromium-browser --window-size=1024,600  --kiosk https://www.embeddedTS.com --user-data-dir ~/ &
exec xfce4-terminal
Save it, and now we’ll make it executable and create the symlink so that it executes on startup:
chmod a+x /usr/bin/mini-x-session
ln -sf /usr/bin/mini-x-session /etc/alternatives/x-session-manager
If you want to see it now, you can restart the slim service by executing:
service slim restart
Otherwise, you can now reboot using shutdown -r now and once it’s finished rebooting you’ll find yourself looking at the embeddedTS.com website once it boots up again. Of course, replace with your own website or even point it to localhost where you can run a simple HMI application via web, and you’ll be up and running in no time!
Pro Tip: Qt is a much more lightweight alternative to running in a chromium environment (aka Google Chrome), and there’s already been some leg work done by Technologic Systems’ engineers to get fullscreen webkit demo in Qt. You can find the source code in the official GIT repository here, and instructions for getting Qt working in the “Configuring QT Creator IDE” section of the TS-TPC-7990 manual. For more advanced HMI/SCADA applications, you’ll want to look at using Qt Creator or Qt Quick for development rather than HTML for performance reasons. Yocto is currently the only environment with graphics acceleration and Qt support.
HMI/SCADA Development Resources
If you’re looking at getting started in developing your HMI or SCADA application, take a look at our getting started guides below.
- Getting Started with Qt Creator on the TS-TPC-8390-4900 or TS-TPC-7990
- Develop a Simple Qt Quick Interface for HMI/SCADA Application
Conclusion
In this getting started guide, we took a quick look at how to get everything connected, how to communicate with the board, and how to setup networking. You should be well on your way in developing your application.
Is there anything else you’d like to see added to this practical getting started guide for the TS-TPC-7990? Be sure to comment below, and we’ll get it added!
One thought on “Practical Guide to Getting Started with the TS-TPC-7990”