Introduction
In this getting started guide, we’re going to look at what it takes to get an example Qt Creator project running on the TS-TPC-8390-4900 or TS-TPC-7990. This will help pave the way for developing a human machine interface (HMI) for supervisory control and data acquisition (SCADA). We’ll start out by talking about the expected workflow and specific versions compatible with our chosen hardware, TS-TPC-8390-4900 or TS-TPC-7990. Next the TS-TPC-8390-4900 and Qt Creator will need to be prepared to work together. Finally, we’ll test our environment by running an example Qt Quick Controls Application. In a follow up guide, titled Develop a Simple Qt Quick Interface for HMI/SCADA Applications, we’ll look into what it takes to gather some system data and control DIO. Home
Why Qt Creator?
We chose to create a guide on Qt Creator mostly based on feedback from customers. This is the most popular request, and on top of that, we get a lot of inquiries about using Qt Quick, so we’ll be creating a Qt Quick Controls Application. Also, we have the cross compile toolchains available and documented steps in the official TS-TPC-8390-4900 manual. Some of the principles in this guide could be applied to other GUI development tools such as GTK and Crank Software, but we’ll very specifically be talking about Qt Creator in this guide.
One Guy’s Workflow
An ideal workflow would be to use a Linux desktop machine with Qt Creator installed. This way, GUI development, debugging, and cross compiling can be done on the same machine. Ubuntu seems to be a very friendly distribution to get going on, and it has plenty of community support around Qt Creator. Which version is up to you, but I’d recommend using the latest with long term support (LTS).
Pro Tip: This really is the desired method. After attempting the Mac OSX and Linux VM workflow method mostly talked about in this guide, I personally would very much prefer a dedicated Linux development box (not VM) to handle all aspects of development. If your host machine has ample RAM resources, then a Linux VM is usable. Otherwise, you may experience a very sluggish system. Also, the Windows/Mac OSX and Linux VM development approach adds unnecessary complexity to your project, both in code and in environment setup.
A real world workflow is probably something more like having a Windows or Mac OSX machine running a Linux virtual machine (VM) installed. Either way, you’ll have a difficult time getting going without Linux, because the cross compilers only work with Linux (without a major fight, anyways). I’ve always enjoyed VirtualBox, seeing how it’s easy, friendly, and just works. There’s also many communities online which prepare Linux VMs for download to make getting started even easier. I’ve downloaded a Ubuntu 14.04 LTS VirtualBox Disk Image (.vdi) and installed VirtualBox Guest Additions, which provides many benefits including shared folders, dynamic screen resolution, clipboard sharing, and many other goodies.
Whichever you choose, Mac OSX with an Ubuntu Linux VM is what this guy will be using. Additionally, I’ll be using a shared folder in order to quickly access my Qt project files from both my Mac desktop (host) and Ubuntu VM (client) in real time. I won’t go into details about installing or configuring a VM in this guide, but you won’t find a shortage of great tutorials and demos available on the web.
Qt Creator will be setup to work with the TS-TPC-8390-4900 in later steps. For now, it’s sufficient to say that when we click the green “Run” button, Qt Creator will automagically be transferring our compiled binary files to the board and executing them via SSH and our application will show up on the screen.
Getting the Versions Right
I’ve found it doesn’t really matter which version of Qt Creator you install, so you may as well get the latest available version you can for your OS. You can download it from Qt’s website. For Ubuntu 14.04, at the time of this writing, the default software repositories have version 3.0.1 available which you can simply install using apt-get install qtcreator . For Windows and Mac OSX, it’s version 4.0.1. Depending on the workflow you’ve chosen, you’ll either need to install one instance of Qt Creator (Linux desktop machine only) or two different instances (Windows or Mac desktop with Linux VM). What really matters is which version of Qt we install. The TS-TPC-8390-4900 supports Qt 5.4.3, so during installation, we’ll want to be sure to install Qt v5.4 when prompted during the install process and then use it in our example projects. You can choose to install other versions, but for our purposes, Qt 5.4 is the only one we’ll be using. Home
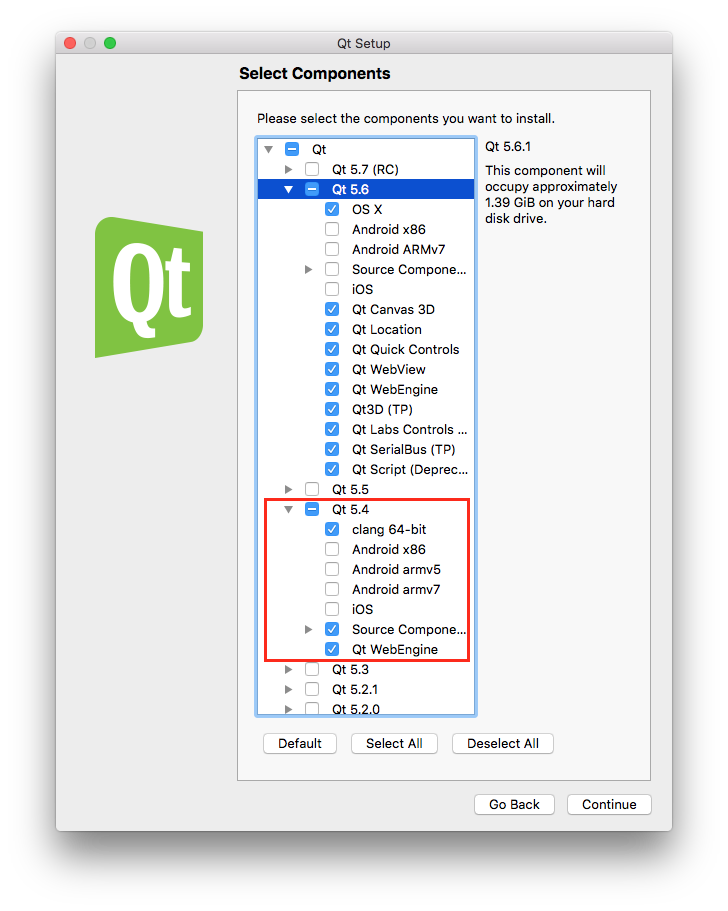
For clarification, I ended up with Qt Creator 4.0.1 on my desktop and Qt Creator 3.5.1 on my virtual machine. I also chose not to install Android and iOS components, since they take quite a bit more storage and I’m not going to be using them. I did choose to install Qt 5.6 at the time, but come to think of it, I didn’t need to.
Pro Tip: The cross compile toolchains require Linux kernel version 2.6.32 or above.
Gotcha!
Ubuntu 14.04 and Qt Creator v3.0.1 don’t play nicely together for some reason. If you try to connect to the TS-TPC-8390-4900 board via Qt Creator, you’ll receive this error message:
Connecting to host... SSH connection failure: SSH Protocol error: Server and client capabilities don't match. Client list was: aes128-cbc,3des-cbc. Server list was aes128-ctr,aes192-ctr,aes256-ctr,aes128-gcm@openssh.com,aes256-gcm@openssh.com,chacha20-poly1305@openssh.com. Device test failed.
The workaround is to upgrade Qt Creator to version v3.5.1 using the command:
sudo add-apt-repository ppa:ubuntu-sdk-team/ppa && sudo apt update && sudo apt dist-upgrade && sudo apt install ubuntu-sdk-ide
Preparing Our TS-TPC-8390-4900
The only preparation our touch panel computer (TPC) needs is to make sure it’s connected to our network and that we can access it via SSH. If you haven’t done this yet, take a look at Practical Guide to Getting Started on the TS-TPC-8390-4900 and come back when you’re successfully able to use SSH.
Preparing Our Linux Machine for Cross Compiling
We’ll need to download the cross compile toolchains provided by Technologic Systems and then prepare Qt Creator in our Linux machine. Downloading the toolchains from Technologic Systems’ FTP repository takes about 25 minutes, depending on your download speeds. Then, we’ll need to configure Qt Creator to use the compilers for the TS-4900 running the NXP i.MX6 ARM CPU. This is covered in the section “Configure Qt Creator IDE” in the official TS-TPC-8390-4900 manual, so please refer to that now. You can stop right before the “Hello World” section where it walks you through how to start an example project.
Diving In
Now it’s time to actually begin developing our projects. We’ll start out by running an example Qt Quick Controls Application that comes with our Qt Creator install. This will be our sanity check to make sure our workflow and board setup is correct. Then, we’ll be ready to move onto bigger and better things, like controlling DIO pins and reading sensors in a follow up tutorial.
Testing Our Setup with an Example
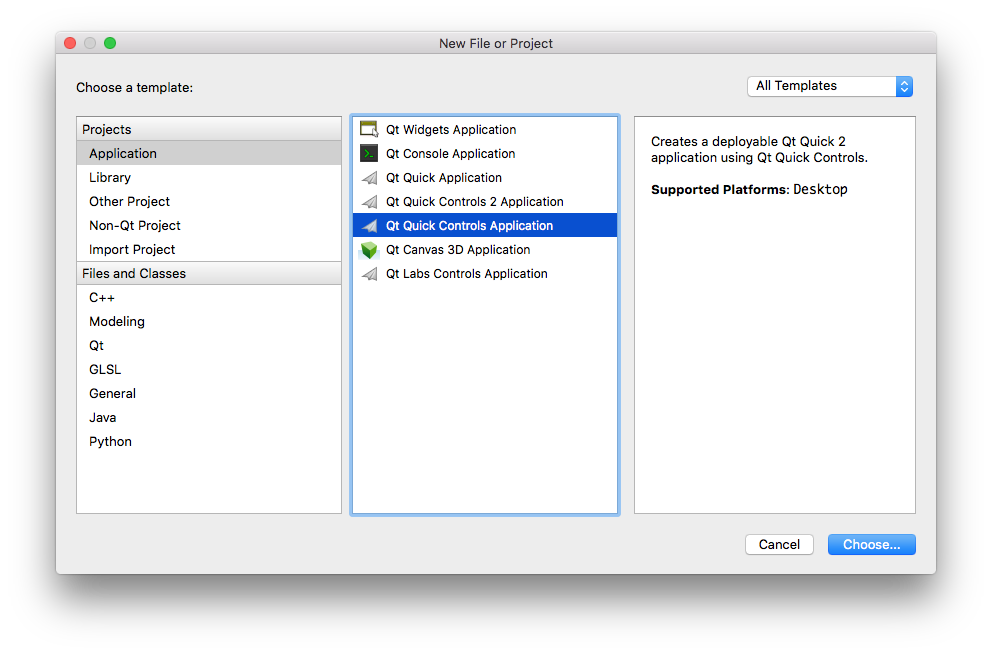
This is our sanity check to make sure our workflow is going to work. Launch Qt Creator on your development machine, and let’s create our first project.
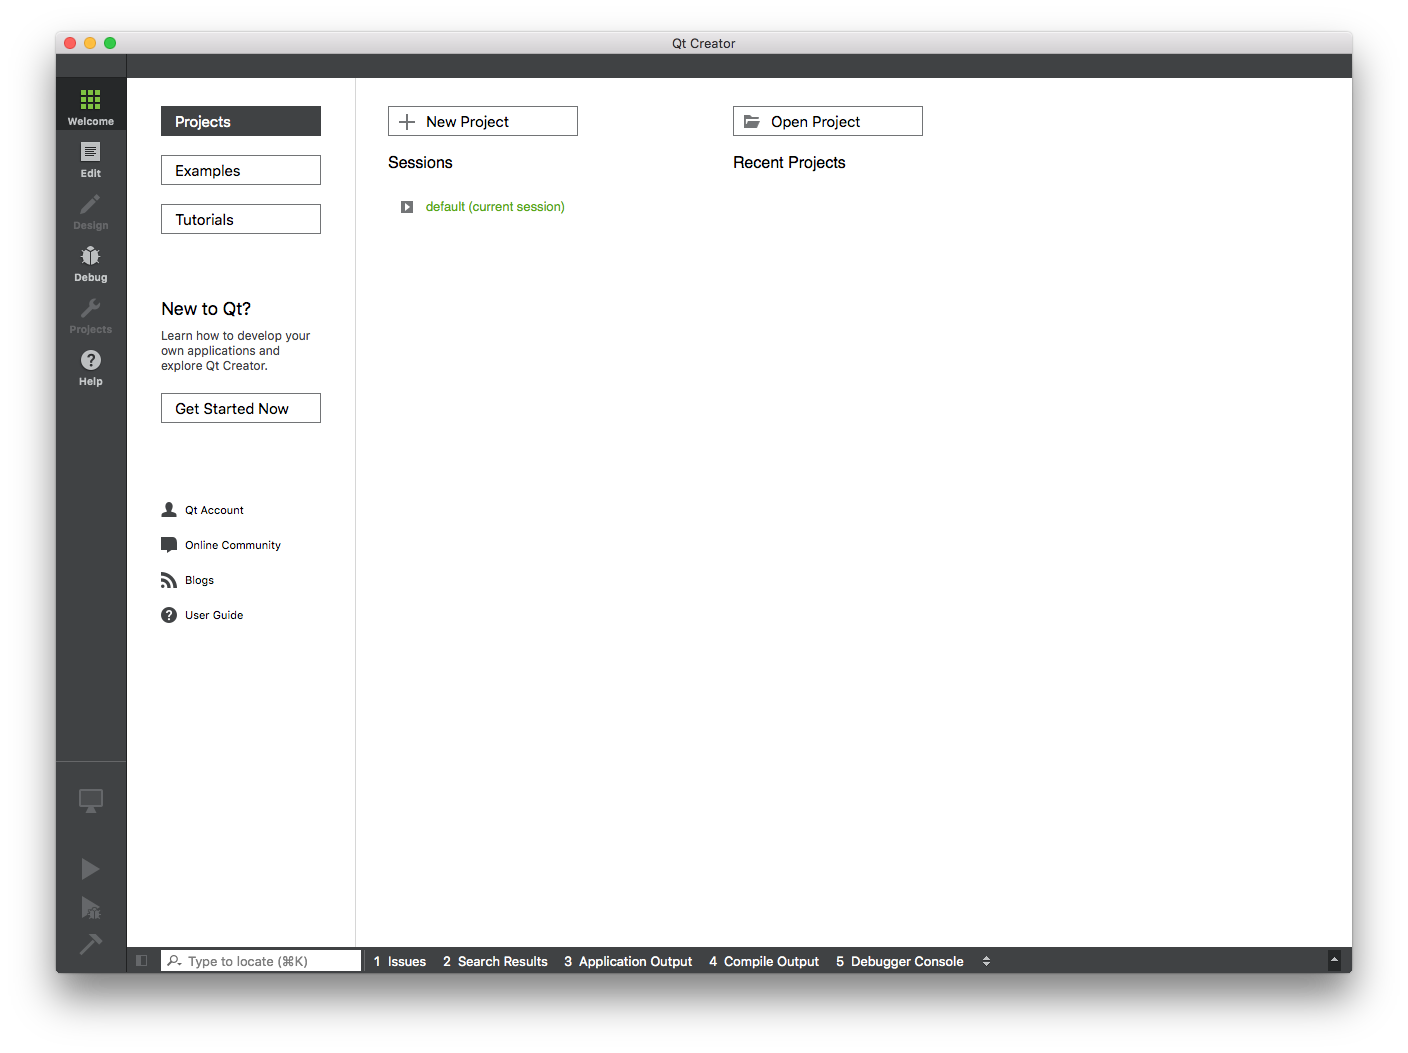
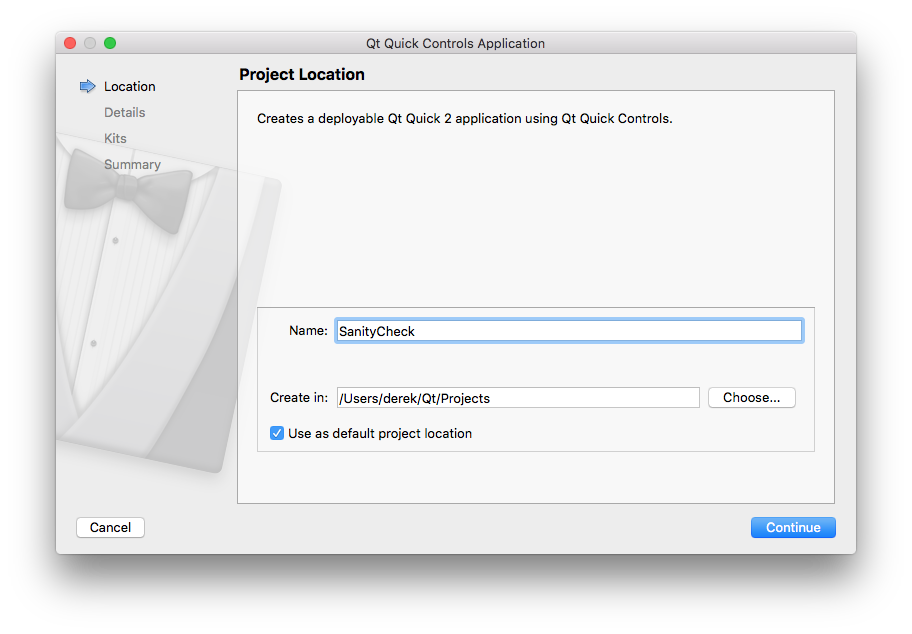
Begin by clicking on “+ New Project”. You’ll be asked to choose a project template and you’ll choose “Qt Quick Controls Application”. Home
Then, you’ll be prompted to save the project somewhere. I like my projects to be in a “Projects” folder, so I created it under the default Qt Creator install directory (/Users/<username>/Qt). Obviously, this will be different if you’re on a Windows machine. Just put it somewhere you won’t forget.
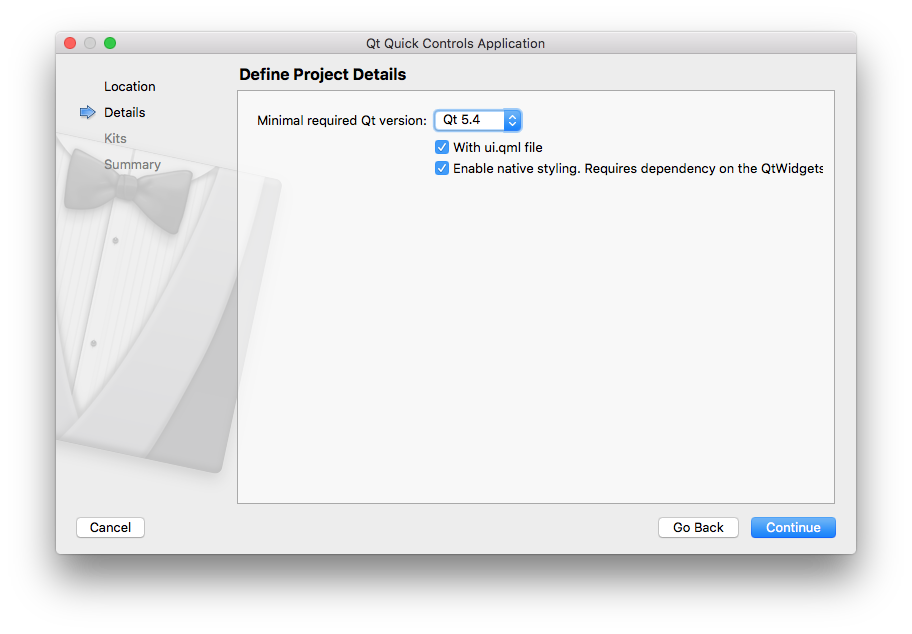
Next is defining the minimum required Qt version. Since our TS-TPC-8380-4900 supports Qt 5.4.3, we’re going to select Qt 5.4.
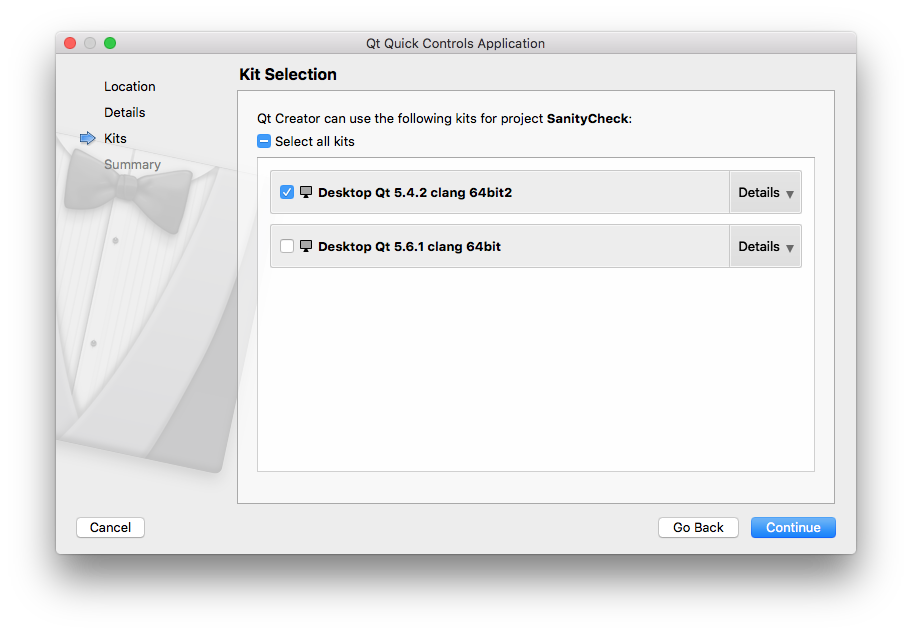
Continuing, we’re going to select the Qt 5.4.2 kit called “Desktop Qt 5.4.2 clang 64bit2” in my case. If you’re running on a single Linux machine for all development, you’ll want to select the desktop kit as well as the TS-4900/TS-IMX6 kit that you installed after following the instructions to “Configure Qt Creator IDE” in the official TS-TPC-8390-4900 manual. This way, you can run your application on your desktop for quick iterations and then run on your TS-4900 for when you’re ready to take it for a test spin. Home
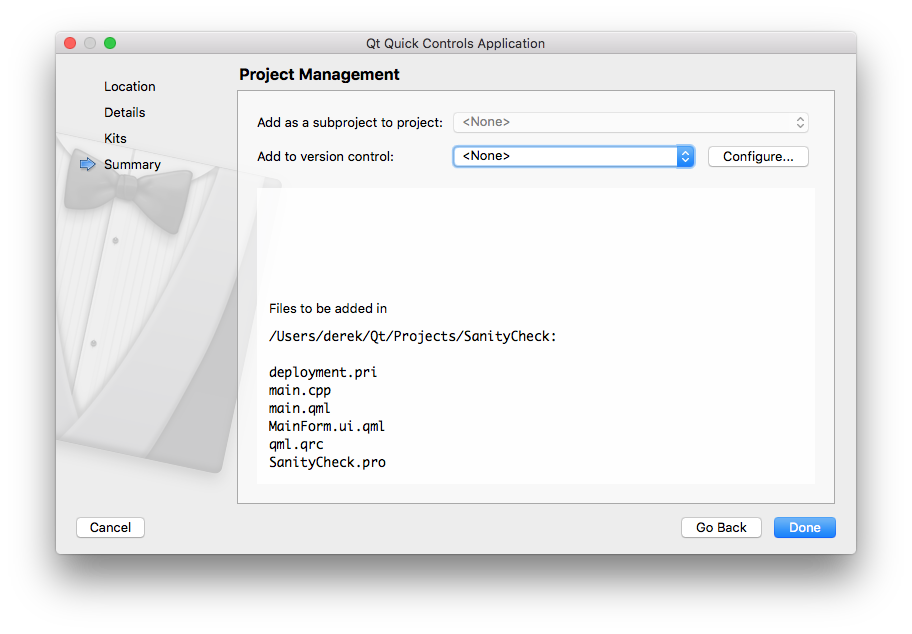
Finally, this is where you’d setup your project to be in version control. Since it’s essentially a “Hello World” application, we’ll ignore this and click “Done”.
Hooray! We’ve finished and now we’re presented with the main Qt Creator IDE with our “SanityCheck” project. Feel free to browse around a bit if you’re excited about code. The main file, main.qml, is written in Qt Quick. Refer to the documentation for more information, but for now we’re just interested in running it.
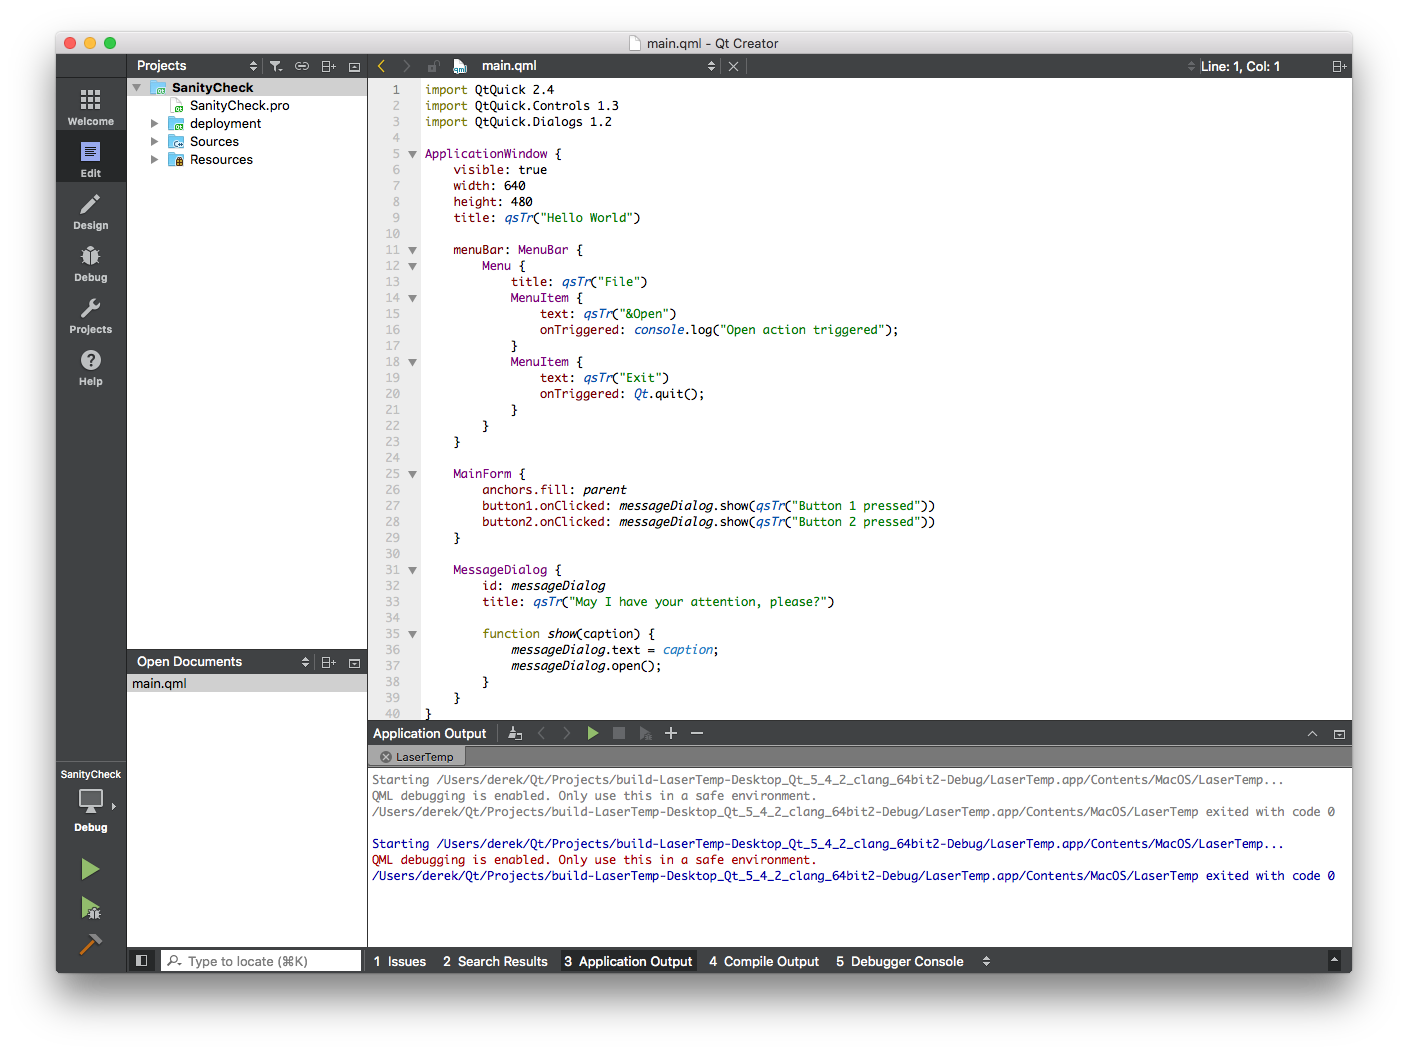
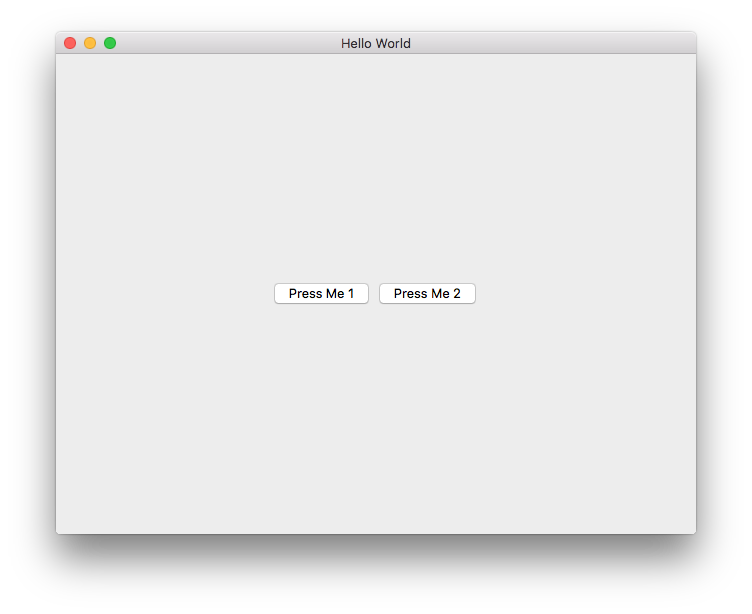
Clicking on the green “Run” arrow on the bottom left hand corner of the screen will compile and run our project in another window. This is what you should be seeing. If it’s not exactly like this, don’t fret because different versions of Qt Creator pack different demos. This one happens to be of two buttons in the center. Clicking on either one will drop down an alert which says “Button x Pressed.” Home
Now, our goal is to copy this project over to our virtual machine and then attempt to run it on our TS-TPC-8390-4900.
Shared Folder for VM
If you’re not going to be using a virtual machine, you can skip this section. Just understand that we’ll be referring to this shared folder throughout the guide, but it’s really just the project folder.
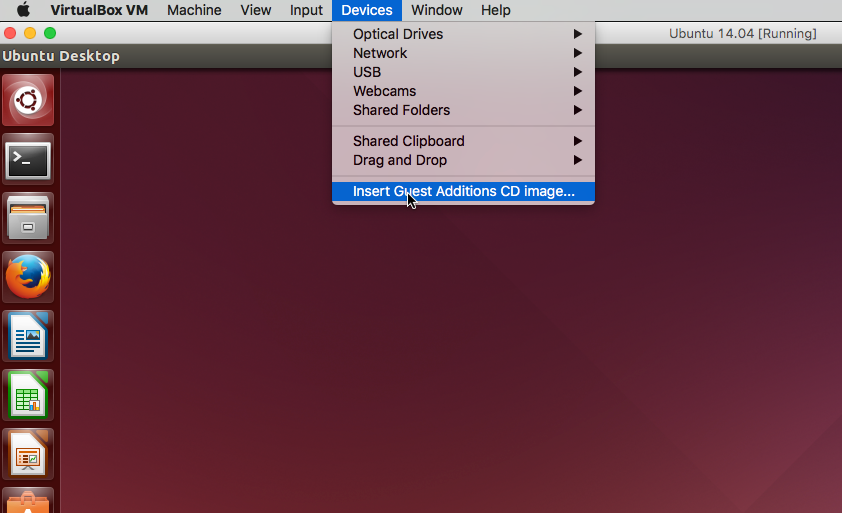
We can make our lives much easier if we just setup a shared folder between our desktop host and virtual machine client. This way, changes made to our shared project directory are made in real time in our virtual machine. VirtualBox Guest Additions makes this easy, but there is a single manual step you’ll need to take on the Ubuntu VM that we’ll get to in a moment. First, make sure VirtualBox Guest Additions is installed by clicking “Devices -> Insert Guest Additions CD image,” which will mount and launch the installer.
Once the additions have been installed, you’ll need to manually add your user to the group vboxsf using the following command:
sudo adduser `whoami` vboxsf
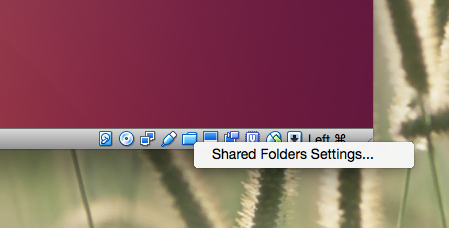
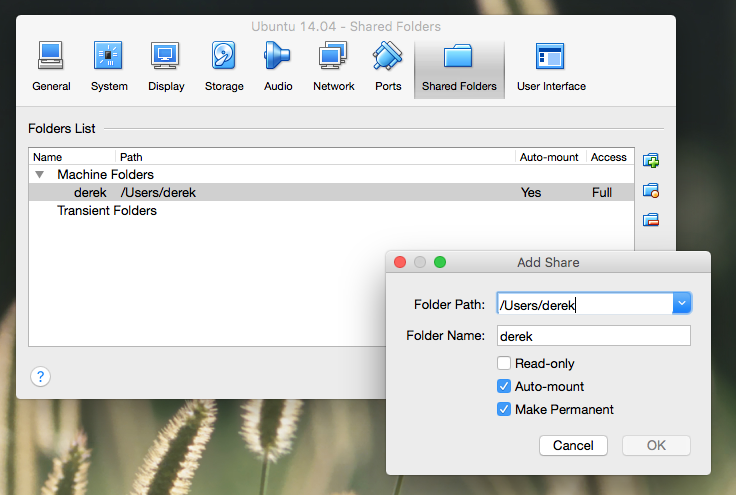
The next step is to add the shared folder, so click on the little folder icon in the bottom right hand corner.
Then, add the folder by clicking on the icon with the plus sign over the folder. We want this shared folder to automatically mount when we boot up our VM, and we want it to be permanent so we don’t need to bother with adding it again in the future. You can see I’ve chosen to share my whole user directory, which includes my Qt Projects directory.
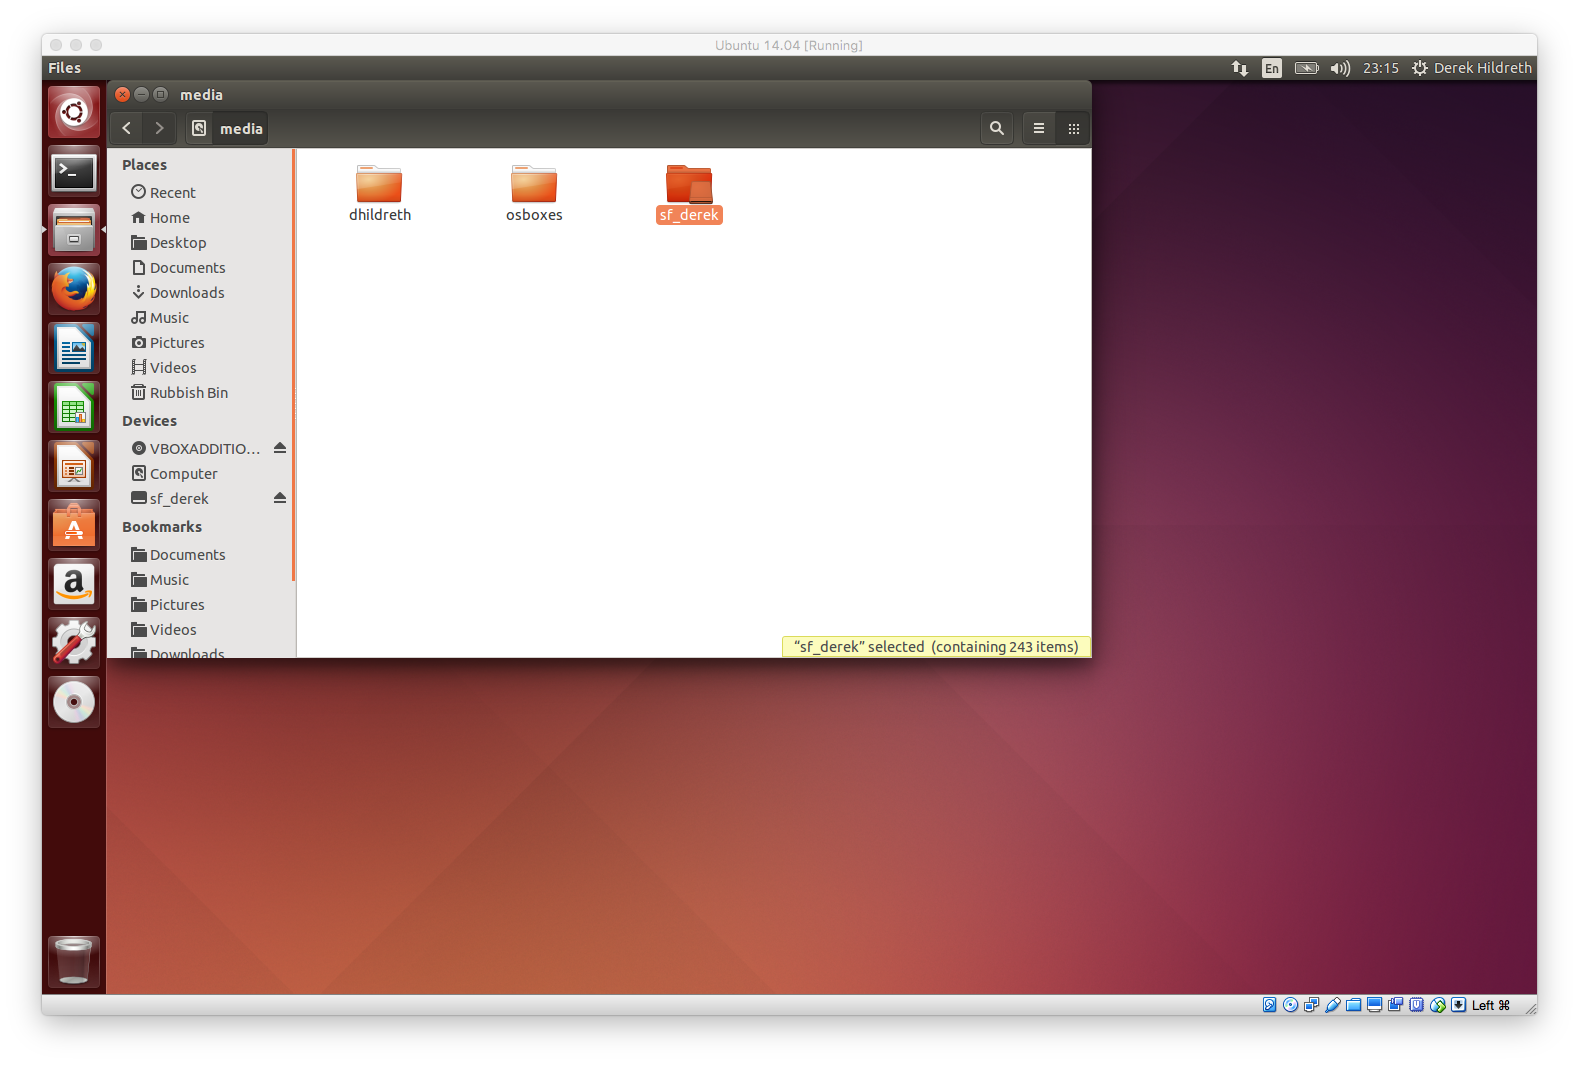
We’ll need to restart at this point, but once your VM is back you’ll see your shared folder automatically mounted in /media/ with the prefix “sf_”. Since I shared /Users/derek/, my mounted folder is called “sf_derek”. You can see this in the screenshot below.
Exciting! Now, we can launch Qt Creator and “Open Project”. Point it to our shared folder, and we’ll be sittin’ pretty and ridin’ smooth.
Pro Tip: Ubuntu 14.04 with its unity desktop environment is graphics intensive. It makes for some great eye candy, but it becomes unusably slugging in a virtual machine. One trick to dramatically improve responsiveness is to enable 3D acceleration from within the VirtualBox display settings for the Ubuntu VM. Also, increasing the video memory and system RAM seem to help quite a bit as well. It depends on the host system, but I had mine at 128 MB video memory and 2 GB of system memory, which made it tolerable to work with For some reason enabling 3D acceleration caused my VM to lockup when opening Qt Creator, so I ended up disabling it. Home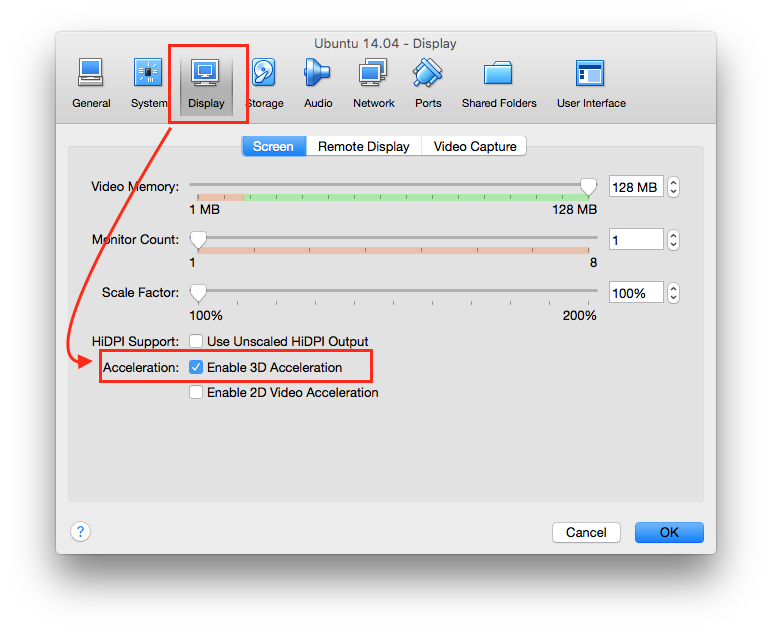
Opening the Example Project in Our VM
We’re ready to open our project from Qt Creator installed on our VM. There are a couple of important steps we need to take, so pay close attention. When you click that green run button, a few things happen. Mainly, qmake is executed to create a Makefile based on environment settings and the code in the .pro project file, and then ‘make’ is executed. When make is executed, we need to have our environment variables setup properly so it knows which compiler we want it to use. For this, we need to first source our environment variables before we launch qt creator. The easiest way to do this is to open the terminal and execute the commands:
source /opt/poky/1.8/environment-setup-cortexa9hf-vfp-neon-poky-linux-gnueabi
qtcreator
Pro Tip: To make this more convenient without the need to open the terminal, you could create a custom launcher which executes these commands when you click on it. Then, you could create a shortcut to that launcher on your desktop, taskbar, etc.
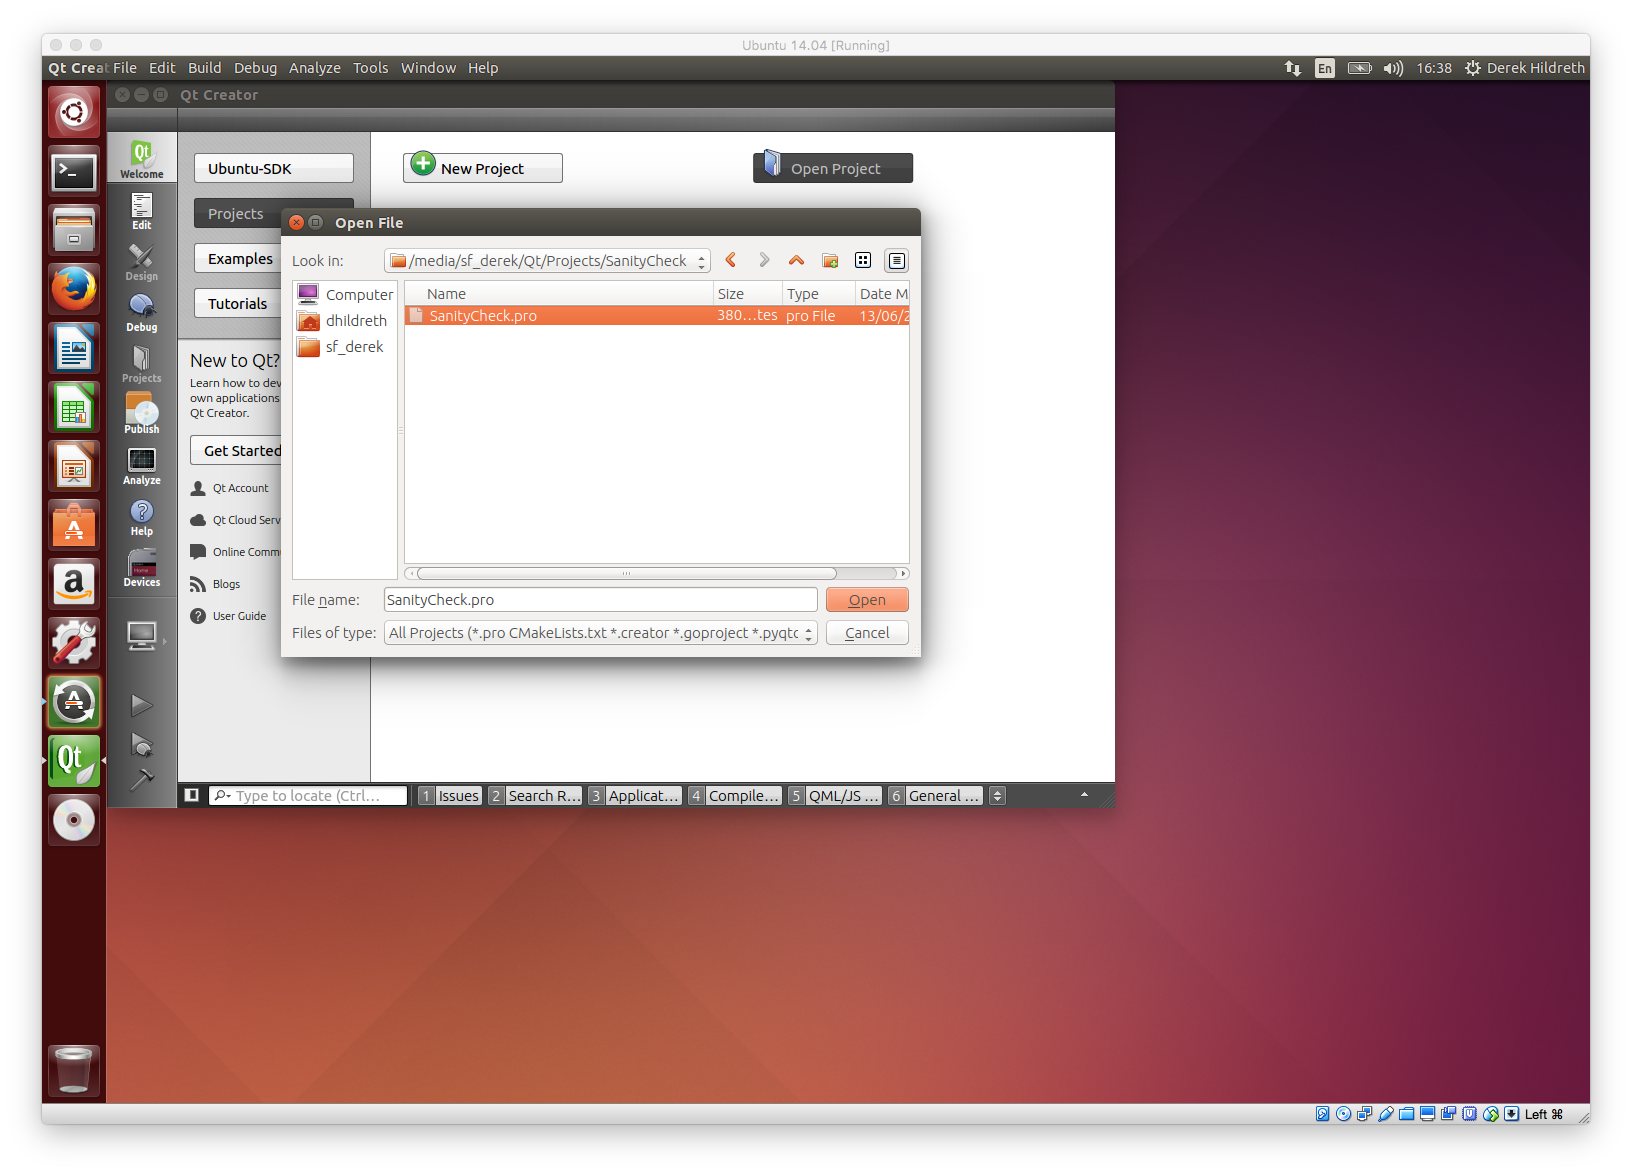
Once qt_creator is opened, we’re going to click on the “Open Project” button in the welcome screen and point it to our shared folder where our project resides, in my case, that’s /media/sf_derek/Qt/Projects/SanityCheck/.
We’ll be prompted to configure our project on this development machine. We’ll want to select the ‘TS-IMX6’ kit that we created in previous steps. You may get a dialog alert asking about a project user file. Go ahead and accept this.

Project File Setup
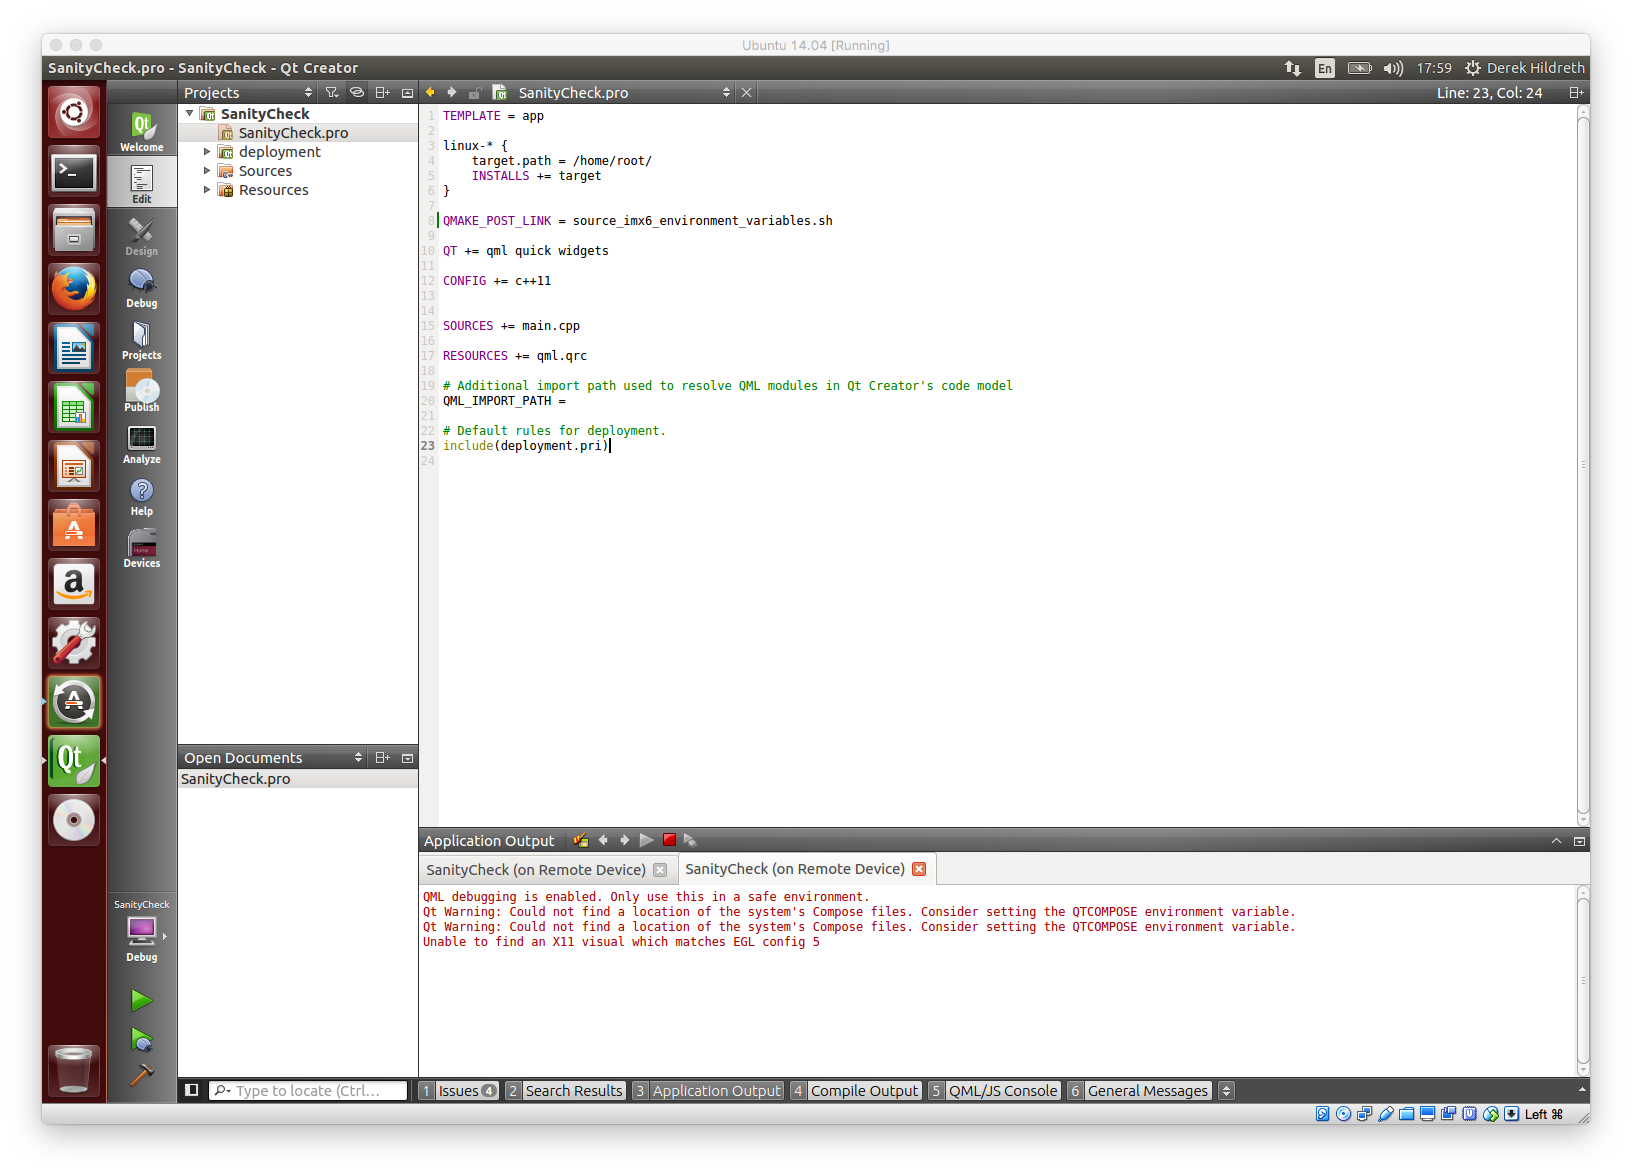
Now that we have the project opened, we have some additional setup to the project file (.pro) we need to go through before we can run our project on the TS-TPC-8390-4900. This file is a multiplatform project file which qmake turns into platform-specific makefiles. If you’re curious about advanced qmake usage, take a look at the official qmake Advanced Usage. As mentioned in the TS-TPC-8390-4900 manual, we’re going to specify a directory on our target machine by adding the following lines after TEMPLATE = app line:
linux-* {
    target.path = /home/root/
    INSTALLS += target
}
Running the Example Project
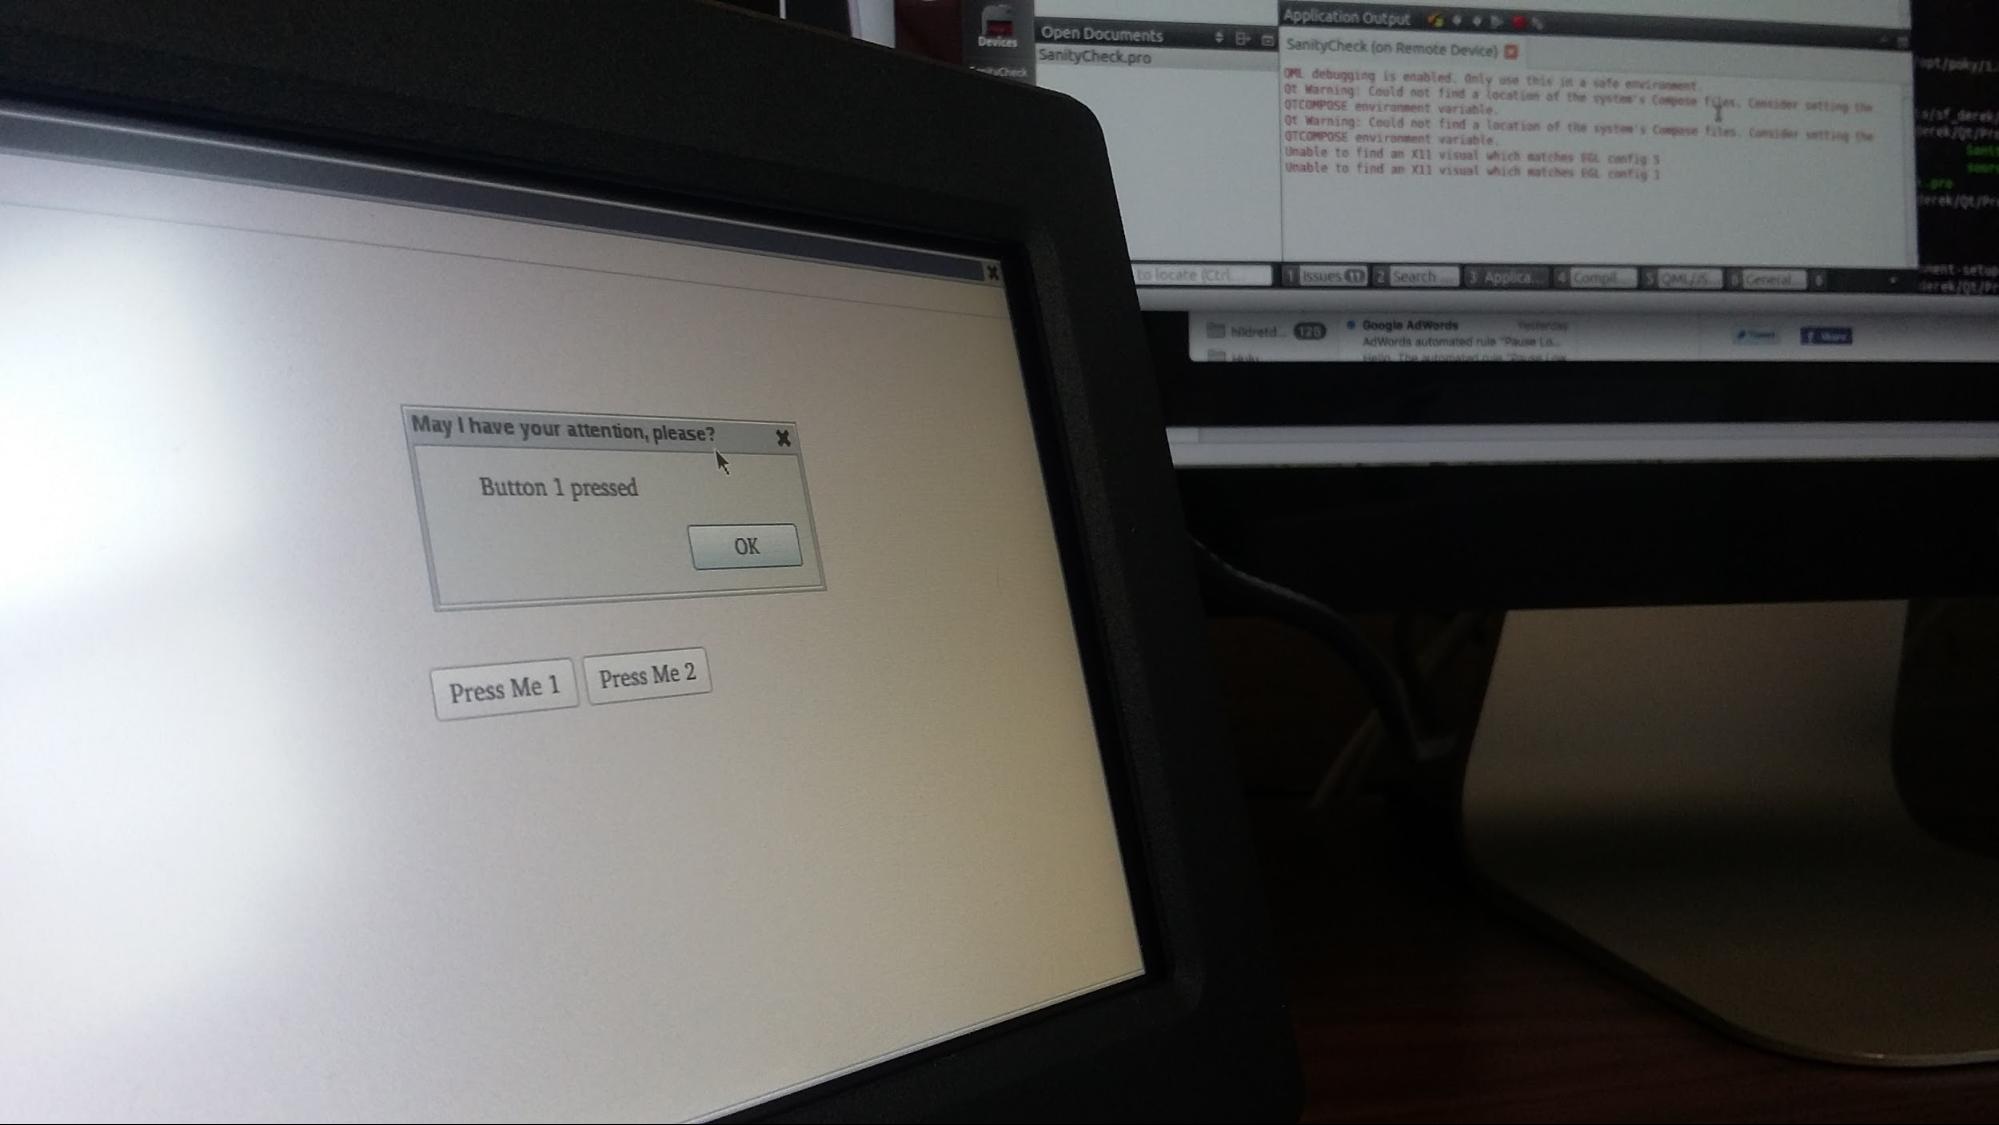
All of our hard work has led us to this moment of truth. A pre-drumroll is optional, but go ahead and click on the green run arrow. Save all files, and watch as everything compiles. Shortly, you’ll see something similar to the screenshot below, with some Qt warnings we can safely ignore.
And, as if by magic, we’ll see our application show up on the TS-TPC-8390-4900 screen:
Congratulations! At this point, you’ve earned a break, or at least a trip to the snack closet or caffeine depot because you’re at the point where you’re about to convert caffeine into code.
Conclusion
There was a lot to learn in this guide, starting with defining a workflow. We were able to see one workflow in action using a Mac OSX desktop computer which would be used to quickly iterate GUI design and a Linux VM to compile and transfer to the TS-TPC-8380-4900. Then, we learned about which versions of software we should use and a pitfall to avoid. We prepared our TS-TPC-8380-4900 product for SSH and then prepared our Linux machine for cross compiling. Finally, we dove into our example program and setup our project file appropriately so that we could compile and run on our TPC.
In the follow up article, Develop a Simple Qt Quick Interface for HMI/SCADA Applications, we’ll take a deeper dive into actually using this knowledge and develop an application that will control DIO and read a sensor to simulate a SCADA-like application.
Is there anything you’d like to see or would rather see? If so, please post in the comments below. Home
Appendix
Sources
- Qt Creator Upgrade
- TS-TPC-8390-4900 Manual
2 thoughts on “Getting Started with Qt Creator on the TS-TPC-8390-4900 or TS-TPC-7990”