Simple Embedded Monitor and Control Dashboard
In this guide, we’re going to learn how to create a very simple PHP web application that will read and display real-time CPU temperature data and control an LED using javascript AJAX calls from a web browser anywhere in the world. In the real world, you’d want to monitor something more interesting, like equipment or sensors connected to ADC, CAN, RS-485, RS-232 ports and other GPIO pins. Or how about monitoring voltage input? You’d also want to be able to control your connected equipment using digital output signals. This guide provides an introduction to the concepts that will help get you started in the right direction. All source code is available in the tarballhmi-example-web-app.tar. Home
Please note that this guide can be applied generally to most single board computers or System on Modules loaded with web services like apache or nginx, but we’re emphasising the use of Technologic Systems‘ line of embedded products powered by Linux, specifically the TS-7250-V2.
Prerequisites
Before we begin on our web application project, you should be able to: 1.) access the shell terminal on your board via serial console, telnet, or SSH (preferred), 2.) connect to a local network using a static IP address and ping debian.org, and 3.) bootup to the full Debian environment by default. Therefore, it’s recommended that you take a look at our “Practical Guide to Getting Started with the TS-7250-V2”, which walks you through all of these items.
Getting Started
Now that we have setup our TS-7250-V2 to boot directly to Debian with a static IP address, we’re ready to start diving into the fun bits of building our HMI web application. All of the development will be done on the board itself, so open a serial console and/or SSH shell, and we’ll get started!
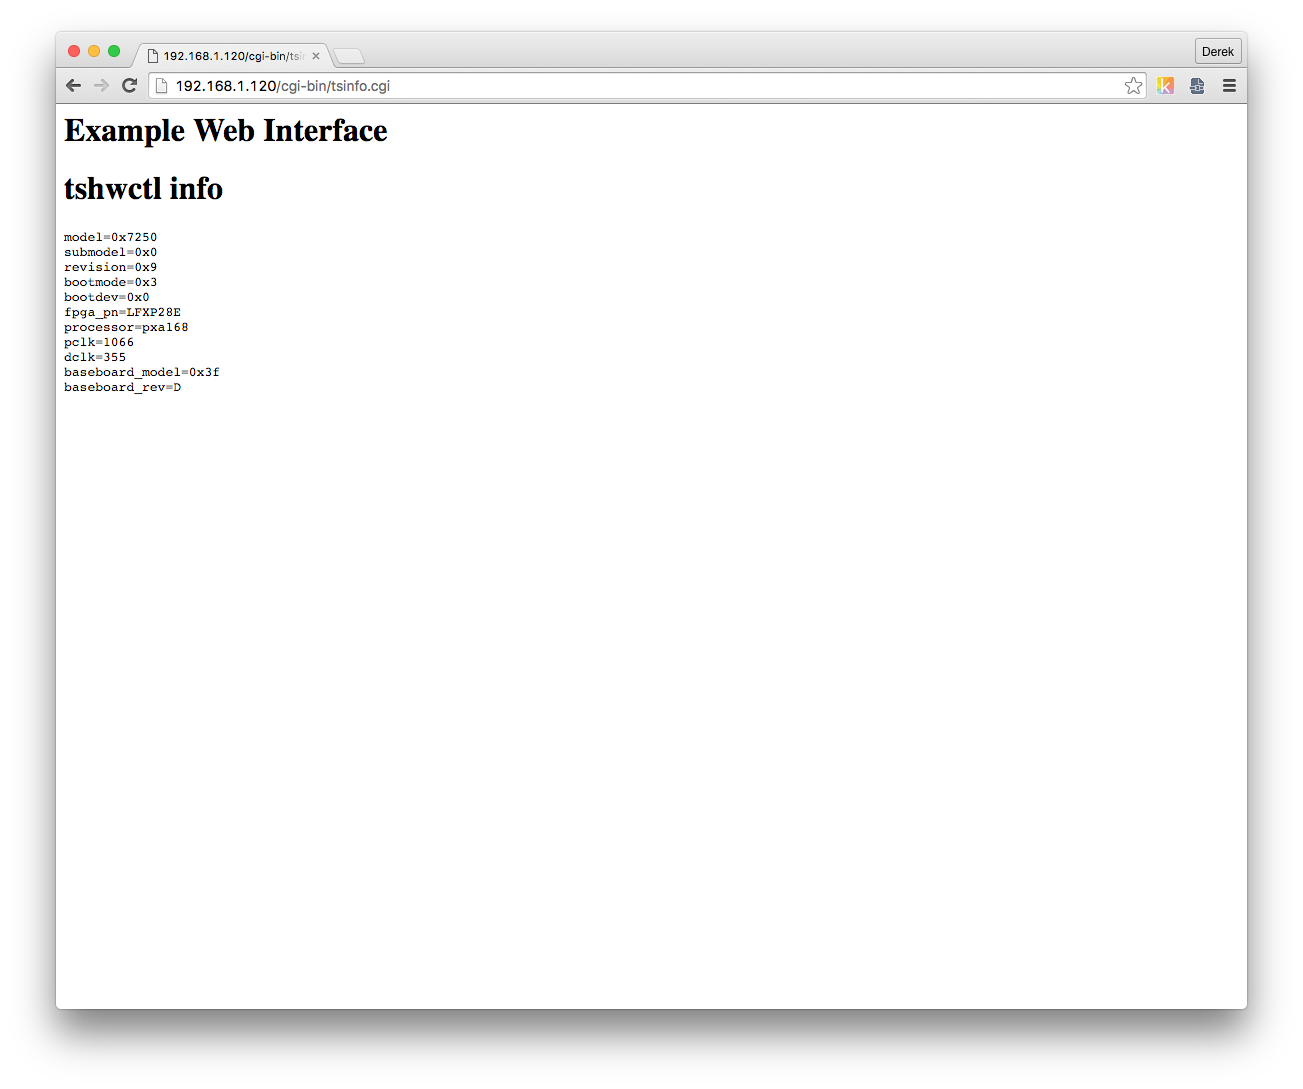
The first thing we’ll want to do is learn how to setup our board as a web server. Luckily, Technologic Systems provides some preloaded software solutions which makes such a task easy to get started with. Not only do we already have a web server running with an example web page, we also have utilities like tshwctl, which can poll CPU temperatures as well as much, much more. Thanks to this, we can immediately jump in by taking a look at the pre-loaded web application. Open your browser and type in your board’s IP address. You should see something similar to the following screenshot: Home
Great! This serves nicely as our “Hello World” application. Now we need to become familiar with our environment and how files are organized to generate such a page.
If you’ve ever setup a website powered by Apache, you’ll know the standard location for serving web page files is in /var/www/. The file index.html or even index.php are loaded first. So, we should see an index file in /var/www/. Let’s see what we have:
root@ts7250-496b63:~# ls /var/www/
 index.html
Sure enough, there is our index file responsible for the web page we see above. Let’s take a further look at it:
root@ts7250-496b63:~# cat /var/www/index.html
<meta http-equiv="refresh" content="0; url=cgi-bin/tsinfo.cgi">
A one-liner! Essentially, it instructs the web browser to refresh and redirect to cgi-bin/tsinfo.cgi, which is what’s responsible for the web page we seen above. In Debian-based distributions, the cgi-bin scripts live in /usr/lib/cgi/bin. Files in this /usr/lib/cgi-bin/ directory are treated as programs instead of HTML pages or images. Meaning, we can have the server run system scripts, commands, and programs and display the output of those commands to the web browser. If we take a look at tsinfo.cgi, we’ll notice it’s not a HTML page, but rather a script echoing HTML to the browser: Home
root@ts7250-496b63:~# cat /usr/lib/cgi-bin/tsinfo.cgi
#!/bin/bash

echo "Content-type: text/html"
echo ""
echo "<html>"
echo "<body>"
echo "<h1>Example Web Interface</h1>"

echo "<h1>tshwctl info</h1>"
echo "<pre>$(tshwctl -i)</pre>"
echo "</body>"
echo "</html>"
Pro Tip: There are special considerations to file permissions when running external applications from a web interface using CGI. Many applications need permissions to memory and hardware GPIO. A common way to setup permissions properly is to use the setuid bit on your files to allow them to run as root. For example: chmod 4755 /usr/lib/cgi-bin/tsinfo.cgi
We’ve now reached a decision point. Do we continue with the included CGI example, or try something else like PHP? Use of CGI is perfectly suitable for executing some commands and displaying the results in the browser. It would be perfectly reasonable to decide to build upon the “Hello World” example CGI scripts above. However, CGI is an aging technology which might get ugly when forming more complex HTML. On the other hand, PHP is a scripting language which can also execute system commands with the benefits of being easy to understand, powerful, and flexible. Many PHP frameworks exist to help bootstrap development of complex web applications. We’re not necessarily building a complex web application here, but we might want to plan for growth. For this tutorial, let’s decide to use PHP.
Requirements Planning
We know we want to build a web application to display CPU temperature as well as give us a way to turn on or off the red LED by pressing buttons. We could do all of this in a single file, but let’s think about the CPU temperature for a moment. We don’t necessarily want to refresh the page to get the current temperature every time. We’d rather have it update itself periodically, every few seconds or so. For this, we’ll want to have a supporting file that we can call periodically from within our main index file which will update the temperature. For controlling the red LED, we’ll probably also want some sort of a helper file to turn on and off the LED.
So, we’ll need three files: 1.) an index file, which we will name index.php, 2.) a file to get CPU temperatures, which we will name get-cpu-temp.php, and 3.) a file to set the red LED and report status, which we will name set-red-led.php.
In order to periodically poll our get-cpu-temp.php script, we’ll need to use Javascript so that we can asynchronously call get-cpu-temp.php and display resulting data to the webpage. This is known as an AJAX request, which we’ll talk about later. In order to get the CPU temperature and toggle the red LED, we’ll need to be able to execute a system command, specifically, tshwctl. For this, we’ll use PHP’s built-in exec() function.
This should take care of all the requirements for building our web application. Now, we can get started with creating our PHP index script.
Installing PHP
We need to install some packages to get PHP to work on our system (see also “Installing New Software” section of the TS-7250-V2 manual). To do this, we first need to prepare to run apt-get for the first time. We need to install debian-archive-keyring so we have all the public keys necessary for running apt-get update. We run apt-get update in order to update the list of available packages and their versions.
root@ts7250-496b63:/var/www# apt-get install debian-archive-keyring
root@ts7250-496b63:/var/www# apt-get update
Pro Tip: If apt-get update still doesn’t work, double check that your system is setup with the correct date by running the date command. If this is set properly, you could also try running dpkg-reconfigure openssh-server to refresh SSH keys.
Now, with these commands successfully executed, we can install the necessary packages to get PHP working. Execute the following command, and when prompted, type “Y” as in,”Yes, continue installing”.
root@ts7250-496b63:/var/www# apt-get install php5
We’re now ready to create our first PHP file and browse to it from the web browser. Home
Index File or ‘The Homepage’
For this, we’re going to create and run our main index file, which will serve as a homepage. So, the first command we run will be to move the existing index page to a backup file, and then we’ll create the index.php file which will dump PHP information to the browser. Since we’re going to be working within the /var/www directory, we may as well cd to it as well.
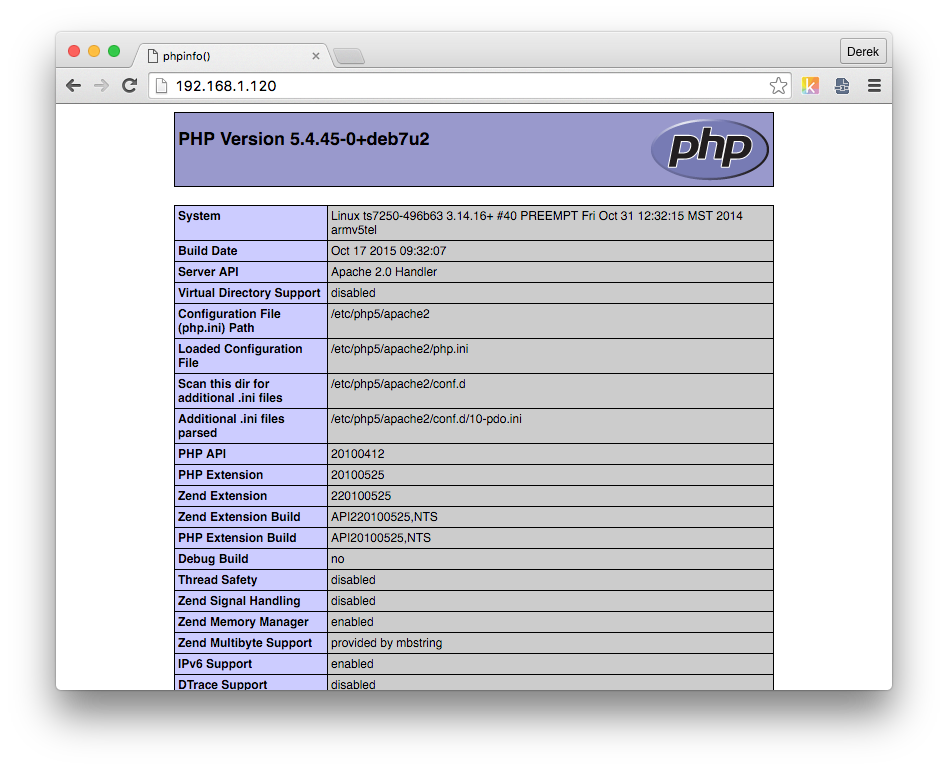
root@ts7250-496b63:~# cd /var/www/
root@ts7250-496b63:/var/www# mv index.html ts-index.html.bak
root@ts7250-496b63:/var/www# echo "<?php phpinfo();" > index.php
Then, open a browser and point it to the URL http://192.168.1.120 (or the IP address you setup in “Practical Guide to Getting Started with the TS-7250-V2”). You should see something similar to what’s in the screenshot below.
Great! We’re successfully running our first PHP script. Now, we can really sink our teeth into our example project and develop our index page.
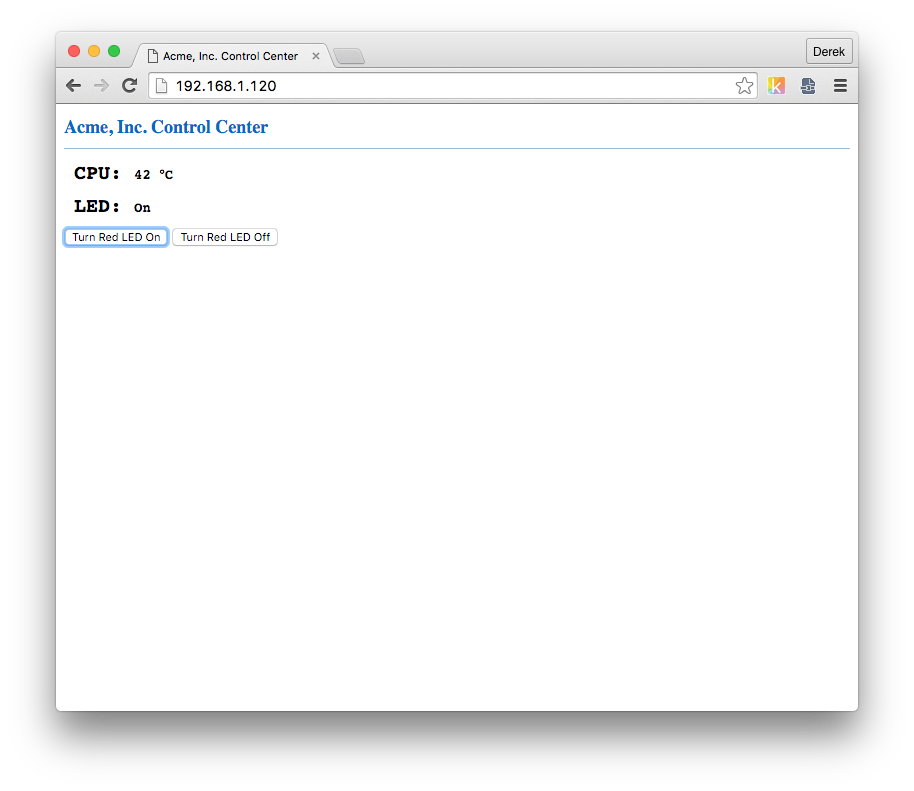
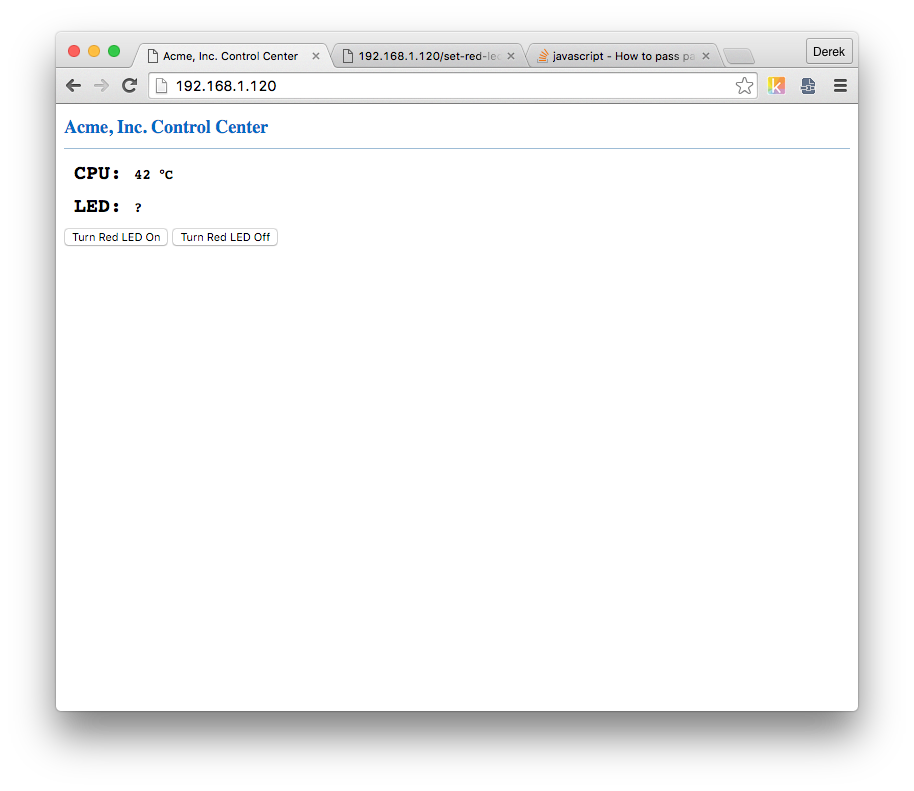
For brevity, I’ve already generated a working PHP script that we will start with that will generate a page that looks like this:

Simply copy the block of HTML code below and paste directly into your index.php file, or you can save it on your local computer and transfer it via SCP. Whichever you prefer. Just be sure that you’re working on a clean index.php file first (delete any text previously added).
<!DOCTYPE html>
<html lang="en">
  <head>
    <meta charset="utf-8">
    <title>Acme, Inc. Control Center</title>
    <style>
      h1.header {
        font-size: 18px;
        color: #006CC7;
        border-bottom: 1px solid #9DBCD6;
        padding-bottom: 10px;
      }
      .cpu-temp p,
      .led p {
        margin: 10px 0px 10px 10px;
        font-size: 20px;
        font-family: monospace;
        font-weight: bold;
      }
      .cpu-temp span#temp,
      .led span#status {
        font-size: 14px;
      }
      .error {
        color: red;
    font-weight: bold;
      }
    </style>
  </head>
<body>
  <h1 class="header">Acme, Inc. Control Center</h1>
  <div class="cpu-temp">
    <p>
      CPU: <span id="temp">?</span>
    </p>
  </div>
  <div class="led">
    <p>
      LED: <span id="status">?</span>
    </p>
    <input type="button" value="Turn Red LED On" id="red_led_on"/>
    <input type="button" value="Turn Red LED Off" id="red_led_off"/>
  </div>

  <script src="https://ajax.googleapis.com/ajax/libs/jquery/1.12.0/jquery.min.js"></script>
  <script>
    /******
     * TODO:  Need to call helper files to populate CPU and LED status.
     *****/
  </script>

</body>
</html>
You can see it’s really just a PHP file with HTML formatting. Technically, we could rename the file as index.html since there isn’t any PHP code to be seen, but we won’t for the sake of consistency and also further development (ie. you could build upon it as a PHP template to include header.php and footer.php files). We have a couple TODO spots to work on in the following sections, but you can see we’re well on our way. Home
Helper File to Get CPU Temperatures
Next, we’ll work on our helper file, get-cpu-temp.php, to poll the CPU temperature using tshwctl --cputemp, parse the output, and echo the temperature in degrees celsius. If something goes wrong, we want to gracefully handle it, so we’ll use a try catch block. So, create the file and copy/paste the following code:
<?php
// Filename: get-cpu-temp.php
// We'll run tshwctl --cputemp, which returns a string value like:
// "cputemp_millicelsius=40000".
try {
  $ret = exec("tshwctl --cputemp");
  $millicelsius = (int)substr($ret, strpos($ret, '=') + 1);
  $temperature = (int)$millicelsius / 1000;

  echo $temperature;
}
catch (Exception $e) {
  header($_SERVER['SERVER_PROTOCOL'] . ' 500 Internal Server Error', true, 500);
}
Pro Tip: In situations like this, where HTML is not mixed in with the PHP, you can omit the final “?>” at the end of the file. In fact, it’s encouraged to do so. See the PHP manual for more information.
If all went well, you should be able to visit http://192.168.1.120/get-cpu-temp.php in your browser and see the current CPU temperature.
Helper File to Set Red LED
For our final file, set-red-led.php, we’ll want to be able to turn on or off the LED by visiting the url http://192.168.1.120/set-red-led.php. For this, we’re going to use URL parameters to get user input. For example, to turn on the red LED, you’ll visit set-red-led.php?led=on. To turn it off, you’ll visit set-red-led.php?led=off. In PHP, we’re going to look at the built-in $_GET variable to get the value of ‘led’. We’ll want to execute exec() and then echo the LED status back to the homepage’s AJAX call. Here’s the code for this:
<?php
// Filename: set-red-led.php
// We'll run tshwctl --redledon or tshwctl --redledon, depending on
// URL parameters
$led = isset($_GET['led']) ? $_GET['led'] : null;

if (isset($led)) {

  if ($led === "on") {
    exec("tshwctl --redledon");
    $led_status = "On";
  }

  else if ($led === "off") {
    exec("tshwctl --redledoff");
    $led_status = "Off";
  }

  else
    $led_status = "Error";

  echo $led_status;
}
else
  echo "Error";
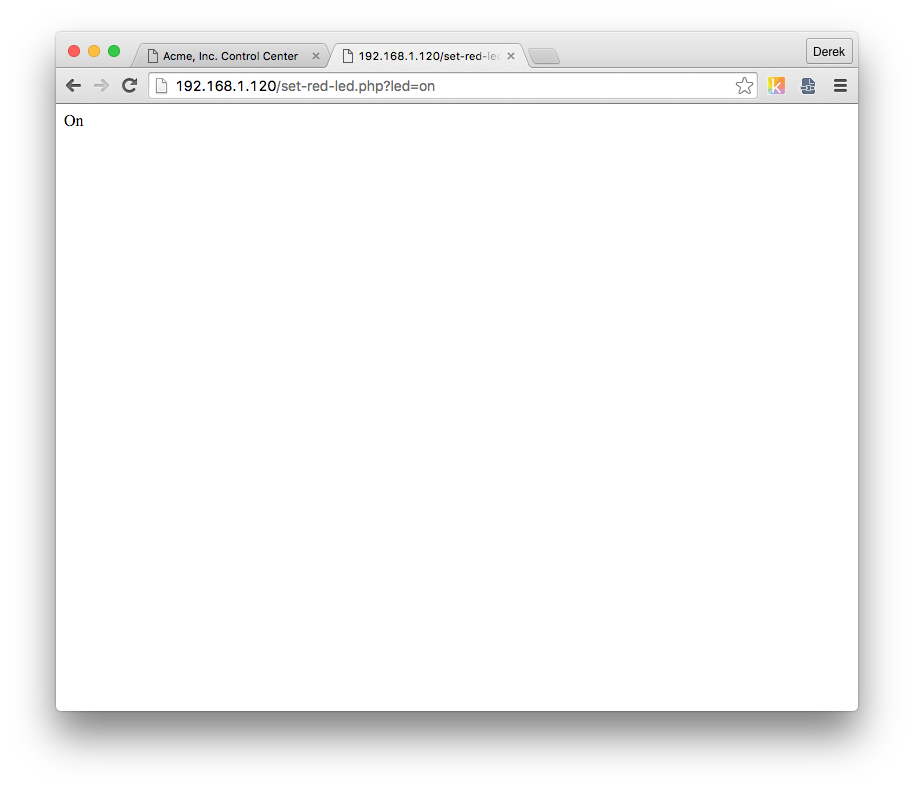
If we visit this page in our browser, we should physically see on our TS-7250-V2 that the red LED is turned on, and we’ll also see a status message on the webpage.
Putting it All Together
Now that we have all the files we need, let’s get them working together using javascript. We’ll start with the CPU temperatures and then move onto the red LEDs.
Displaying CPU Temperature
In order to display the CPU temperature on our home page, we’ll need to call get-cpu-temp.php and then display that output in the page. For this, we’re going to use AJAX. You can read up on AJAX over at W3 Schools “AJAX Introduction” page. Suffice it to say, we’re going to call get-cpu-temp.php, grab the value, and update the page (aka Document Object Model (DOM)) to reflect current temperature. We’ll also setup a timer to fire off this javascript function periodically. We’ll take advantage of jQuery here as well to make things easier on ourselves. So, within our unfinished<script> section near the bottom of index.php, we’ll add the following:
    function get_cpu_temp() {
      $.ajax({
        url: 'get-cpu-temp.php',
        success: function(data) {
          $('#temp').removeClass("error");
          $('#temp').html(data + " °C");
        },
        error: function() {
          $('#temp').addClass("error");
          $('#temp').html("!");
        },
        complete: function() {
          setTimeout(get_cpu_temp, 3000);
        }
      });
    }

    $(document).ready(function() {
      // Run for the first time; all subsequent calls will take care of themselves
      get_cpu_temp();
    });
Basically, what we’re saying is every three seconds call get-cpu-temp.php and, if successful, insert the return data into our temperature HTML element. If there is an error, then display a red exclamation mark to indicate something went wrong. Home
As soon as we save our file with the new javascript and reload our web page, we’ll see the CPU temperature is updated and continues to update every 3 seconds with live data.
Controlling and Displaying LED Status
There are a couple of things we want to accomplish here: one is controlling the red LED and the other is to see the status on the webpage. Initially, we won’t know what the status will be, so we’ll use a question mark until the user turns it on or off. When a user does click on one of the buttons, we want to make a call to our set_red_led.php file using an AJAX call similar what we used in our CPU temperature AJAX calls. Then, when AJAX has completed successfully, we’ll update our page with the status. Here’s the code to accomplish this. Add it to our <script> section under the javascript for the CPU temperature and save.
    function set_red_led(led) {
      $.ajax({
        url: 'set-red-led.php',
        data: { "led": led },
        success: function(data) {
          $('#status').html(data);
        }
      });
    }

    $('input').on('click', function(e) {
      var id = $(this).attr('id');
      if (id == "red_led_on") {
        set_red_led("on");
      }
      else if (id == "red_led_off") {
        set_red_led("off");
      }
    });
Refresh the page and click on either of the buttons. You should be able to physically see the red LED turn on or off, as well as the status being displayed in text on the web page like the following screenshot:
Conclusion and Additional Thoughts
Congratulations on making your first HMI web application! Thanks to the attention the Technologic Systems’ engineers gave to the pre-loaded software, we were able to quickly use the TS-7250-V2 to develop a simple web app that allows a user to easily monitor and control hardware. This is just the beginning of what you can do with this powerful platform. Some additional thoughts that come to mind:
- Introduce dynamic graphics and charts to display critical system stats. Google Charts or Highcharts are great places to start.
- Quickly make the dashboard responsive and friendly by using front end frameworks like Twitter Bootstrap or Foundation.
- For complex applications, consider using a “batteries included” PHP framework, like Laravel, Cake PHP, or Codeignitor, where things like authentication, email queuing, and database operations, and job scheduling are already implemented for you.
- Add file handling forms to both upload data files and download reports.
- Send automated email messages when values go outside a certain threshold.
- Make it accessible from anywhere in the world. For this, you’ll setup port forwarding on your router to accept incoming requests on port 80 and forward to your board’s IP address. Use a service like dyndns.org to map your modem’s IP address to a domain name you’ll remember, like myts7250v2.dyndns.org. Home
What are your ideas for how to use your new HMI web application? Feel free to share in the comments below.
2 thoughts on “Creating a Human-Machine Interface (HMI) Web Application”