Real-Time Company Announcements and Information Using Multiple Touch Panel PCs
Abstract
This project aims to improve the communication of company events, key performance metrics, and collaboration through several strategically mounted touch panel computers (TPCs) throughout the building. It also serves as an inspirational digital signage application for potential customers using our TPCs. Skimming through the technical details, you’ll find the screens are powered by our very own TS-TPC-8950-4900, a 10” resistive TPC running Debian Linux, a fullscreen, kiosk-mode browser, and a custom node.js web app.
The Problem

Let’s face it, communicating current information in a growing company is a challenging problem, and one that pops up seemingly overnight for some. Announcing events or celebrations was once easily done using paper flyers taped around the office, but not so much anymore. Flyers started multiplying with the number of employees, and pretty soon, we’re left with the inside of our building looking like a Portland poster wall, shouting for attention, but often left ignored. Okay, not really, but the sentiment is similar. Not to mention, flyers aren’t conducive to two-way communication. Home
In the end, we’re attempting to solve the problem of ineffective communication in a growing company as well as how to effectively communicate in a timely manner.
The Solution
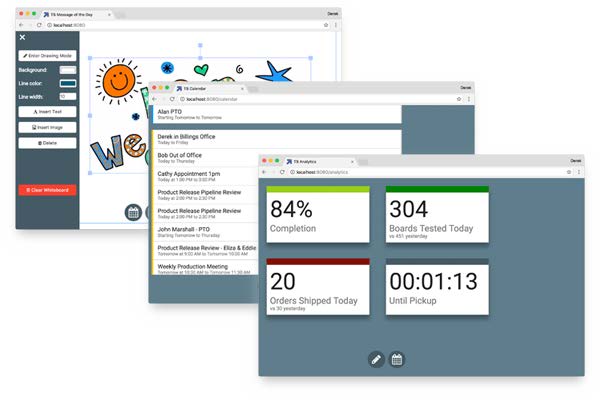
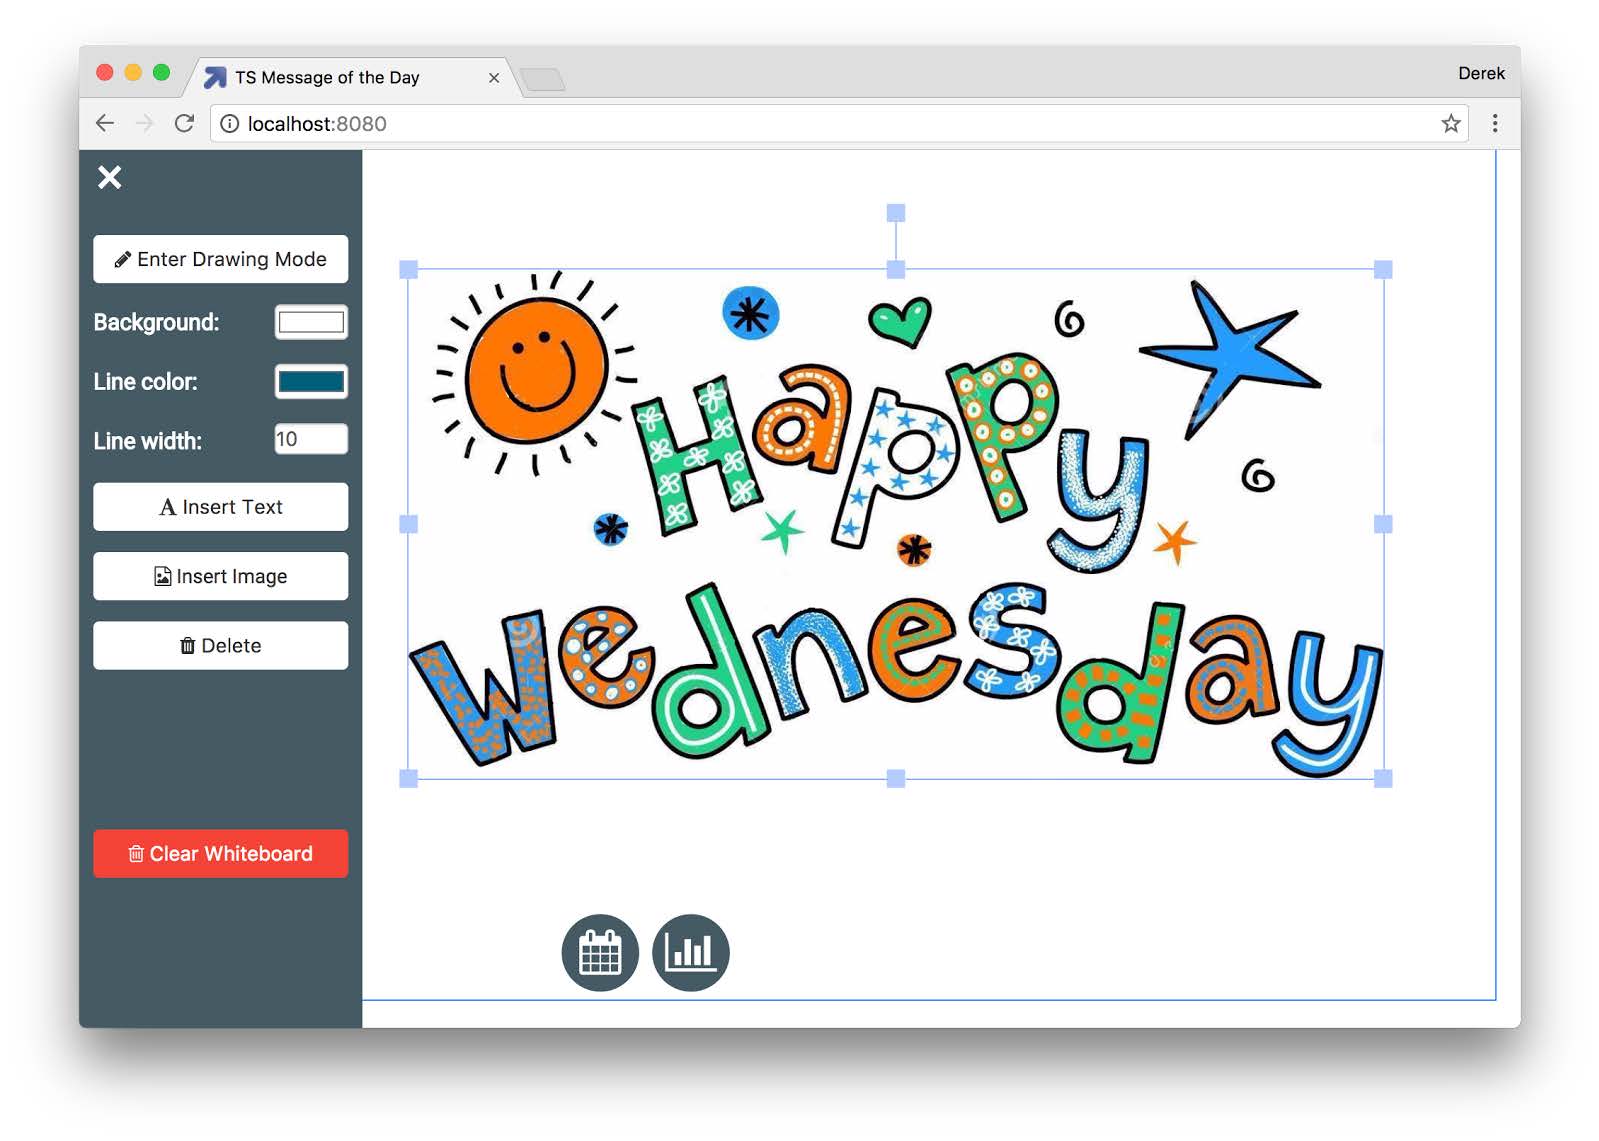
In order to tackle our communications problem, we came up with the idea of using the touch panel computer products that we build in order to create several interactive displays located in busy spots around the office. These displays, which we affectionately named the “Lookie Here Screens”, provide an aesthetic and captivating way of presenting company information, like calendar events and key metrics, as well as receiving written or typed feedback from employees. These screens, numbering five in total, give passersby something to look forward to reading since they are constantly updating, without the need to go through potentially several login processes and clicks to get the information they need. An interactive digital whiteboard component makes these screens fun to use. A scribble or insertion of an image or text on one screen will immediately be reflected on the other screens throughout the office in real-time. A centralized server, to which all of the display browsers are pointed to, choreographs touch events as well as pulls information through various APIs to display to our employee passerby.
Essentially, our solution to our growing communication problem is to replace paper flyers with strategically located, high-tech touch panels and a web app driving an easy to use UI. This makes it very easy for employees to get immediate access to information, provide immediate feedback, and get on with their work.
Advantages
The main advantages of using a touch panel computer over paper is the ability to display dynamic, real-time information, as well as enable bidirectional communication for collaborating. The digital whiteboard portion of the project has an advantage over paper in that you can quickly and easily update it without ever leaving your computer seat in order to pin up flyers. The dynamic and interactive nature of the screens also gives employees something to look forward to reading when they pass by. They are colorful, bright, and beg attention to be sure everybody is up to speed on the latest announcements.
Using a web-based solution to display this information carries the advantages of being device independent and easy to add new features to and update the user interface. You can load the web app from any browser, such as a desktop, smartphone, or other embedded system outputting via HDMI or similar to a large screen. Web development can be easier and more agile than development with GUI toolkits using C/C++, so acquiring talent (internal or external) to make updates can be quicker and cheaper. Home
Hardware Requirements
In choosing our hardware, we had a list of considerations:
- Power and longevity
- The displays are going to be on 24/7/365
- We need to be sure the hardware we choose is low powered, robust, and continues to be reliable over time.
- Network connectivity
- Need to be able to connect to the network wirelessly.
- Operating temperature
- The screens may be subjected to an Arizona summer in a fully enclosed, wall-mountable wooden box.
- Even with air conditioning, we should still expect inside temperatures to reach upwards of 85 °F (~30 °C)
- Screen size
- The screens should be large enough to read from a distance while walking past.
- Processing power
- Need to display a fullscreen webkit browser and operate smoothly.
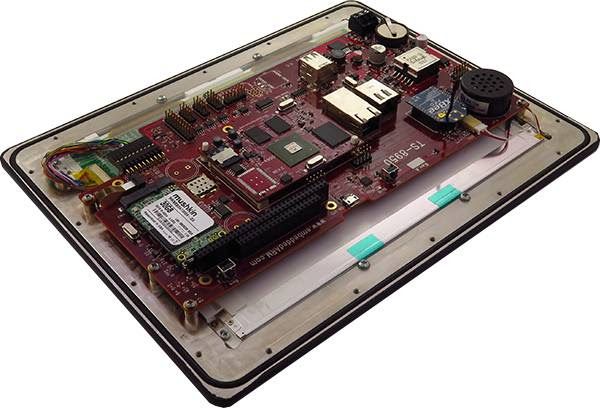
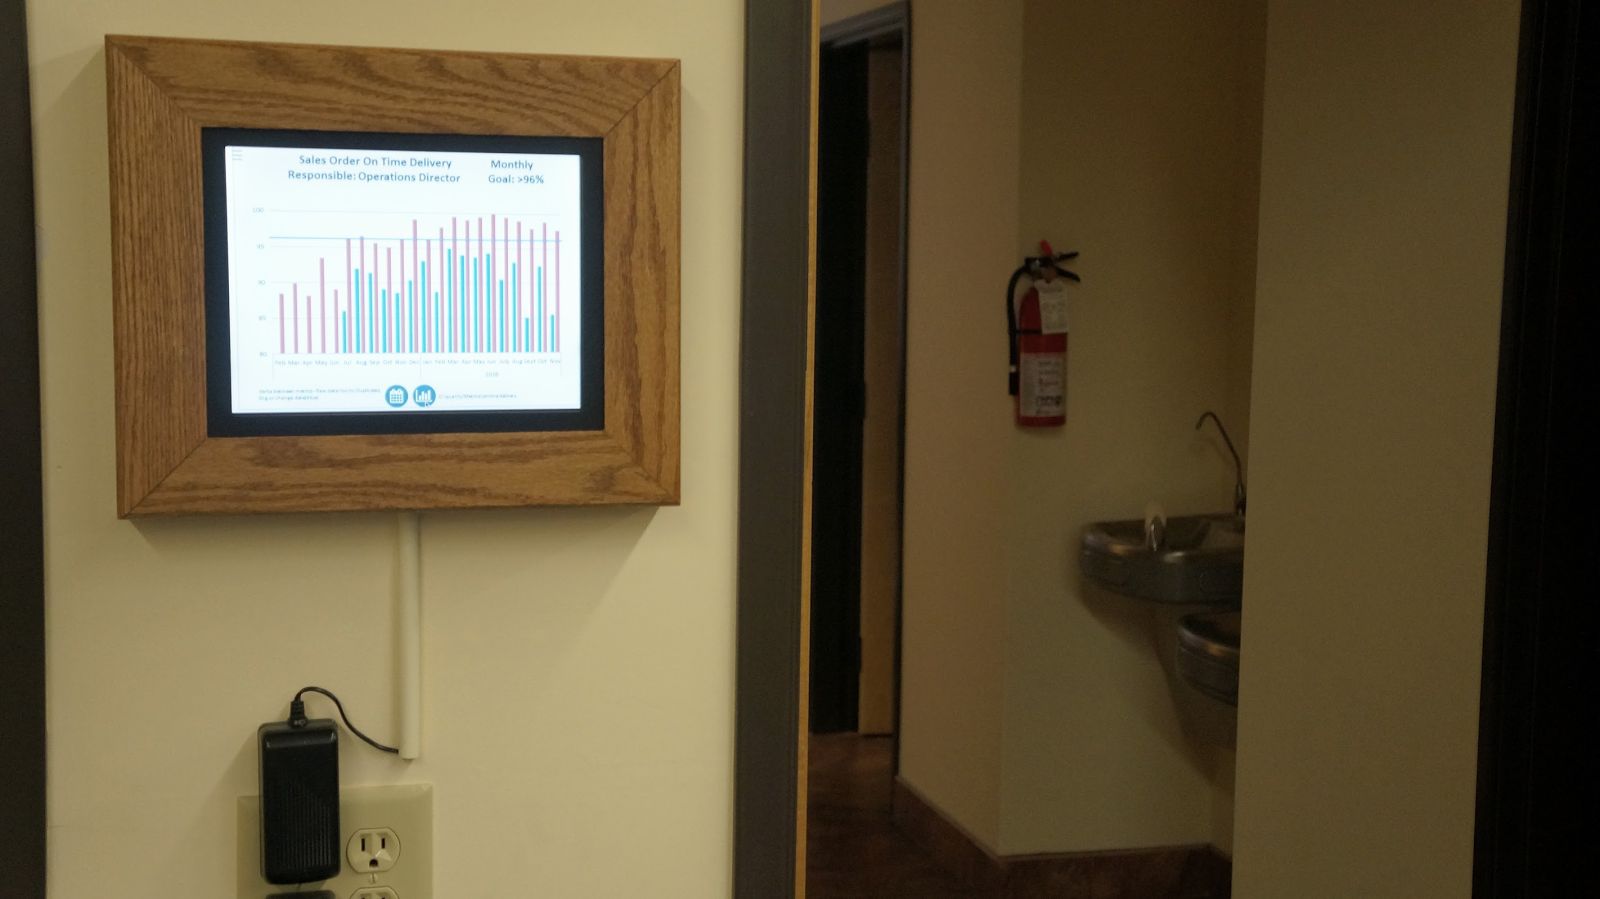
Given these requirements, we decided on the TS-TPC-8950-4900, a 10” embedded touch panel PC powered by an NXP i.MX6 Solo Core ARM CPU with wireless module capable of operating from 4 °F (-20 °C) to 158 °F (70 °C). A close second choice would’ve been the capacitive 7” screen offered on the TS-TPC-7990, which gives the displays a more modern, tablet-like feel.
Software Requirements
For our software requirements, we already know we want a web-based solution because it’s easy to develop and it’s familiar (to this author at least). Architecture-wise, we’ll need a web client, our touch panel displays, and a web server to point them to. So, we’ll have to figure out software requirements for both.
Starting with the web server, we need to be able to run a modern web app and publish it. The web app needs to support multiple pages, or routes, that our users will be able to navigate to. Several pages will be written in typical HTML, somewhat static with some styling. One page in particular, the interactive whiteboard, will be more complex. We need to be able to interact with it, for example draw and insert images, and broadcast any changes to any other clients connected to it. Home
We know from experience that a Linux-based server makes quick work of setting up and publishing modern web apps since most packages are easily installed using simple commands (i.e. apt-get) and most frameworks are built in a ‘Linux-first’ fashion. With confidence, we can then consider what frameworks exist that will easily handle real-time events and broadcast them to clients. After a bit of googling, we found that websockets is a viable solution, but perhaps not the easiest to implement ourselves. Enter Socket.io and Node.js! These two frameworks make broadcasting events over websockets very easy, so we’ll use them. As for the interactive whiteboard, we decided on using the fabric.js javascript HTML5 canvas library, which supports events and many other things. In order to easily develop and handle several different pages, we’re also going to reach for express.js, a web development framework that supports routing and templating.
For the client, or touch panel displays in our case, we need to be able to display a web app in a kiosk-like way, fullscreen and hidden desktop menu bars. The browser will need to be able to run in an embedded Linux environment, since that’s what comes preloaded on our TPCs.
To fill this requirement, we’re going to use a custom fullscreen webkit browser which our engineers have already conveniently created. It will be able to run a HTML5 web app in a kiosk-like mode efficiently, without the bloat of a full Chromium or Firefox browser.
Initial Planning and Project Writeup
Planning
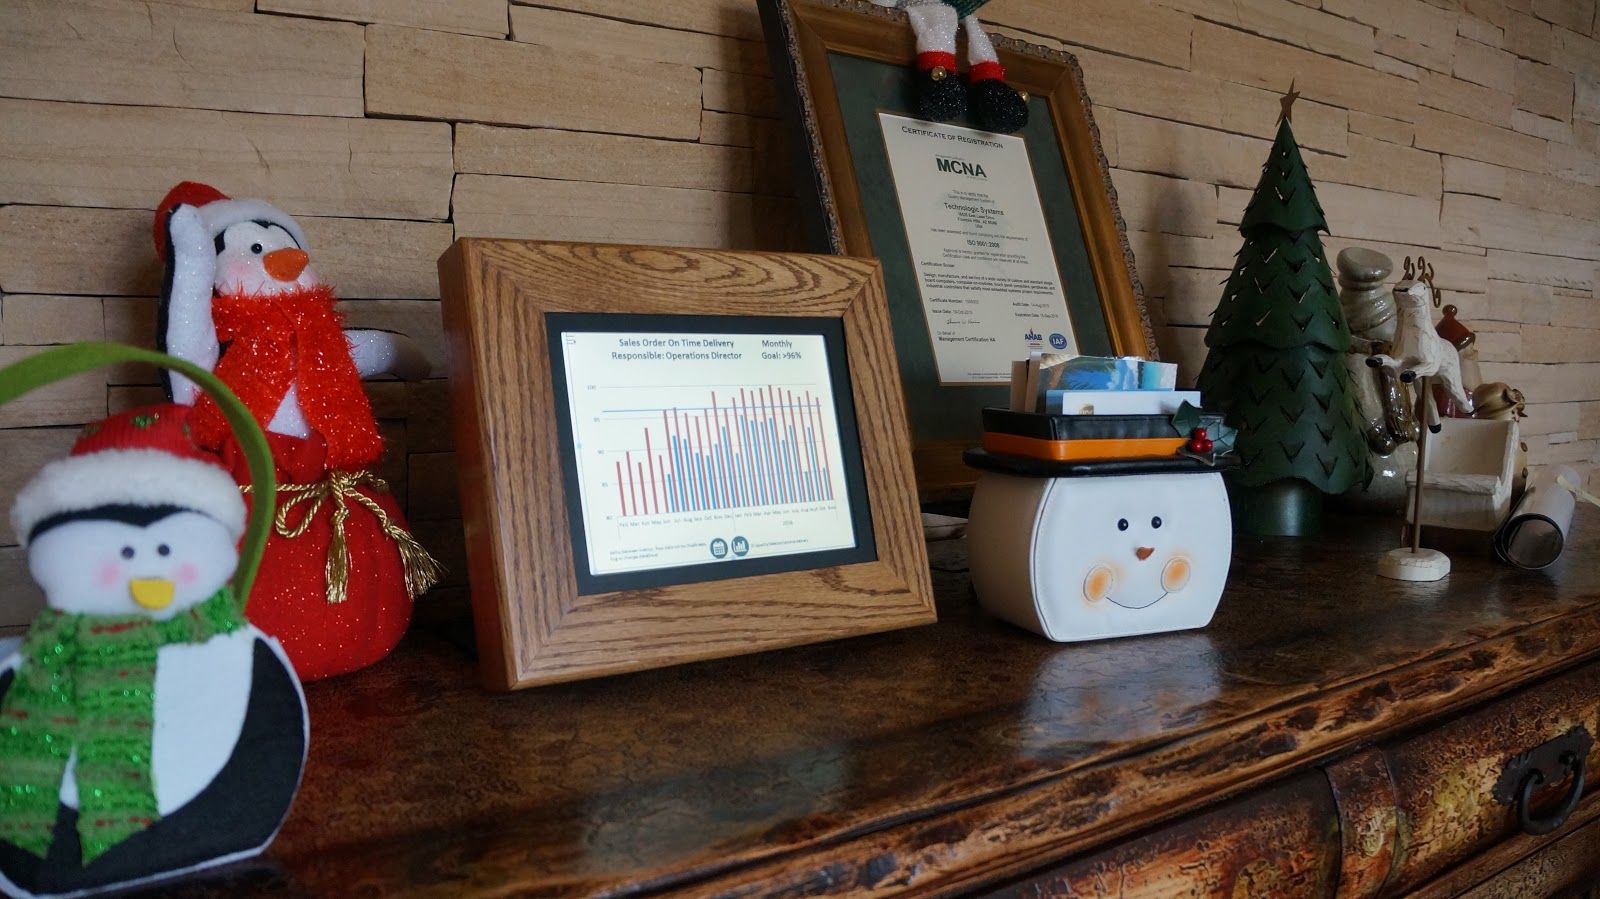
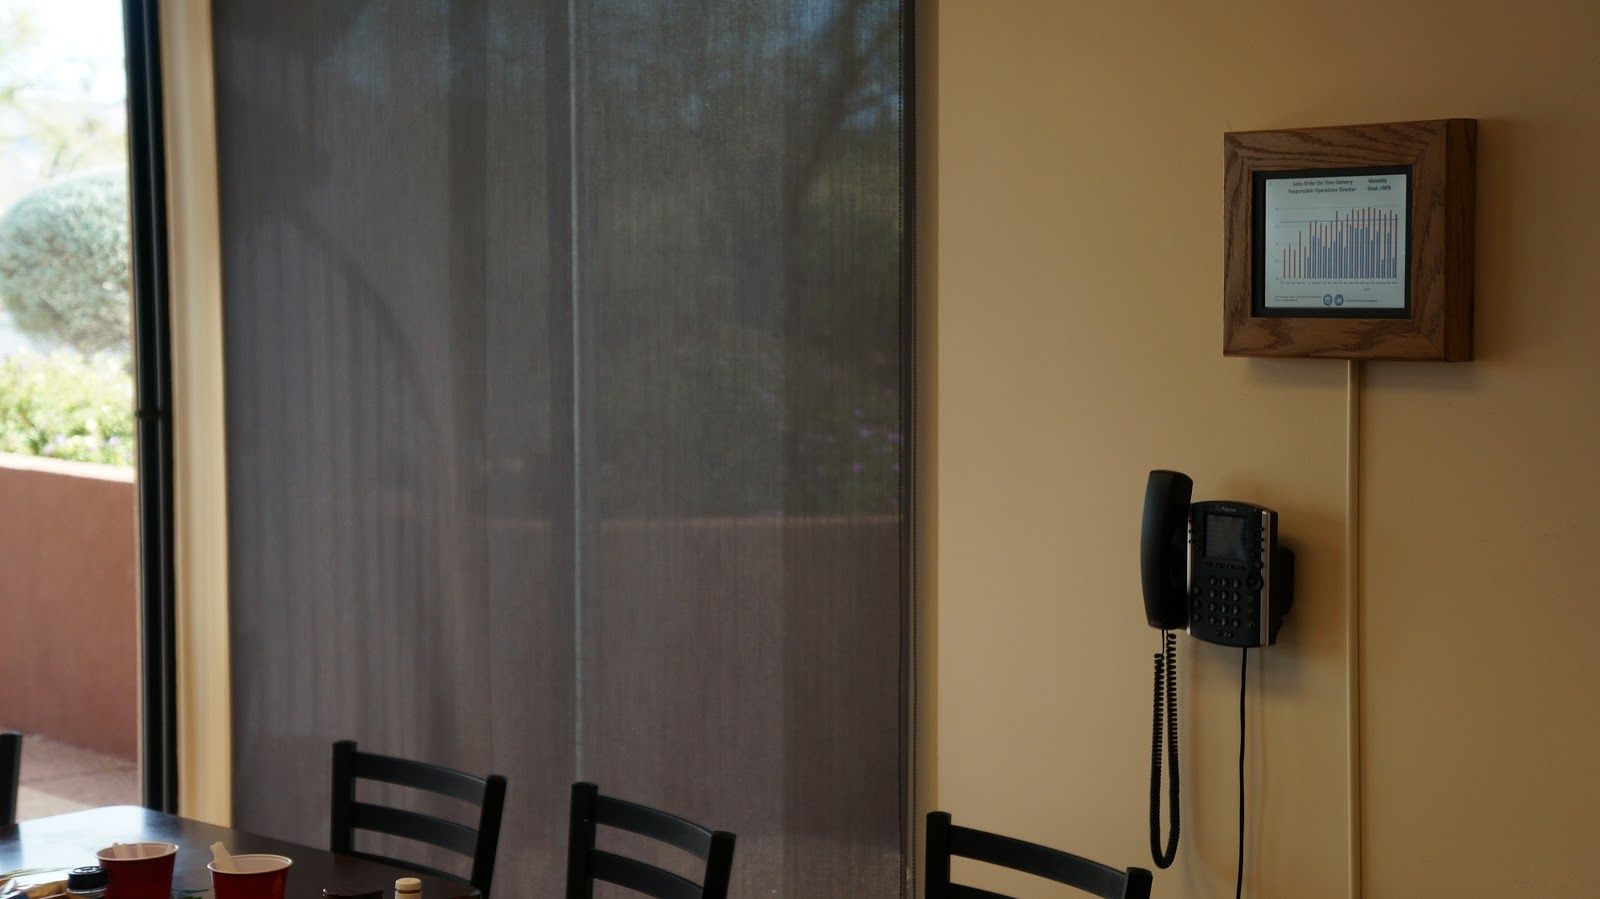
With requirement gathering out of the way, the only thing left to plan was the installation of the project by locating it in key areas where a screen would be most viewed. The main entryway, kitchen, and hallways between engineering and production and next to the bathrooms were chosen. Next, we wanted to make sure the displays were going to look aesthetically pleasing to mount on the walls. We didn’t want to use a industrial metal cabinet, so we chose to make custom wooden box frames that could easily mount flush to the wall. We chose mounting locations close to outlets for easy power access. For network connectivity, we went wireless, connecting to a central wireless access point.
Development
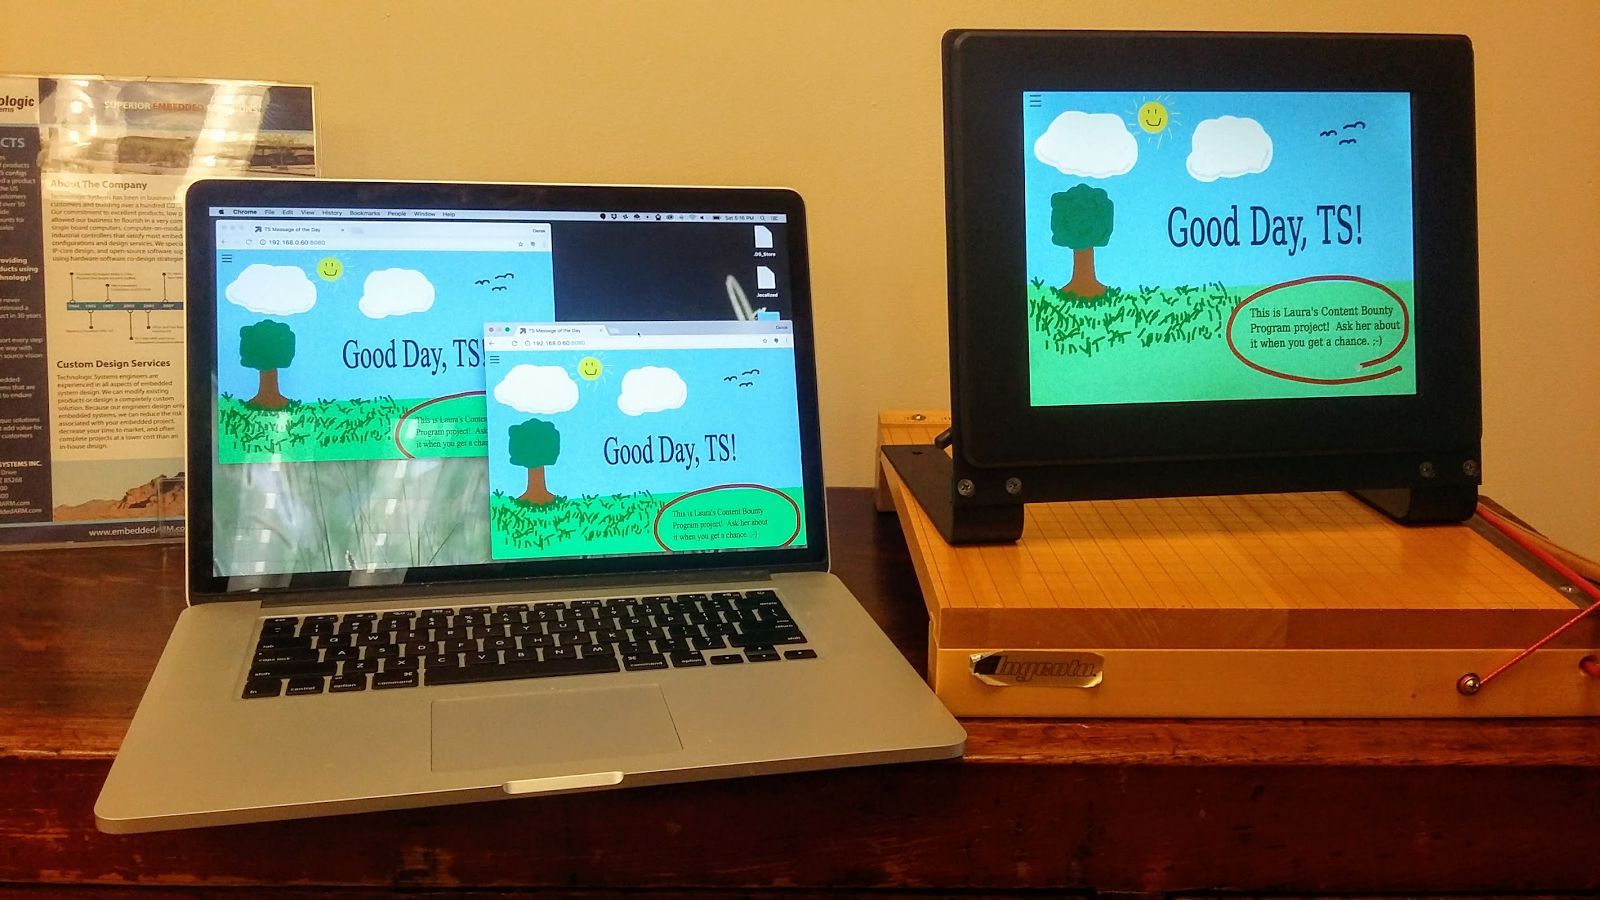
We grabbed a single TS-TPC-8950-4900 with a WiFi module and started development. We started configuring the TPC to boot automatically to Debian and then connected it with a wireless access point so that we could connect to the web server. We found that the Chromium browser was too resource hungry, so we decided to use the minimal fullscreen webkit browser developed by one of our engineers. While in fullscreen, we’re essentially working in a kiosk-like mode, which is perfect for our application. Next, we designated and set up a virtual server, which helps reduce cost and maintenance compared to a physical server, to host the node.js application. The browser was then pointed to the server and we successfully received the famous “It works!” screen. Time to move on to development of the web application.
We sought out existing solutions to our need for a collaborative digital whiteboard. Luckily, there were several available. After evaluating a few of them, we went with Building a collaborative whiteboard with Fabric.js by Jeroen van Veen. A node.js development environment was setup on a laptop, and customization on Jeroen’s code began. The first thing was to rework it to use the express.js framework for easy templating and routing. The look and feel was also changed by adding a slide-out control menu for editing, inserting text and images, and changing colors. Home
There was at least one hardship along the way where we ran across a tricky bug dealing with asynchronous loading of images and how to communicate across all clients. After a quick codementor.io debugging session (link for the curious) we were ready to move onto adding other pages that will communicate metrics and calendar events.
Adding these new pages was easy thanks to the express.js framework. Navigation buttons were added to the screen to jump from page to page. Starting with the metrics page, we simply tapped into an internal REST API that we have for metric reporting. We won’t bore you with the details on this, so suffice it to say it gave us a chance to prominently display the most important metrics to the company in a pretty UI.
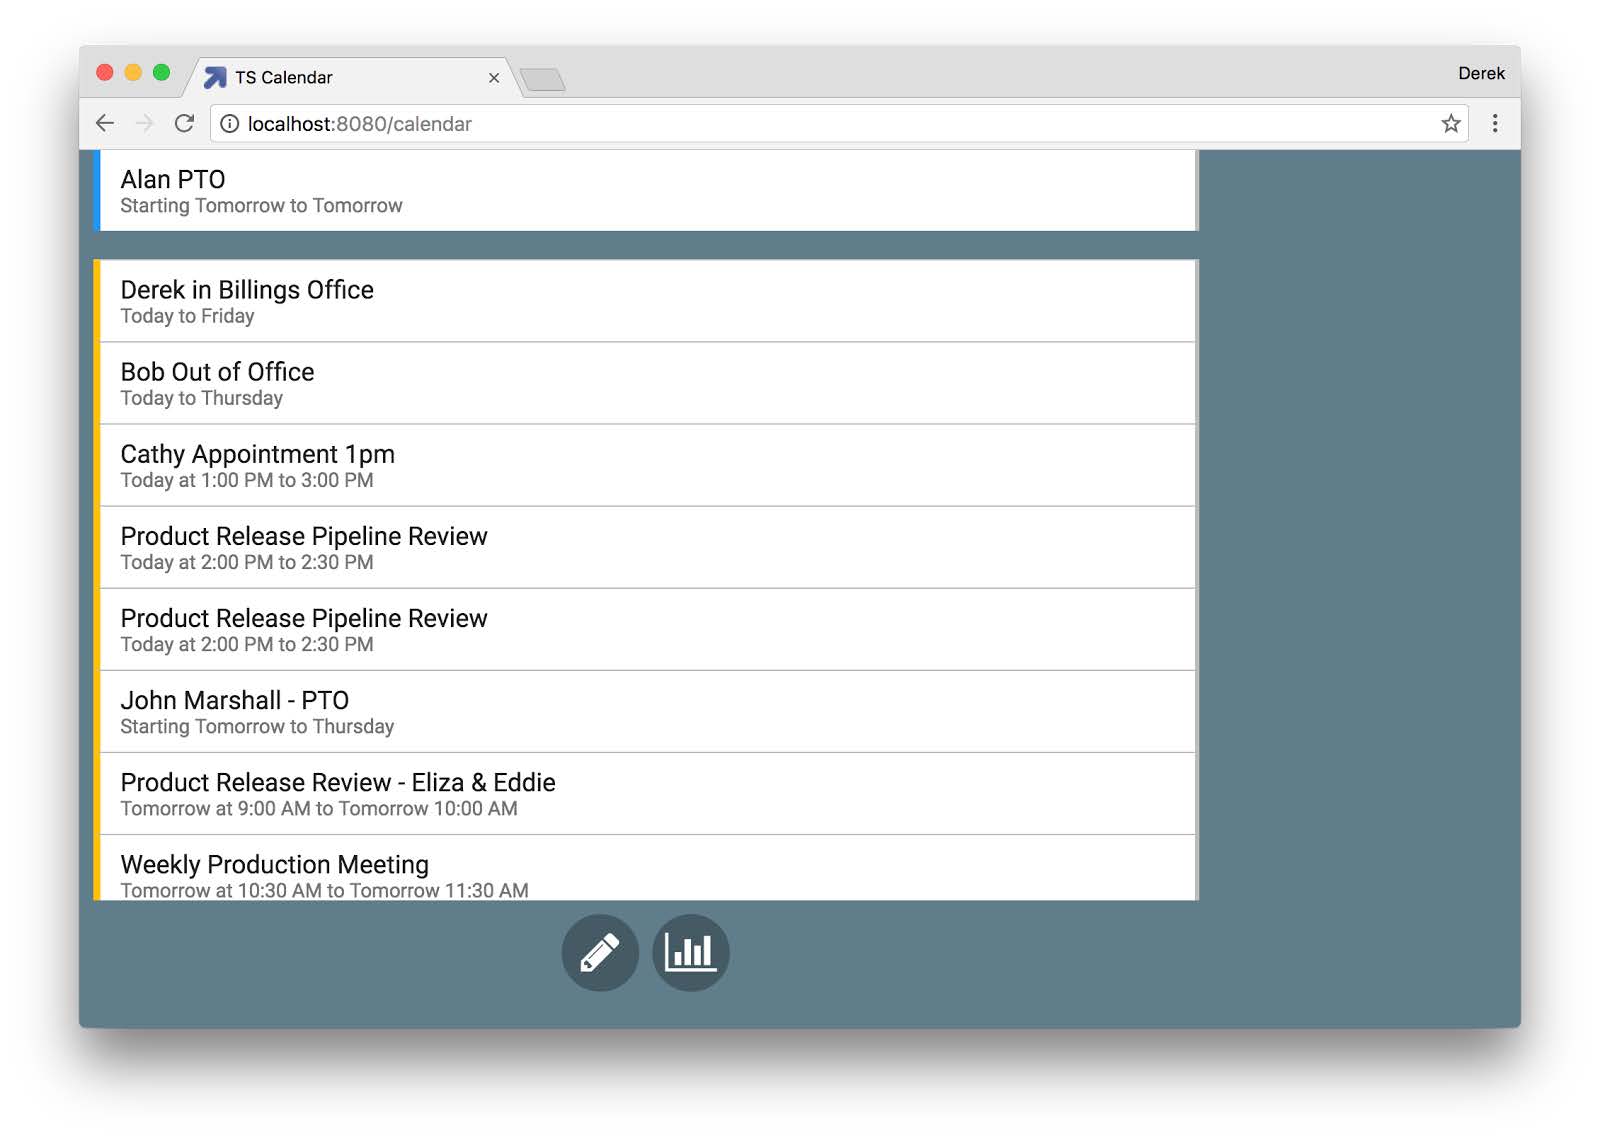
The calendar events page was a bit more difficult since we had to tie in with the Google Calendar API. The API itself is easy to work with, but the authentication and authorization steps were difficult to get our heads wrapped around. Thanks to the general online community and Google documentation, we were able to use an automated solution by using a Google service account. A secured file is placed on the server which is read in order to authenticate. The service account email was added to our Google Calendar so it’s allowed to pull data. Once this was completed, pulling in the events list was simple (see also Source Code section below). The Moment.js library was fantastic at making short work of formatting and calculating the dates.
We moved the application over to the virtual server we setup to host it. Node.js was installed via apt-get, and a quick npm install in the project directory pulled in all of the app dependencies. The program ‘pm2’, an advanced production process manager for node.js, was also installed in order to supervise and manage the app. After some quick connection tests, we were ready to move onto the framing hardware side of things. Home

With software mostly out of the way, we started designing and making the wood mounting frames. Once the plans were drawn up, we made a quick trip to the local hardware store to pick up some oak project boards and panel board for the backing. From there, it was off to the woodshop, using a router, table saw (with miter and cross cut sleds), and random orbital sander. The first prototype was built and verified to work. After that, the design was improved upon slightly and four more were created in an assembly line. A slot was cut into the bottom of the frame to make room for wiring and a keyhole slot was routed into the back panel for flush wall mounting. The frames were then finished with wood stain and polyurethane coats.
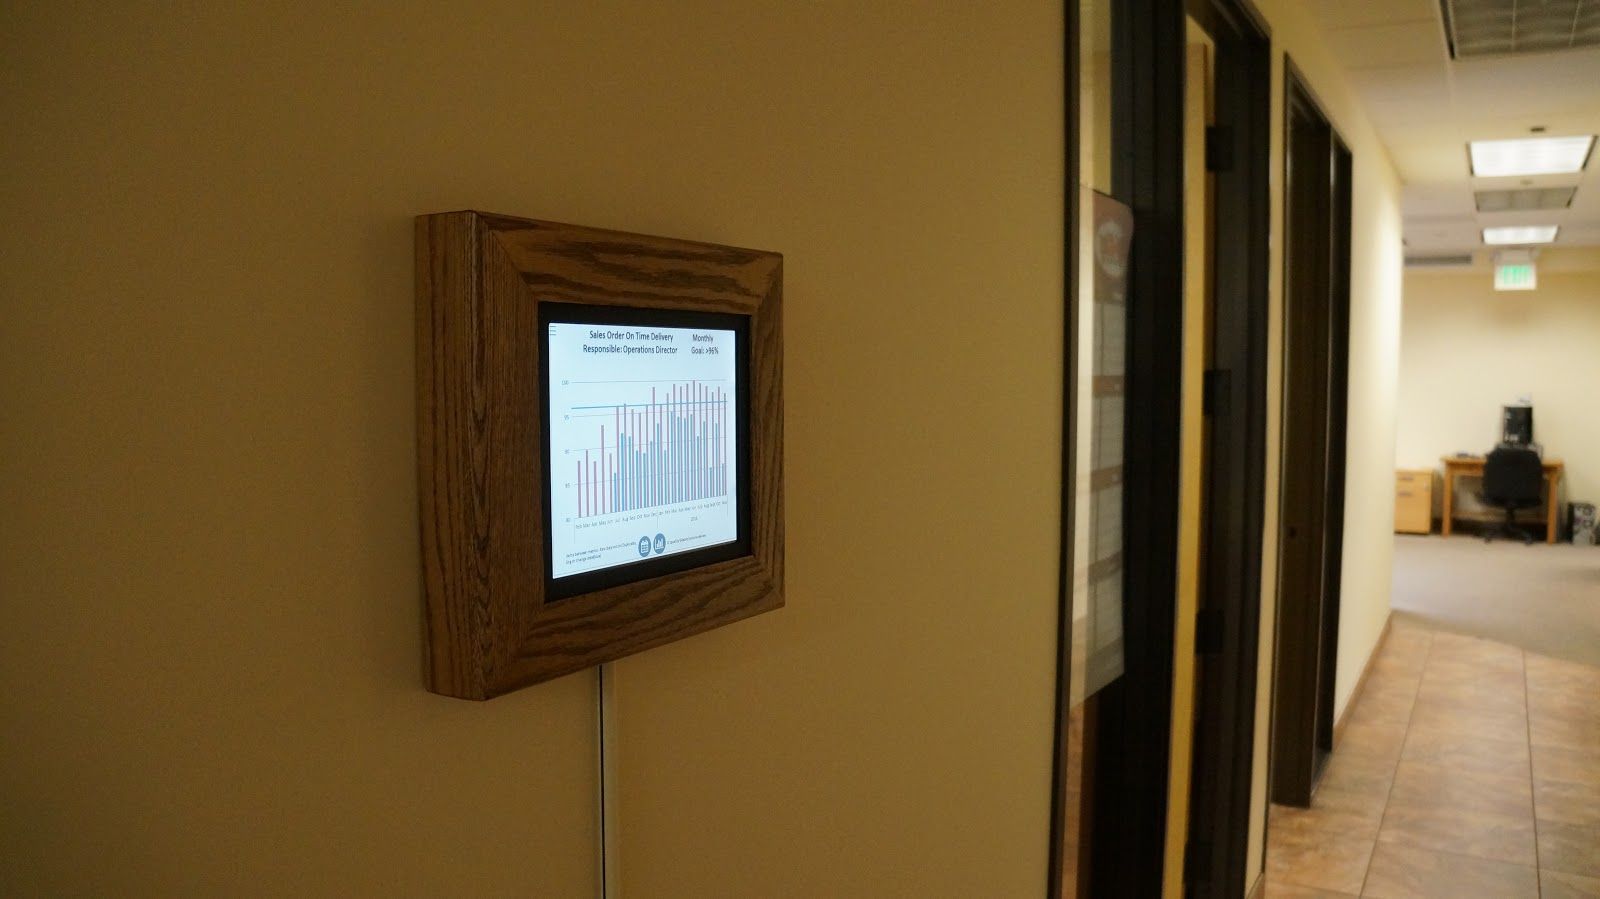
Finally, we were ready to install the five TPCs in various locations throughout the building. For this, we made a copy of the microSD card image we used in the prototype and loaded it onto four other microSD cards. Once those microSD cards were inserted into the four TPCs, we installed all TPCs into the enclosures, making sure to run power cords before inserting the final back panel screws. The frames were then mounted them to the designated walls and painted wire channel added to hide the power cord. When the power was applied, the five TPCs started the bootup process and to our great pleasure, loaded the browser and web app perfectly. The collaborative information screens were ready for use at this point, so we packed up the tools and called it a day.
Results
[gfycat data_id="PleasingImmediateAmazontreeboa"]We’ve yet to see any long term results as it’s only been deployed for a month or so, but the general buzz around the office is these screens have been great at effectively communicating events and critical information across the company. Employees are frequently stopping to review the screens and clicking on multiple pages and those with something to share are submitting content to be displayed. The frictionless ability to update the screen has it updating quickly and often so content is always fresh and interesting to look at. It would be interesting to collect data and note any percentage increase/decrease of things like missed meetings, production floor productivity, and missed deadlines. Overall, these collaborative, real-time information screens have given positive results around the office.
Hopefully this project has inspired you in some way for your own digital signage application using Technologic Systems’ embedded products. If you’re buzzing with anticipation, please reach out to our sales and engineering teams. They love hearing about new and exciting applications.
Materials List
Here’s a quick bullet point view of the materials used in this project.
- TS-TPC-8950-4900 10” Touch Panel Computer with WiFi
- TS-TPC-8950-4900-1024-4096F-S8S-RTC-WIFI-I
- KIT-8950-4900
- CB-ANT-TIWI
- Legrand Wiremold CordMate III Kit
- Various sized oak hobby boards
- Development workstation (Mac OSX, Linux, or Windows)
- Linux Server with node.js and pm2 installed Home